unity-shader-SamplerState采样器
unity-shader-SamplerState采样器
前篇
- 官方文档: Using sampler states - https://docs.unity3d.com/Manual/SL-SamplerStates.html
说明
之前对在玩 ue4-shader-自定义shader代码hlsl 就时里面的 SamplerState 不了解, 现在查看 shader graph 内置节点 Normal From Texture 的源码时又遇到了才去查了下.
官方 Normal From Texture 节点的源码
1 | void Unity_NormalFromTexture_float(Texture texture, SamplerState Sampler, float2 UV, float Offset, float Strength, out float3 Out) |
我翻译后实现: [Normal From Texture 的实现](#Normal From Texture 的实现)
现在一般采用纹理是都用这样的语法, 使用 sampler2D,sampler3D,samplerCUBE HLSL关键字同时声明贴图和取样器。
1 | sampler2D _MainTex; |
大部分图形API和CPU允许贴图比采样器多,并且耦合的贴图+采样器在写复杂的shader时可能是不允许的。比如在D3D 11中一个shader中可以使用128张贴图,但是最多却只有16个采样器。
unity允许声明贴图和采样器时使用DX11风格的HLSL语法,用一个特殊的命名惯例来将他们匹配起来;拥有名字为“sampler”+贴图名字 的采样器会对这个纹理进行取样。
1 | Texture2D _MainTex; |
unity提供几个shader宏命令来帮助声明和采样贴图使用这个“分离的采样器”方法,查看 built-in macros.上面的例子可以被重写为下面的样子:
1 | `UNITY_DECLARE_TEX2D(_MainTex);``UNITY_DECLARE_TEX2D_NOSAMPLER(_SecondTex);``UNITY_DECLARE_TEX2D_NOSAMPLER(_ThirdTex);``// ...``half4 color = UNITY_SAMPLE_TEX2D(_MainTex, uv);``color += UNITY_SAMPLE_TEX2D_SAMPLER(_SecondTex, _MainTex, uv);``color += UNITY_SAMPLE_TEX2D_SAMPLER(_ThirdTex, _MainTex, uv);` |
实例代码
用 unlit shader 为模板改一下
代码
1
2
3
4
5
6
7
8
9
10
11
12
13
14
15
16
17
18
19
20
21
22
23
24
25
26
27
28
29
30
31
32
33
34
35
36
37
38
39
40
41
42
43
44
45
46
47
48
49
50
51
52
53
54
55
56Shader "test/SamplerState_unlit" {
Properties {
_MainTex ("Texture", 2D) = "white" {}
}
SubShader {
Tags { "RenderType"="Opaque" }
LOD 100
Pass
{
CGPROGRAM
struct appdata
{
float4 vertex : POSITION;
float2 uv : TEXCOORD0;
};
struct v2f
{
float2 uv : TEXCOORD0;
float4 vertex : SV_POSITION;
};
// sampler2D _MainTex;
float4 _MainTex_ST;
// Texture2D _MainTex;
// SamplerState sampler_MainTex;
UNITY_DECLARE_TEX2D(_MainTex);
v2f vert (appdata v) {
v2f o;
o.vertex = UnityObjectToClipPos(v.vertex);
o.uv = TRANSFORM_TEX(v.uv, _MainTex);
return o;
}
fixed4 frag (v2f i) : SV_Target {
// fixed4 col = tex2D(_MainTex, i.uv);
// fixed4 col = _MainTex.Sample(sampler_MainTex, i.uv);
fixed4 col = UNITY_SAMPLE_TEX2D(_MainTex, i.uv);
return col;
}
ENDCG
}
}
}效果 (tiling 不起作用, 暂时没去找解决方案)

Normal From Texture 的实现
参考官方 shader graph 的实现: Normal From Texture - https://docs.unity3d.com/Packages/com.unity.shadergraph@6.5/manual/Normal-From-Texture-Node.html
shader
1
2
3
4
5
6
7
8
9
10
11
12
13
14
15
16
17
18
19
20
21
22
23
24
25
26
27
28
29
30
31
32
33
34
35
36
37
38
39
40
41
42
43
44
45
46
47
48
49
50
51
52
53
54
55
56
57
58
59
60
61
62
63
64
65
66
67
68
69
70
71
72
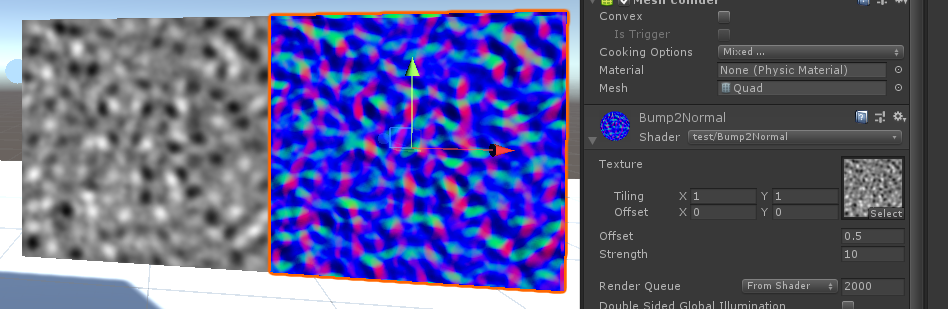
73Shader "test/Bump2Normal"
{
Properties
{
_MainTex ("Texture", 2D) = "white" {}
_Offset ("Offset", Float) = 0.5
_Strength ("Strength", Float) = 10
}
SubShader
{
Tags { "RenderType"="Opaque" }
LOD 100
Pass
{
CGPROGRAM
// make fog work
struct appdata
{
float4 vertex : POSITION;
float2 uv : TEXCOORD0;
};
struct v2f
{
float2 uv : TEXCOORD0;
float4 vertex : SV_POSITION;
};
float _Offset;
float _Strength;
// sampler2D _MainTex;
float4 _MainTex_ST;
UNITY_DECLARE_TEX2D(_MainTex);
v2f vert (appdata v) {
v2f o;
o.vertex = UnityObjectToClipPos(v.vertex);
o.uv = TRANSFORM_TEX(v.uv, _MainTex);
return o;
}
fixed4 frag (v2f i) : SV_Target {
float offset = _Offset;
float Strength = _Strength;
float3 Out = float3(0, 0, 0);
float2 offsetUV = i.uv;
offset = pow(offset, 3) * 0.1;
float2 offsetU = float2(offsetUV.x + offset, offsetUV.y);
float2 offsetV = float2(offsetUV.x, offsetUV.y + offset);
float normalSample = UNITY_SAMPLE_TEX2D(_MainTex, offsetUV);
float uSample = UNITY_SAMPLE_TEX2D(_MainTex, offsetU);
float vSample = UNITY_SAMPLE_TEX2D(_MainTex, offsetV);
float3 va = float3(1, 0, (uSample - normalSample) * Strength);
float3 vb = float3(0, 1, (vSample - normalSample) * Strength);
Out = normalize(cross(va, vb));
return fixed4(Out, 1);
}
ENDCG
}
}
}效果