linux-Grafana+Prometheus监控服务器状态
linux-Grafana+Prometheus监控服务器状态
前篇
- 官方
- Grafana dashboards - https://grafana.com/grafana/dashboards/
Grafana 安装
下载安装
官网下载: https://grafana.com/grafana/download
1
2
3
4
5
$ wget https://dl.grafana.com/enterprise/release/grafana-enterprise-11.2.0.linux-amd64.tar.gz // 下载
$ tar -zxvf grafana-enterprise-11.2.0.linux-amd64.tar.gz // 解压
$ mv grafana-v11.2.0 /usr/local/grafana // 习惯移动到系统目录
$ cd /usr/local/grafana创建配置
用默认配置拷贝出一份自定义配置 myconf.ini
1
$ cp conf/defaults.ini conf/myconf.ini
按需修改配置, 默认端口是 3000, 这里将端口修改为 6300
1
http_port = 6300
启动服务
1
$ /usr/local/grafana/bin/grafana-server --config=/usr/local/grafana/conf/myconf.ini web
可以将服务注册为系统服务, 开机自启动
创建 test_grafana.service 文件
1
2
3
4
5
6
7
8
9
10
11
12
13
14
15
16
17
18
19
20
21
22
$ vim /etc/systemd/system/test_grafana.service
[Unit]
Description=my grafana service
After=network.target
[Service]
RestartSec=2s
Restart=always
#Restart=no
User=root
Group=root
WorkingDirectory=/usr/local/grafana
ExecStart=/usr/local/grafana/bin/grafana-server --config=/usr/local/grafana/conf/myconf.ini web
StandardOutput=append:/usr/local/grafana/bin/temp_std_acc.log
StandardError=append:/usr/local/grafana/bin/temp_std_err.log
[Install]
WantedBy=multi-user.target重载系统服务
1
$ systemctl daemon-reload
启动服务
1
$ systemctl start test_grafana.service
查看状态
1
2
3
4
5
6
7
8
9
10
11
12
$ systemctl status test_grafana.service
● test_grafana.service - my grafana service
Loaded: loaded (/etc/systemd/system/test_grafana.service; enabled; vendor preset: enabled)
Active: active (running) since Mon 2024-09-02 11:50:24 CST; 6min ago
Main PID: 1286404 (grafana)
Tasks: 8 (limit: 4476)
Memory: 44.3M
CGroup: /system.slice/test_grafana.service
└─1286404 grafana server --config=/usr/local/grafana/conf/myconf.ini web
Sep 02 11:50:24 iZwz9j6q3xv2vhn6rsm6m2Z systemd[1]: Started my grafana service.注册为开机自启动服务
1
2
3
$ systemctl enable test_grafana.service
Created symlink /etc/systemd/system/multi-user.target.wants/test_grafana.service → /etc/systemd/system/test_grafana.service.
done. 浏览器打开测试

Prometheus 安装
Prometheus 本身不支持 安全认证, 但可以通过一下几种方式做安全策略
- 内网部署, 外网不可访问
- 外网访问情况下, 通过 nginx 反向代理, 在 nginx 中安全校验, 如: header 上带上校验信息
下载安装
官网下载: https://grafana.com/grafana/download
1
2
3
4
5
$ wget https://github.com/prometheus/prometheus/releases/download/v2.54.1/prometheus-2.54.1.linux-amd64.tar.gz // 下载
$ tar -zxvf prometheus-2.54.1.linux-amd64.tar.gz // 解压
$ mv prometheus-2.54.1.linux-amd64 /usr/local/prometheus // 习惯移动到系统目录
$ cd /usr/local/prometheus创建配置
用默认配置拷贝出一份自定义配置 myconf.yml
1
cp prometheus.yml myconf.yml
- 按需修改配置, 后面抓起其他机子状态的就是在这个配置文件里配置
启动服务
1
$ /usr/local/prometheus/prometheus --config.file=/usr/local/prometheus/myconf.yml --web.listen-address=":6311"
这里指定服务端口为 6311
可以将服务注册为系统服务, 开机自启动, 参考: [Grafana 安装](#Grafana 安装)
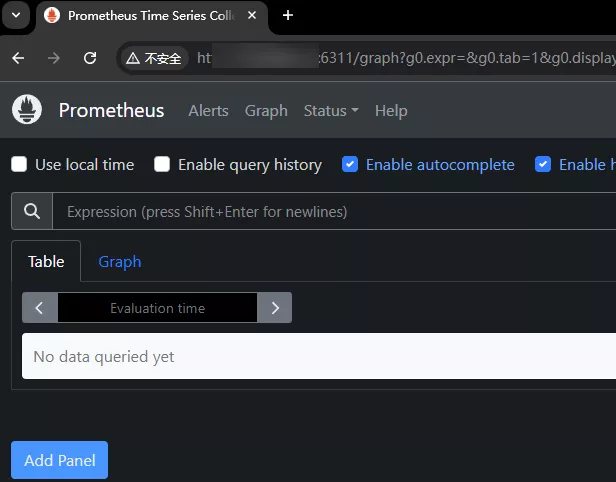
done. 浏览器打开测试
node_exporter 安装
这个服务是在各个需要检测的机子上安装, 用来被 Prometheus 服务抓取数据
以部署到 192.168.1.45 为例
下载安装
官网下载: https://grafana.com/grafana/download
1
2
3
4
5
$ wget https://github.com/prometheus/node_exporter/releases/download/v1.8.2/node_exporter-1.8.2.linux-amd64.tar.gz // 下载
$ tar -xzvf node_exporter-1.8.2.linux-amd64.tar.gz // 解压
$ mv node_exporter-1.8.2.linux-amd64 /usr/local/prometheus_node_exporter // 习惯移动到系统目录
$ cd /usr/local/prometheus_node_exporter启动服务
1
$ /usr/local/prometheus_node_exporter/node_exporter --web.listen-address=":6321"
这里指定服务端口为 6321
可以将服务注册为系统服务, 开机自启动, 参考: [Grafana 安装](#Grafana 安装)
done. 浏览器打开测试: http://192.168.1.45:6321

Prometheus 配置 Node
修改 prometheus 配置文件
1
2
3
4
5
6
# vim /usr/local/prometheus/myconf.yml
scrape_configs:
- job_name: "my_node_01"
static_configs:
- targets: ["192.168.1.45:6321"] # 抓取 node 的 服务地址重启 prometheus 服务
1
$ systemctl restart test_prometheus.service
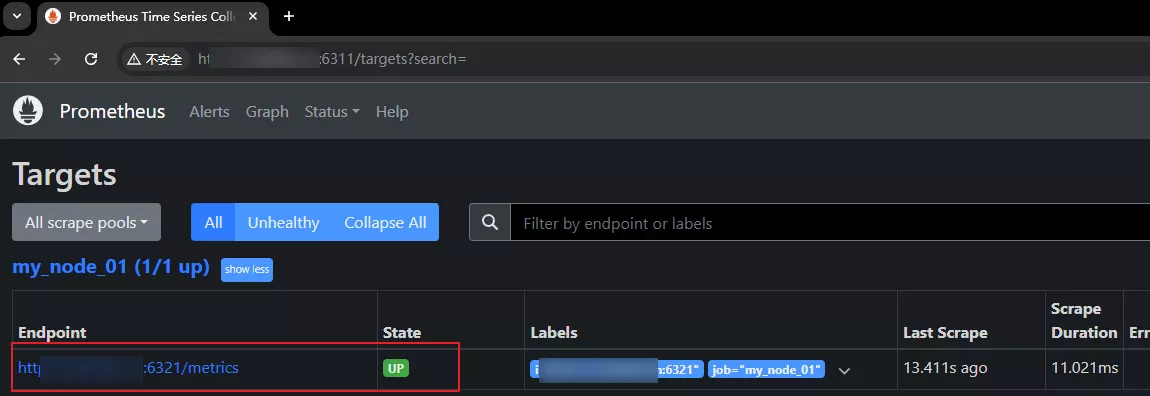
打开 prometheus 服务的 targets 就能看到抓取的节点. 点击 Status->Targets
node_exporter 加入安全校验
通过 nginx 去做安全访问
修改 node_exporter 服务的端口为一个 外网不可达的端口, 如: 1234
增加 nginx 配置, 反向代理到 node_exporter 服务
1
2
3
4
5
6
7
8
9
10
11
12
13
14
15
16
17
18
19
20
21
22
23
$ vim /etc/nginx/conf.d/http_my.conf
# prometheus node
server
{
listen 5678 ;
server_name aaa.bbb.com;
location / {
if ($http_Authorization != "Bearer helloworld") { # 校验 token
return 400 "auth fail!";
}
proxy_set_header X-Real-IP $remote_addr;
proxy_set_header X-Forwarded-For $proxy_add_x_forwarded_for;
proxy_set_header X-Forwarded-Server $host;
proxy_set_header X-Forwarded-Proto $scheme;
client_max_body_size 1m;
proxy_pass http://localhost:1234; # node_exporter 服务
}
access_log /var/log/nginx/aaa.bbb.com.log;
}重载 nginx 配置
1
$ service nginx force-reload
修改 prometheus 配置
1
2
3
4
5
6
7
# vim /usr/local/prometheus/myconf.yml
scrape_configs:
- job_name: "my_node_01"
static_configs:
- targets: ["aaa.bbb.com:5678"] # 修改为 nginx 访问地址
bearer_token: "helloworld" // 校验 token重启 prometheus 服务
1
$ systemctl restart test_prometheus.service
Grafana 配置 Prometheus
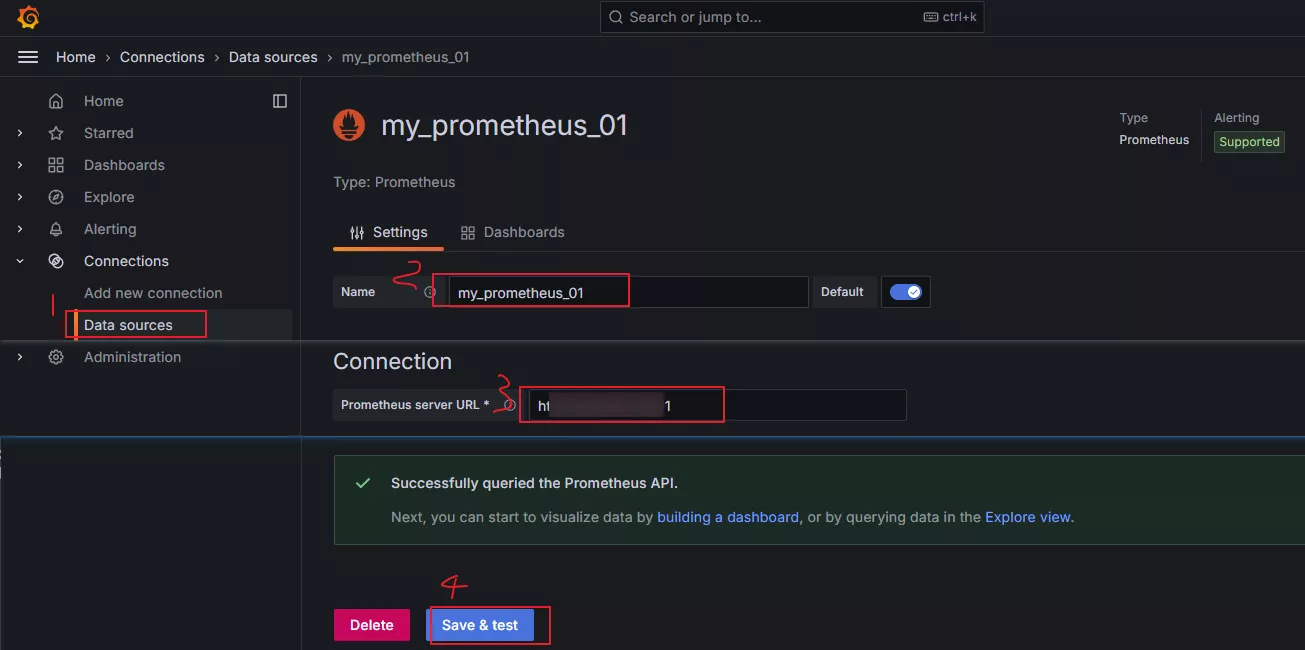
添加数据源
在 Data sources 中搜索 Prometheus 模板, 配置 Prometheus 服务信息 (这里已经提前安装好 Prometheus, 参考: [Prometheus 安装](#Prometheus 安装))
添加可视化面板
可以手动添加, 不过社区已经有很好用的模板: https://grafana.com/grafana/dashboards
搜索 node exporter 第一个就就能看到 Node Exporter Full, 然后复制 ID: 1860 (其实链接 https://grafana.com/grafana/dashboards/1860-node-exporter-full/ 里的 1860 就是 ID)

然后导入模板 Dashboards -> New -> Import
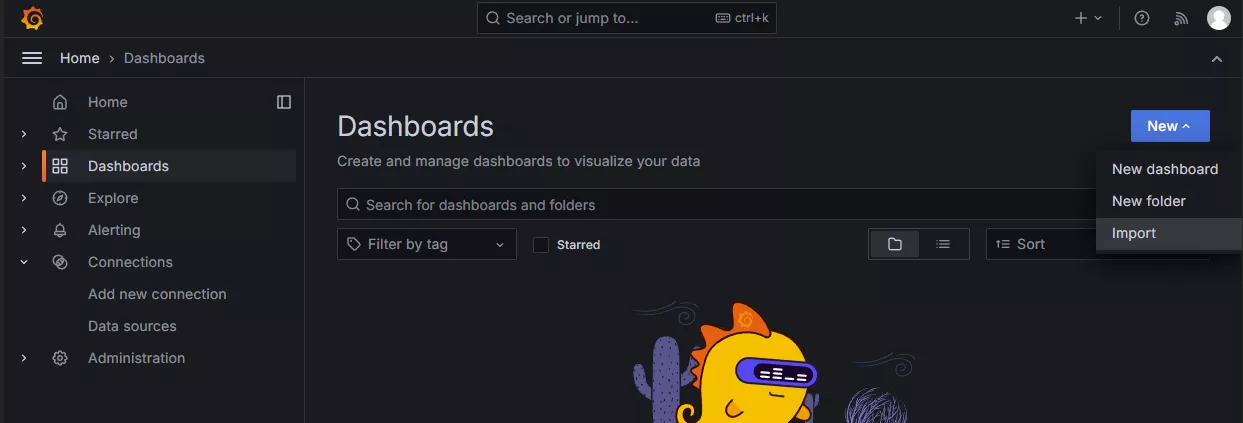
输入模板 ID, 选择数据 Prometheus 源
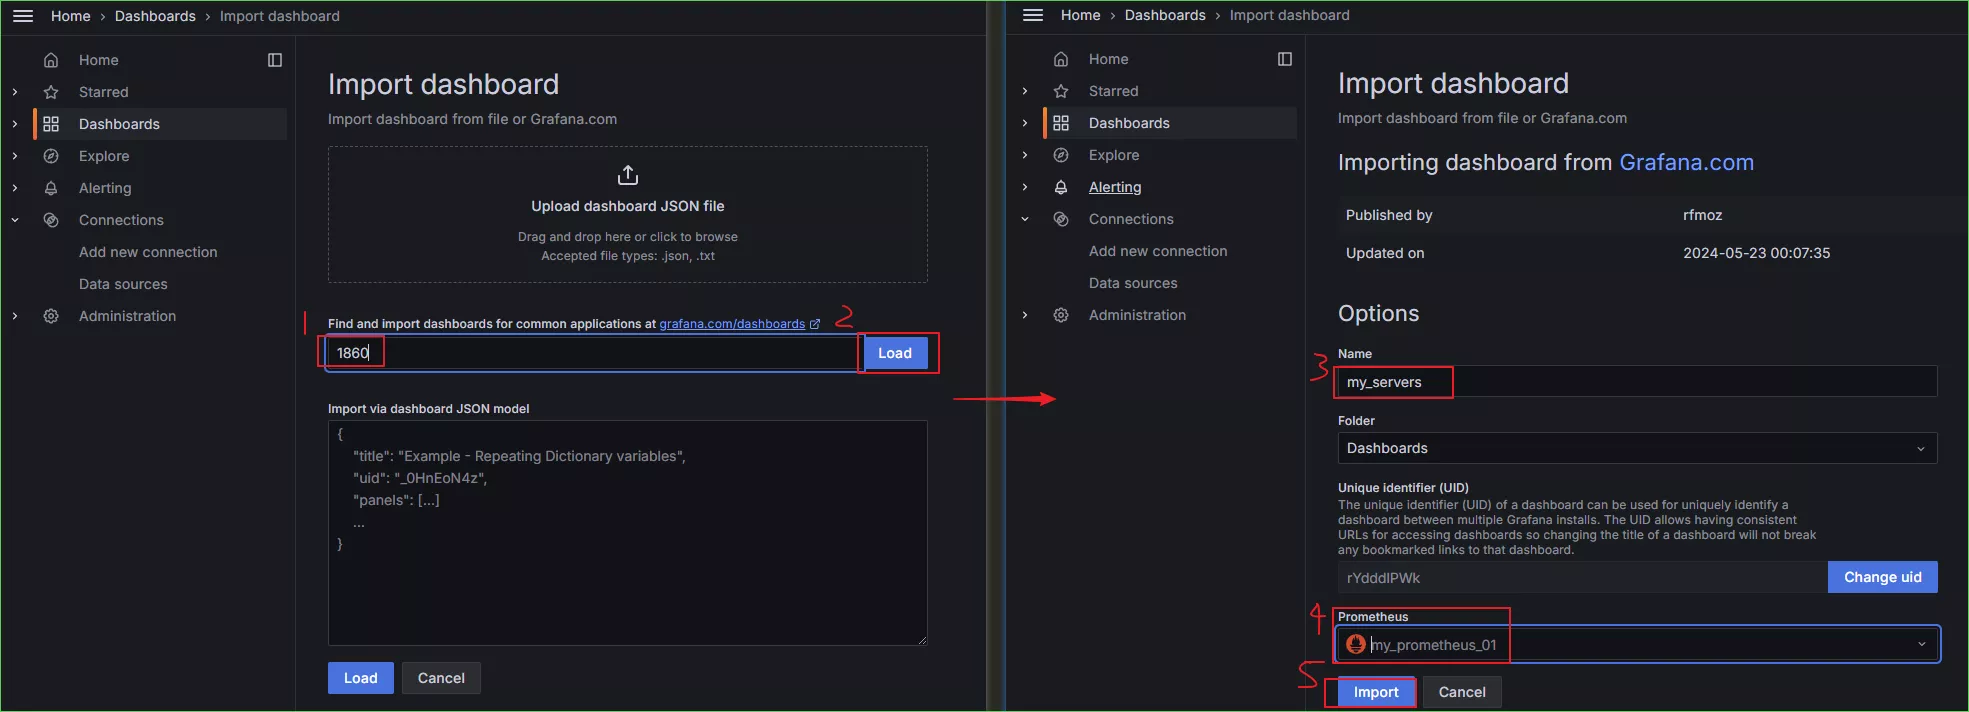
导入后稍作调整即可
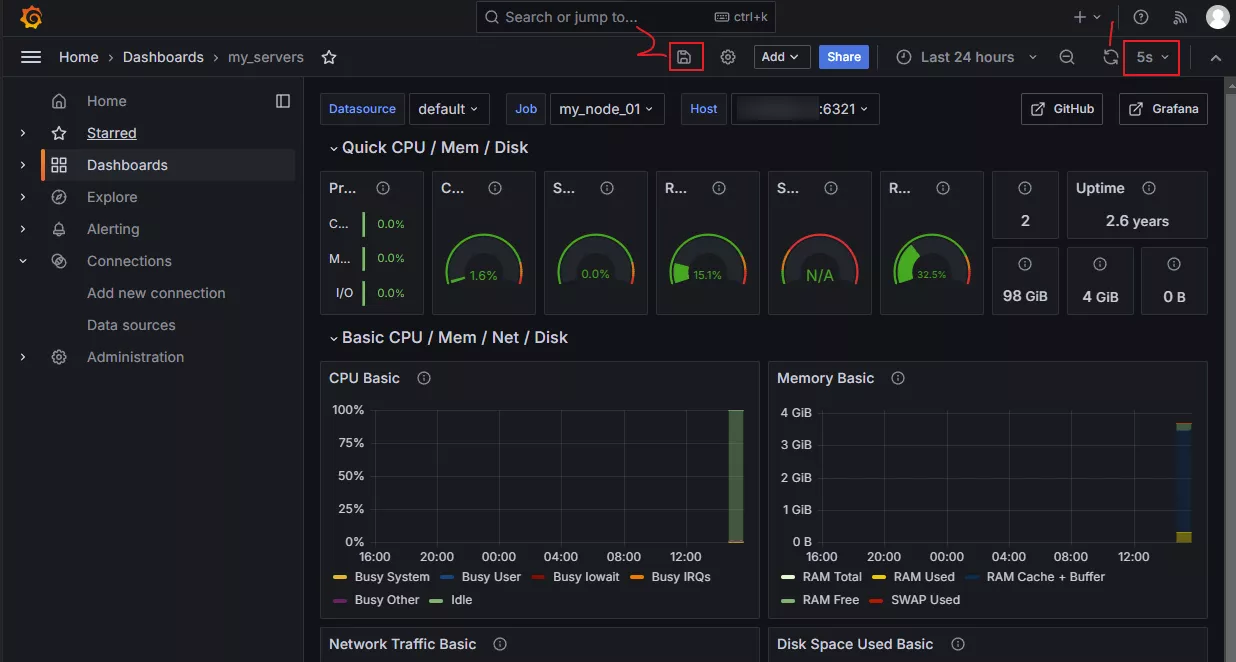
- 调整抓取时间的间隔
- 保存