creator-creator记录
creator-creator记录
前篇
- 官方
- https://www.cocos.com/creator
- Cocos Creator 3.5 用户手册 - https://docs.cocos.com/creator/manual/zh/
- 使用 TypeScript 脚本 - https://docs.cocos.com/creator/1.9/manual/zh/scripting/typescript.html
- Cocos Creator 虚拟列表 - https://forum.cocos.org/t/ccvirtualgridlist-cocos-creator/90251
- 发布到 Web 平台 - https://docs.cocos.com/creator/manual/zh/editor/publish/publish-web.html
- 日志输出 - https://docs.cocos.com/cocos2d-x/manual/zh/basic_concepts/logging.html
- 命令行发布项目 - https://docs.cocos.com/creator/manual/zh/editor/publish/publish-in-command-line.html
- awesome-CocosCreator - https://github.com/Leo501/awesome-CocosCreator
- 一些常用的用户需求示例 - https://gitee.com/yeshao2069/CocosCreatorDemos
去掉闪屏
- a
配置代码编辑环境
Asset Bundle
- Asset Bundle 介绍 - https://docs.cocos.com/creator/manual/zh/asset/bundle.html?h=asset
cocos 的 assetbundle 其实就是 文件夹 + 配置, 并不是 unity 中一个单独的 ab 文件, 所以 cocos 不用考虑维护 assetbundle
生命周期
编辑器扩展
- https://docs.cocos.com/creator/manual/zh/editor/extension/readme.html
- 自定义构建流程 - https://docs.cocos.com/creator/manual/zh/editor/publish/custom-build-plugin.html
protobuf 使用
加入所有 proto 文件放在
build_proto/src_proto/csprotos目录下在 package.json 文件中加入 pb 配置和生成命令
1
2
3
4
5
6
7
8
9
10
11
12
{
"dependencies": {
"protobufjs": "^7.2.2"
},
"devDependencies": {
"protobufjs-cli": "^1.1.1"
},
"scripts": {
"pbjs": "npx pbjs --dependency protobufjs/minimal.js -t static-module -w commonjs -o assets/code/gen/proto.js build_proto/src_proto/csprotos/*.proto",
"pbts": "npx pbts -o assets/code/gen/proto.d.ts assets/code/gen/proto.js"
}
}cd 到项目目录下执行命令
1
2
3
$ npm i # 安装引用包
$ npm run pbjs # 生成 js
$ npm run pbts # 生成 ts就会在
assets/code/gen目录下生成 proto.js 和 proto.ts 文件代码中使用
1
2
3
4
5
6
7
8
9
10
11
12
13
14
15
16
17
18
19
20
21
22
23
24
25
26
27
28
29
30
31
32
33
34
35
36
37
38
39
40
41
42
import { csprotos } from '../../gen/proto.js'; # 这里有个坑, 是要用引用js 文件, 一定要带上后缀, 否则报错 Module 'xxx' not found
let pldReq = new csprotos.PayloadData()
pldReq.CSHead = new csprotos.CSHead()
let loginReq = new csprotos.LoginReq()
loginReq.AppsflyerId = "hello"
loginReq.PlatID = 123
pldReq.CSBody = csprotos.LoginReq.encode(loginReq).finish()
let pbReqBuff = csprotos.PayloadData.encode(pldReq).finish()
---
### 二进制文件加载
1. 文件必须以 *.bin* 结尾
2. 加载代码
```json
async TestReadCfgBin() {
let path = "cfg_skin"
let bundleName = "dataconfig"
let finishCb
finishCb = (err: Error, ba: BufferAsset) => {
console.log(`--- BufferAsset 111,`, err, ba)
const data = ba.buffer()
console.log("--- data len:", data.byteLength)
let info = CFGskin.skinArray.decode(new Uint8Array(data))
info.items.forEach((val, idx, arr) => {
LogUtil.D(`--- idx: ${idx}, ID: ${val.ID}, IconPath: ${val.IconPath},`)
})
}
ResMgr.Ins.load<BufferAsset>(bundleName, path, finishCb)
}
图片类型 及 资源加载
- 精灵帧资源(SpriteFrame) - https://docs.cocos.com/creator/3.3/manual/zh/asset/sprite-frame.html
指定了 type, 这加载图片的时候, 有两种方式可以加载到
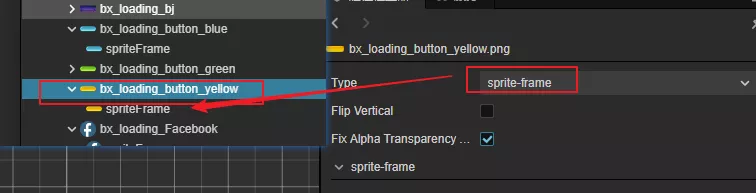
方式一: 可以直接加多个类型, 用于直接加载对应图片
1
2
3
4
5
let saPath = "ui/Atlas/login/bx_loading_button_yellow/spriteFrame" // 加多个 类型后缀
ResMgr.Ins.load(saPath, (err, sf: SpriteFrame) => {
let sp = this._view._BtnFbLogin.getComponent(Sprite)
sp.spriteFrame = sf
})方式二: 不加类型后缀, 将 ImageAsset 转成对应类型
1
2
3
4
5
6
7
8
9
10
11
12
13
let saPath = "ui/Atlas/login/bx_loading_button_yellow"
ResMgr.Ins.load(saPath, (err, imgAst: ImageAsset) => {
// 将 ImageAsset 转换成 SpriteFrame
const spriteFrame = new SpriteFrame();
const tex = new Texture2D();
tex.image = imgAst;
spriteFrame.texture = tex;
// 将 SpriteFrame 赋值到组件上
let sp = this._view._BtnFbLogin.getComponent(Sprite)
sp.spriteFrame = spriteFrame;
})
destroy 和 removeFromParent 的区别
调用一个节点的 removeFromParent 后,它并不会从内存中释放,因为引擎内部仍会持有它的数据。因此如果一个节点不再使用,请直接调用它的 destroy 而不是 removeFromParent,否则会导致内存泄漏。
总之,如果一个节点不再使用,destroy 就对了,不需要 removeFromParent 也不需要设置 parent 为 null 哈。
2d 粒子序列帧实现
资源管理
热更
- 资源热更新教程 - https://docs.cocos.com/creator/manual/zh/advanced-topics/hot-update.html
- 热更新管理器 AssetsManager - https://docs.cocos.com/creator/manual/zh/advanced-topics/hot-update-manager.html
平台调用
- 如何在 Android 平台上使用 JavaScript 直接调用 Java 方法 - https://docs.cocos.com/creator/manual/zh/advanced-topics/java-reflection.html
- 简化使用 JavaScript 调用 Objective-C 方法(实验性功能) - https://docs.cocos.com/creator/manual/zh/advanced-topics/js-oc-bridge.html
打包发布
- 跨平台发布游戏 - https://docs.cocos.com/creator/2.2/manual/zh/publish/
- 构建选项介绍 - https://docs.cocos.com/creator/manual/zh/editor/publish/build-options.html
- 打包发布到原生平台 - https://docs.cocos.com/creator/manual/zh/editor/publish/native-options.html#%E6%9E%84%E5%BB%BA%E9%80%89%E9%A1%B9
Android
- ndk 版本: android-ndk-r25c-windows.zip, https://github.com/android/ndk/wiki
Windows
- 报错:
Configuring incomplete, errors occurred! - 解决办法: 安装 Visual Studio 2019/2022 社区版
可写路径
native.fileUtils.getWritablePath()- Android :
/data/user/0/com.test.hot001/files
- Android :
动态合图
ase 加密
- Cocos Creator3.x中使用AES加密解密 - https://www.jianshu.com/p/125315a7c6ca
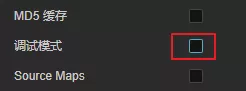
js 代码压缩
release 模式会自动压缩 js 代码, 也就是非 调试模式, 不勾选构建面板的调试选项
引入外部模块
PWA
渐进式 Web 应用 ( )
踩坑
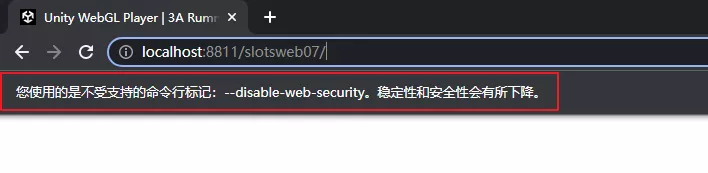
临时解决方案, 禁止掉浏览器的跨域检测
解决Chrome浏览器的跨域问题 - https://juejin.cn/post/7019171779478290463
找到快捷方式, 右击打开属性,找到
目标字段,并在目标字段后面加上参数: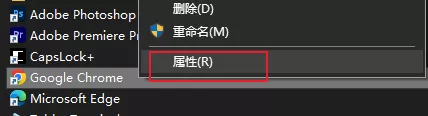
1
--disable-web-security --user-data-dir=D:\ChromeData\MyChromeDevUserData
其中
D:\ChromeData\MyChromeDevUserData为跨域浏览器数据存储的地方,可以根据需要修改。
双击打开浏览器, 出现不安全提示就表示禁用了 跨域检测
shader 中修改了参数, animation 中不更新
在 shader 的 properties 中增加了暴露的参数, 但是在 animation 中没有显示出来
原因是没有退出动画编辑器, 或者没有切到别的节点在切回需要 k 的节点, 动画编辑器没有释放掉就的数据
解决办法: 退出动画编辑器, 选中其他节点, 再选中回要 k 的节点
animation k 材质参数不生效
- 使用 3.6.3 的引擎出现了这个问题
- 解决办法 升级到 3.7.2+ 版本就没这个问题了
引擎变更导致场景打不开
- 报错:
[Scene] Cannot read property 'localSetLayout' of undefined - 解决办法: 关闭工程, 删除掉打开工程默认生成的几个文件夹 library, local, profiles, temp, 然后重新打开工程即可
https 网页内请求 http 内容
- 报错:
This request has been blocked; the content must be served over HTTPS. - 原样是在 https 网页内请求了 http 内容, 有两种解决办法
- 请求的 http 内容改为 https
- 在 html 页面中加入:
<meta http-equiv="Content-Security-Policy" content="upgrade-insecure-requests">, 参考: https://blog.51cto.com/YangPC/5482970
编辑器 run 到浏览器进不去
可能编辑器跑浏览的时候有缓存, 解决办法是先切到 跑编辑器内部, 然后在切到跑浏览器
libcocos.so 变大
原因是有 3.7 升级到 3.8, build.gradle 里 so 构建命令, 使用了 3.7.2 的模板
1
arguments "-DRES_DIR=${RES_PATH}", "-DCOCOS_X_PATH=${COCOS_ENGINE_PATH}", "-DANDROID_STL=c++_static", "-DANDROID_TOOLCHAIN=clang", "-DANDROID_ARM_NEON=TRUE", "-DANDROID_LD=gold"
解决办法, 使用 3.8 创建个新项目构建一下, 对齐到 3.8 默认生成的 build.gradle 即可
1
arguments "-DRES_DIR=${RES_PATH}", "-DANDROID_STL=c++_static", "-DANDROID_TOOLCHAIN=clang", "-DANDROID_ARM_NEON=TRUE"