unity-shader-ShaderGraph可视化shader
可视化shader, 和 shader forge 插件, ue4 材质编辑器 类似的东西, 都是通过可视化链接节点来编写逻辑代码, 然后会自动 编译 就能看到效果.
ShaderGraph 需要用到 lightweight rp. 里面内置了一些常用的公式 如: fresnel, 很简单就可以使用. 可见写 shader 的门槛越来越低了, 如果知道基点的实现原理会更好, 这个可以通过官网文档查阅到, 每个节点都有对应的代码实现. 官网文档 - https://docs.unity3d.com/Packages/com.unity.shadergraph@6.5/manual/index.html
前篇
- 官方资料
- 【Shader Graph教程】轻松学习Unity2018内置shader可视化编辑器Shader Graph (B站不错的教程, 没有必要全看, 有点冗余) - https://www.bilibili.com/video/av32162824/
- 不错的示例仓库: https://github.com/keijiro/ShaderGraphExamples
要点击左上角的 save asset 才会编译生效, 这个和 ue4 的 apply 一样
疑问
Q: 支持多pass?
官方解释貌似不支持.
We don't expose concepts like 'multi-pass' to the graph
参考: https://forum.unity.com/threads/feedback-wanted-shader-graph.511960/page-5Q: 深度测试, 深入写入, 模板测试 等等 frag op?
貌似不支持
参考: https://www.reddit.com/r/Unity3D/comments/9sho4x/is_there_any_way_to_change_ztest_in_the_shader/
上面几个问题还是得用以前的写 xxx.shader 代码的方式去解决.
todo:
- 深度图节点 scene depth 2018版本获取不到 eye 空间下的?? 能量场 特效待定.
相关使用方式
shader 命名规则

- reference 属性的 _MainClr 才是 uniform 变量的命名, 也就是程序设置参数的命名.
pbr AlphaClipThreshold 丢弃片段
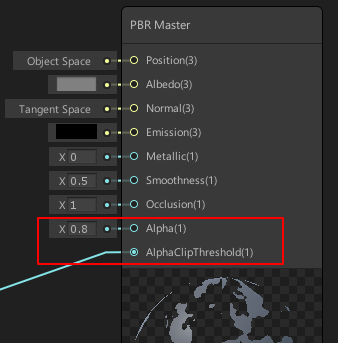
当 AlphaClipThreshold > Alpha 时, 片段才会 discard
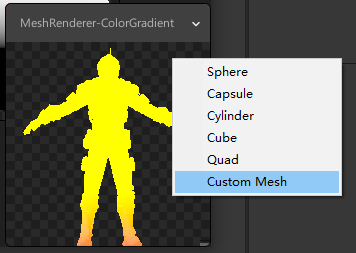
替换预览模型
预览节点右键 custom mesh 就可以选择别的模型
安装 shader graph
当前版本 unity2018.3.11f1. 安装了 shader graph 后, 之前写的 xxx.shader 将会无效 (变成紫色).
所以最好还是另起一个lwrp的模板工程用来学习.
参考: Unity-Shader Graph 安装 - https://blog.csdn.net/liquanyi007/article/details/80771441
默认的 3d 工程没有 shader graph, 需要通过 package manager 安装 lightweight rp, shadergraph 这两个包, 才能使用 shader graph.
如果是 2019 之前的是预览版, 需要在 advance 勾选上 show preview packages 才能显示出来

创建一个 lwrp asset. create -> rendering -> lightweight pipeline asset

然后指定项目使用这个 asset, 才肯使用 shader graph. Edit -> Project Setting -> Graphics

然后 create -> shader 才会出现有 graph 的选项


自定义节点 custom node
相关参考:
- Shader Graph Custom Node API: Using the Code Function Node - https://blogs.unity3d.com/2018/03/27/shader-graph-custom-node-api-using-the-code-function-node/
- Custom Nodes - https://docs.unity3d.com/Packages/com.unity.shadergraph@6.5/manual/Custom-Nodes-With-CodeFunctionNode.html
- 最好就是参考官方节点的写法来写, 例如 Voronoi 节点代码 - https://github.com/Unity-Technologies/ShaderGraph/blob/master/com.unity.shadergraph/Editor/Data/Nodes/Procedural/Noise/VoronoiNode.cs
增加一个自定义节点脚本
1
2
3
4
5
6
7
8
9
10
11
12
13
14
15
16
17
18
19
20
21
22
23
24
25
using System.Reflection;
using UnityEditor.ShaderGraph;
using UnityEngine;
[] // 创建节点时 节点所在的组, 可有n多个层级
public class MyCustomNode : CodeFunctionNode {
public MyCustomNode() {
name = "My Custom Node2"; // graph 中节点名字
}
protected override MethodInfo GetFunctionToConvert() {
return GetType().GetMethod("MyCustomFunction",
BindingFlags.Static | BindingFlags.NonPublic);
}
// 计算公式
static string MyCustomFunction(
[Slot(0, Binding.None)] DynamicDimensionVector A, [Slot(1, Binding.None)] DynamicDimensionVector B, [Slot(2, Binding.None)] out DynamicDimensionVector Out) {
return @"
{
Out = A + B;
}
";
}
}shader graph 中使用

- 节点可以是 vector1,2,3,4, 只要 A 或 B 其中一个换成其他参数类型, 其他两个节点也会跟着变化, 因为形参类型是 DynamicDimensionVector
示例二, 参照官方的写法
增加一个自定义节点脚本
1
2
3
4
5
6
7
8
9
10
11
12
13
14
15
16
17
18
19
20
21
22
23
24
25
26
27
28
29
30
31
32
33
34
35
using System.Reflection;
using UnityEngine;
using UnityEditor.ShaderGraph;
[]
public class MyTriTwistNode : CodeFunctionNode
{
public MyTriTwistNode()
{
name = "MyTriTwistNode";
}
public override string documentationURL
{
get { return "https://blog.csdn.net/yangxuan0261"; }
}
protected override MethodInfo GetFunctionToConvert()
{
return GetType().GetMethod("TriTwistFunc", BindingFlags.Static | BindingFlags.NonPublic);
}
static string TriTwistFunc(
[Slot(0, Binding.MeshUV0)] Vector2 UV, // 默认使用 UV0, 也就是顶点的uv0
[Slot(1, Binding.None, 500f, 500f, 500f, 500f)] Vector1 Scale, // 虽然是 Vector1, 但是指定的是四个分量的默认值
[Slot(2, Binding.None)] out Vector1 Out)
{
return
@"
{
Out = step(UV.x, Scale);
}
";
}
}shader graph 中使用
数据类型
| Name | Color | Description |
|---|---|---|
| Vector 1 | Light Blue | A Vector 1 or scalar value |
| Vector 2 | Green | A Vector 2 value |
| Vector 3 | Yellow | A Vector 3 value |
| Vector 4 | Pink | A Vector 4 value |
| Dynamic Vector | Light Blue | See Dynamic Data Types below |
| Matrix 2 | Blue | A Matrix 2x2 value |
| Matrix 3 | Blue | A Matrix 3x3 value |
| Matrix 4 | Blue | A Matrix 4x4 value |
| Dynamic Matrix | Blue | See Dynamic Data Types below |
| Dynamic | Blue | See Dynamic Data Types below |
| Boolean | Purple | A Boolean value. Defined as a float in the generated shader |
| Texture 2D | Red | A Texture 2D asset |
| Texture 2D Array | Red | A Texture 2D Array asset |
| Texture 3D | Red | A Texture 3D asset |
| Cubemap | Red | A Cubemap asset |
| Gradient | Grey | A Gradient value. Defined as a struct in the generated shader |
| SamplerState | Grey | A state used for sampling a texture |
常用节点
法线节点
sample texture 2d 的 Type 的设置为 Normal 才是 法线图 的采样, 得到蓝色的才是正确的
Default 为普通贴图的采样

边缘 rim
fresnel effect, 使用很方便, 已经把 世界空间 下的 法线和观察方向 算好用来 dot 处理, 只需要填充一下 指数 Power 即可.
ps: 这些节点如果了解过 fresnel 公式的话自然就比较清楚这些节点都干了什么事情.

场景深度 Scene Depth
文档: https://docs.unity3d.com/Packages/com.unity.shadergraph@6.5/manual/Scene-Depth-Node.html
vector 分量 分割与合并
分割, split

合并, vector2,3,4 都行

也可以 combine

拾取指定通道, channel mask

纹理uv偏移
tilling and offset, 相当于 o.texcoord = TRANSFORM_TEX(v.texcoord,_MainTex); 中的 TRANSFORM_TEX 宏
做 uv流动 效果的时候就需要用到这个节点


fraction
内部的实现是 frac 函数, 就是约束值在 [0, 1] 区间内
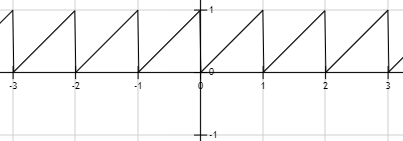
可以与 Time 节点搭配使用
Normal From Texture
将一个 高度图 (灰度图) 转换成 法线贴图, 可以自定义 偏移,强度,采样器
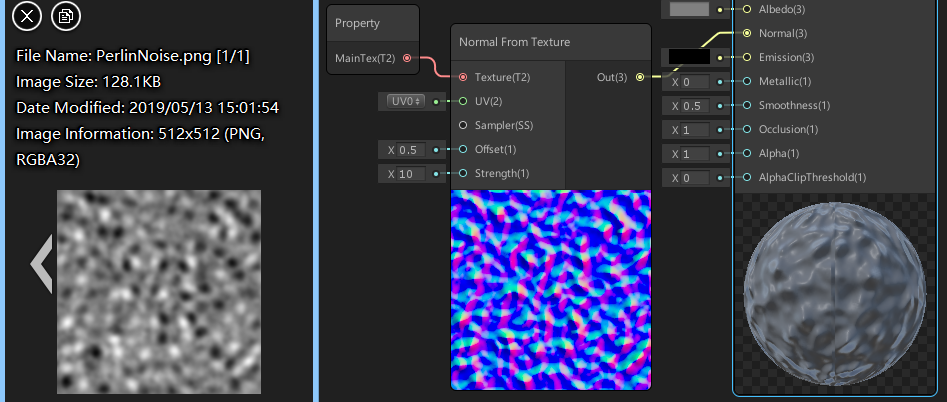
另外一个转换的节点时 Normal From Height, 不过他只有一个输入就是 rgb
appdata 节点
也就是 cpu 到 gpu 的数据结构中的字段, 比如
1 | struct appdata_full { |
在 shader graph 中为以下节点
| Name | Data Type | Description |
|---|---|---|
| Position | Vector 3 | Vertex or fragment position, label describes expected transform space |
| Tangent | Vector 3 | Vertex or fragment tangent vector, label describes expected transform space |
| Normal | Vector 3 | Vertex or fragment normal vector, label describes expected transform space |
| Bitangent | Vector 3 | Vertex or fragment bitangent, label describes expected transform space |
| UV | Vector 2 | UV0, UV1, UV2, UV3 |
| Vertex Color | Vector 4 | RGBA vertex color value. |
- 参考文档: Port Bindings - https://docs.unity3d.com/Packages/com.unity.shadergraph@6.5/manual/Port-Bindings.html
示例说明
积雪
step 函数使用的频率非常高, 常用于条件的判断 (替代 if-else, 更优于gpu并行计算). 之前也总结过 unity-shader-GPU优化_step函数替代if-else.
step(a, b) : 如果 a <= b,返回 1 ;否则,返回 0
官方示例中的 积雪 效果
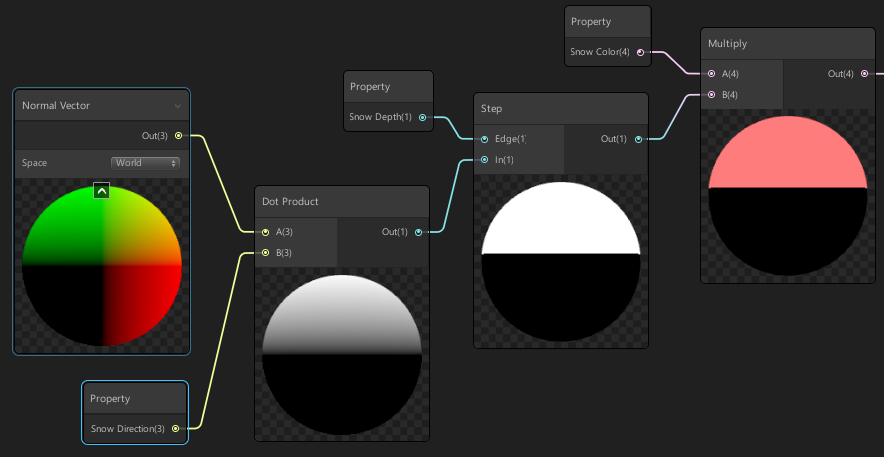
- snow direction : (0, 1, 0), 也就是y轴正方向
- snow depth : 0, 这一步step也就是判断哪些 面 的 法线 与 (0, 1, 0) 的夹角小于 90 度
卡通

- 光的方向与法线的 点乘 结果从 [-1, 1] 映射到 [0, 1] (映射算法
(x+1)/2), 再去采样 Tamp 贴图作为光照的强度.
顶点沿法线偏移
常用于 描边

代码
1 | v2f vert_outline(appdata_t v) { |
水
参考: Cartoon Water & Foam Shader Tutorial - https://www.youtube.com/watch?v=jBmBb-je4Lg
常用快捷键
various shortcut keys to use for better workflow.
| Hotkey | Windows | OSX | Description |
|---|---|---|---|
| Focus | F | F | Focus the workspace on all or selected Nodes |
| Create Node | Spacebar | Spacebar | Opens the Create Node Menu |