art-cubemap贴图制作
art-cubemap贴图制作
前篇
- cubemap 素材下载的站点 - http://www.humus.name/index.php?page=Textures&start=0
- hdr 贴图下载 - http://www.hdrlabs.com/sibl/archive.html
- CubeMapGen : cubemap 制作工具 ( 没研究怎么玩, 先 Mark ) - https://code.google.com/archive/p/cubemapgen/downloads
- How To Generate The Environment Cubemap In Unity ( 渲染unity中的场景到一个cubemap中 ) - https://lmhpoly.com/how-to-generate-the-environment-cubemap-in-unity/
unity 将 六张图 合成为 cubemap
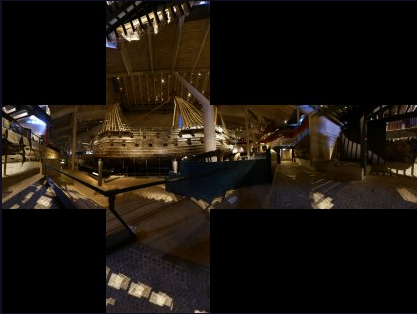
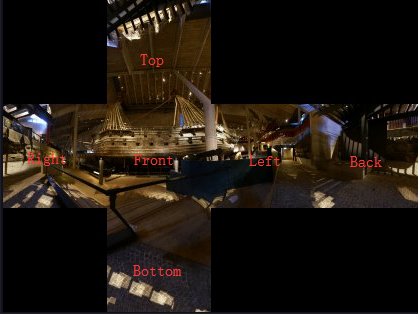
素材来源是六张图
原素材展开图
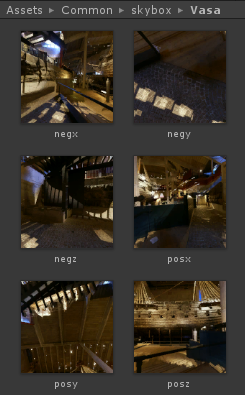
原素材命名
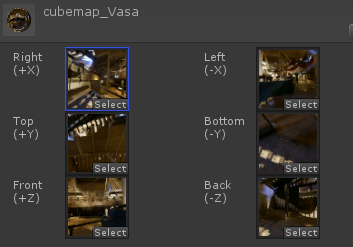
unity中制作cubemap. 创建 cubemap : assets -> create -> legacy -> cubemap
因为坐标系的不同, 所以要将原素材命名为 negx 放在unity中的 +x 位置, posx 放在 -x 位置
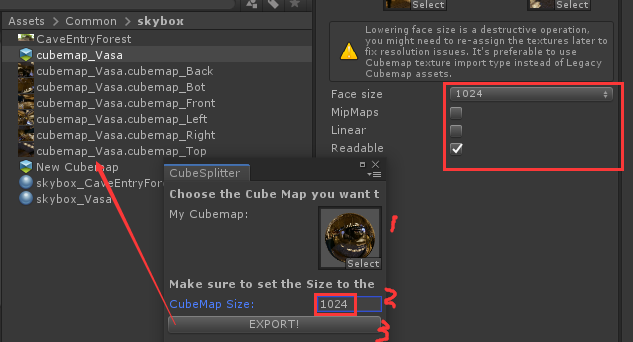
unity 将 cubemap 分割成 六张图
参考: Cube Map Seperator Here! - https://forum.unity.com/threads/cube-map-seperator-here.239101/
编辑器扩展代码
1
2
3
4
5
6
7
8
9
10
11
12
13
14
15
16
17
18
19
20
21
22
23
24
25
26
27
28
29
30
31
32
33
34
35
36
37
38
39
40
41
42
43
44
45
46
47
48
49
50
51
52
53
54
55
56
57
58
59
60
61
62
63
64
65
66
67
68
69
70
71
72
73
74
75
using System.Collections;
using System.Collections.Generic;
using System.IO;
using UnityEditor;
using UnityEngine;
public class CubeSplitter : EditorWindow {
Cubemap splitCube;
Color[] CubeMapColors;
int splitSize;
[]
public static void OpenCubeSplitter () {
var win = GetWindow<CubeSplitter> ("CubeSplitter");
win.Show ();
}
void OnGUI () {
GUILayout.Label ("Choose the Cube Map you want to save as 6 images and click EXPORT!", EditorStyles.boldLabel);
splitCube = EditorGUILayout.ObjectField ("My Cubemap:", splitCube, typeof (Cubemap), false) as Cubemap;
GUILayout.Label ("Make sure to set the Size to the same as the Cubemap you are using", EditorStyles.boldLabel);
splitSize = EditorGUILayout.IntField ("CubeMap Size: ", splitSize);
if (GUILayout.Button ("EXPORT!")) {
if (splitCube) {
Export ();
} else {
Debug.Log ("Forget Something?");
}
}
}
void Export () {
var filePath = AssetDatabase.GetAssetPath (splitCube);
Texture2D tex = new Texture2D (splitSize, splitSize, TextureFormat.RGB24, false);
CubeMapColors = splitCube.GetPixels (CubemapFace.PositiveY);
tex.SetPixels (CubeMapColors, 0);
tex.Apply ();
byte[] bytes = tex.EncodeToPNG ();
File.WriteAllBytes (filePath + "_Bot.png", bytes);
CubeMapColors = splitCube.GetPixels (CubemapFace.NegativeY);
tex.SetPixels (CubeMapColors, 0);
tex.Apply ();
bytes = tex.EncodeToPNG ();
File.WriteAllBytes (filePath + "_Top.png", bytes);
CubeMapColors = splitCube.GetPixels (CubemapFace.PositiveX);
tex.SetPixels (CubeMapColors, 0);
tex.Apply ();
bytes = tex.EncodeToPNG ();
File.WriteAllBytes (filePath + "_Left.png", bytes);
CubeMapColors = splitCube.GetPixels (CubemapFace.NegativeX);
tex.SetPixels (CubeMapColors, 0);
tex.Apply ();
bytes = tex.EncodeToPNG ();
File.WriteAllBytes (filePath + "_Right.png", bytes);
CubeMapColors = splitCube.GetPixels (CubemapFace.PositiveZ);
tex.SetPixels (CubeMapColors, 0);
tex.Apply ();
bytes = tex.EncodeToPNG ();
File.WriteAllBytes (filePath + "_Front.png", bytes);
CubeMapColors = splitCube.GetPixels (CubemapFace.NegativeZ);
tex.SetPixels (CubeMapColors, 0);
tex.Apply ();
bytes = tex.EncodeToPNG ();
File.WriteAllBytes (filePath + "_Back.png", bytes);
this.Close ();
}
}拖入要分割的 cubemap, 设置分辨率为 cubemap 的分辨率. 点击 EXPORT. done!
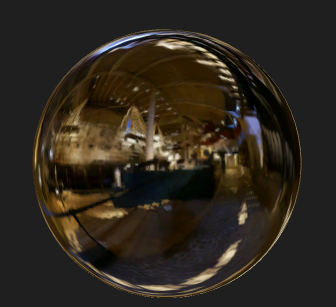
unity 渲染场景 cubemap
把当前场景渲染成一个 cubemap
参考: How To Generate The Environment Cubemap In Unity - https://lmhpoly.com/how-to-generate-the-environment-cubemap-in-unity/
编辑器扩展代码. 这是官方提供的脚本
1
2
3
4
5
6
7
8
9
10
11
12
13
14
15
16
17
18
19
20
21
22
23
24
25
26
27
28
using System.Collections;
using UnityEditor;
using UnityEngine;
public class RenderCubemapWizard : ScriptableWizard {
public Transform renderFromPosition;
public Cubemap cubemap;
void OnWizardUpdate () {
string helpString = "Select transform to render from and cubemap to render into";
bool isValid = (renderFromPosition != null) && (cubemap != null);
}
void OnWizardCreate () {
GameObject go = new GameObject ("CubemapCamera");
go.AddComponent<Camera> ();
go.transform.position = renderFromPosition.position;
go.transform.rotation = Quaternion.identity;
go.GetComponent<Camera> ().RenderToCubemap (cubemap);
DestroyImmediate (go);
}
[]
static void RenderCubemap () {
ScriptableWizard.DisplayWizard<RenderCubemapWizard> (
"Render cubemap", "Render!");
}
}新建一个空的 cubemap, asset -> create -> legacy -> cubemap, 并设置参数. ( 若修改 cubemap 参数崩溃, 可能是版本问题, 参考: [使用 *unity2018.2.8f1* 版本, 修改 cubemap 的参数总是崩溃.](#使用 *unity2018.2.8f1* 版本, 修改 cubemap 的参数总是崩溃.) )
打开脚本工具, 设置 位置 和 新创建的 cubemap. 点解 render. done!
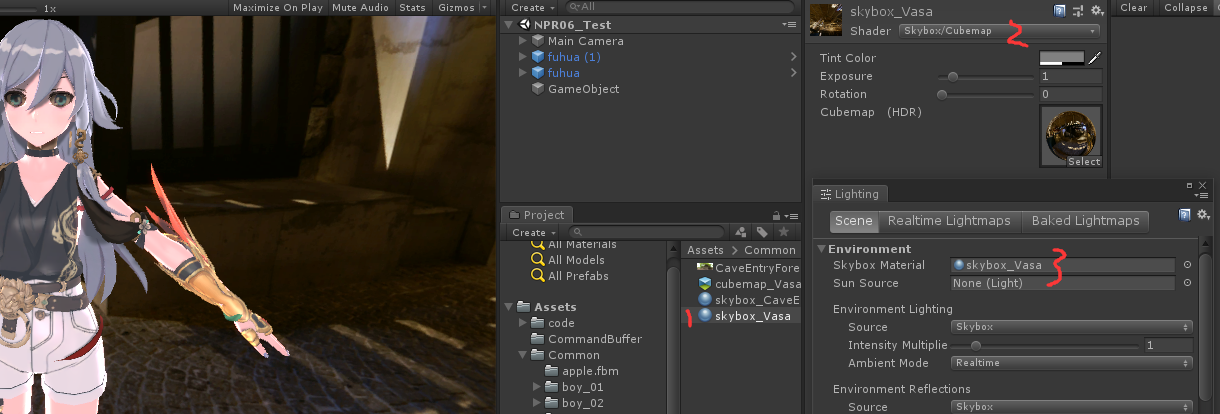
在使用到场景中
踩坑
使用 unity2018.2.8f1 版本, 修改 cubemap 的参数总是崩溃.
解决办法: 我升级到 unity2018.3.11f1 就ok了.