docker_相关操作
docker的相关操作
官网仓库 - https://hub.docker.com/
前篇
容器(container )就是 镜像(image)run 之后生产的东西。
参考资料:
信息查询,
列出 container 和 image 的数量,宿主机器的操作系统,还有 CPU 核数与内存大小等
1 | $ docker info |
列出所有镜像(image)
1 | $ docker images |
运行容器,通常做一个目录映射,实现 容器 与 宿主 的文件交互
1 | $ docker run -it --volume /home/wilker/Desktop:/app my-python-vim |
列出所有运行中的容器(container)
1 | $ docker ps -a |
停止容器(container)
1 | $ docker stop 25e170c7730d # 25e170c7730d 为 容器id |
删除容器
1 | $ docker rm 25e170c7730d # 移除 容器 |
删除镜像 (image)
删除镜像前必须先停掉引用到镜像的容器(container)
参考资料:http://yaxin-cn.github.io/Docker/how-to-delete-a-docker-image.html
比如删除一个 hello-world 镜像
1
2
3
4
5
6
7
8
9
10
11
12
13
14
15
16
17
18
19
20wilker@ubuntu:/etc/default$ docker images # 列出已有的镜像
REPOSITORY TAG IMAGE ID CREATED SIZE
hello-world latest 1815c82652c0 2 weeks ago 1.84kB
wilker@ubuntu:/etc/default$ docker rmi 1815c82652c0 # 尝试删除 1815c82652c0 镜像,但是报了一个已停掉的 container 25e170c7730d 引用着
Error response from daemon: conflict: unable to delete 1815c82652c0 (must be forced) - image is being used by stopped container 25e170c7730d
wilker@ubuntu:/etc/default$ docker stop 25e170c7730d # 假设 容器没有停掉 这里停掉一下
25e170c7730d
wilker@ubuntu:/etc/default$ docker rm 25e170c7730d # 移除 容器
25e170c7730d
wilker@ubuntu:/etc/default$ docker rmi 1815c82652c0 # 最后再删除镜像
Untagged: hello-world:latest
Untagged: hello-world@sha256:f3b3b28a45160805bb16542c9531888519430e9e6d6ffc09d72261b0d26ff74f
Deleted: sha256:1815c82652c03bfd8644afda26fb184f2ed891d921b20a0703b46768f9755c57
Deleted: sha256:45761469c965421a92a69cc50e92c01e0cfa94fe026cdd1233445ea00e96289a
wilker@ubuntu:/etc/default$ docker images # ok,done
REPOSITORY TAG IMAGE ID CREATED SIZE
启动已停止的容器,并进入容器
1 | wilker@ubuntu:~/Desktop$ docker ps -a # 先查看一下已停止的容器 STATUS=Exited |
批量清理相关
杀死所有正在运行的容器
1
$ docker kill $(docker ps -a -q)
杀死所有正在运行的容器
1
docker kill $(docker ps -a -q)
删除所有已经停止的容器
1
docker rm $(docker ps -a -q)
删除所有未打 dangling 标签的镜像
1
docker rmi $(docker images -q -f dangling=true)
删除所有镜像
1
docker rmi $(docker images -q)
为这些命令创建别名
1
2
3
4
5
6
7
8
9
10
11
12
13# ~/.bash_aliases
# 杀死所有正在运行的容器.
alias dockerkill='docker kill $(docker ps -a -q)'
# 删除所有已经停止的容器.
alias dockercleanc='docker rm $(docker ps -a -q)'
# 删除所有未打标签的镜像.
alias dockercleani='docker rmi $(docker images -q -f dangling=true)'
# 删除所有已经停止的容器和未打标签的镜像.
alias dockerclean='dockercleanc || true && dockercleani'
查找、拉取、推送 镜像
1 | wilker@ubuntu:~$ docker search registry # 查找 |
``docker pull registr:1.1` 指定 tag
推送到自己的私人仓库:docker_自建私有仓库.md
1
wilker@ubuntu:~$ docker push 11.22.33.44:5000/python_img:16.04 # 推送到 ip 为 11.22.33.44,端口为 5000 的服务器上
修改镜像名:
$ docker tag 源镜像名 目的镜像名
1 | wilker@ubuntu:~$ docker tag myubuntu:16.04 wilker/myubuntu:16.04 # |
查询镜像信息
1 | wilker@ubuntu:~$ docker inspect 02f42dc11beb # 镜像id |
拷贝文件
1 | $ docker cp <containerId>:/file/path/within/container /host/path/target |
搜索镜像
1 | docker search redis |
tag 只能上官网查: https://hub.docker.com/
拉取指定版本
1 | dockre pull redis:3.2 |
查看所有 tag 脚本
查看Docker镜像仓库中镜像的所有标签 - https://blog.csdn.net/kongxx/article/details/86558328
dockertag.sh
1
2
3
4
5
6!/bin/sh
repo_url=https://registry.hub.docker.com/v1/repositories
image_name=$1
curl -s ${repo_url}/${image_name}/tags | json_reformat | grep name | awk '{print $2}' | sed -e 's/"//g'如果报错
json_reformat找不到, 需要安装yajl-tools1
2
3
4
5Command 'json_reformat' not found, but can be installed with:
apt install yajl-tools
root@92ea43e57755:~# apt install yajl-tools
授权参数
命令参数: --privileged, 给容器超级权限,否则无法操作挂载进去的目录
1 | $ docker run --network host --privileged --name ubuntu1804-22 -v F:/docker_data/ubuntu_1804/mydir:/mydir -itd my/ubuntu1804:0.1 bash |
查看实例参数
inspect 命令: docker inspect redis_server
1 | root@ubuntu:~# docker inspect redis_server |
查询指定参数
1 | root@ubuntu:~# docker inspect -f "{{.Name}} {{.Path}} {{.Args}} {{.Config.Cmd}} {{.Config.Env}} {{.Config.Volumes}} {{.Config.Entrypoint}} {{.HostConfig.Links} }" redis_client |
安装 netsstat
直接安装会报错,需要安装是 net-tool 才对
1
2
3
4
5
6
7$ apt-get install netstat
Reading package lists... Done
Building dependency tree
Reading state information... Done
E: Unable to locate package netstat
$ apt install net-tools
docker 踩坑
退出容器状态变为 Exit
- 确保退出容器后 状态 不会变为 Eixt,run 参数中加上
--tty=true, 或者 yml 文件中加入tty: true
sshd 后台运行, 防止docker退出
在 entrypoint 中输入指令 /usr/sbin/sshd -D
或者在dockerfile中
1 | #RUN /etc/init.d/sshd start |
bash 防止docker退出 (推荐)
装好 ssh 服务
1
# apt install ssh
新建一个脚本 ssh_bash.sh 启动 ssh 服务 及 bash 阻塞 防止 docker 退出. (为了所有docker实例通用, 直接挂载这个脚本)
1
2# vi ssh_bash.sh
/etc/init.d/ssh start && bashCMD 指定运行该脚本
1
sh /mytemp/ssh_bash.sh
修改一下暴露端口对应上ssh的端口即可
1
2
3
4# vi /etc/ssh/sshd_config
Port 23452
PubkeyAuthentication yes
AuthorizedKeysFile .ssh/authorized_keys .ssh/authorized_keys2重启 ssh 服务
1
/etc/init.d/ssh restart
报错: docker: Error response from daemon: No command specified
例如
1 | $ docker run --network host --name ubuntu1804-22 -v F:/docker_data/ubuntu_1804/mydir:/mydir -itd my/ubuntu1804:0.1 |
加入参数: 执行的命令 bash
1 | $ docker run --network host --name ubuntu1804-22 -v F:/docker_data/ubuntu_1804/mydir:/mydir -itd my/ubuntu1804:0.1 bash |
entrypoint
如果指定了 entrypoint 参数, 那么 cmd 参数将作为 entrypoint 的后续参数
桌面版 docker
下载地址: https://hub.docker.com/?overlay=onboarding
window
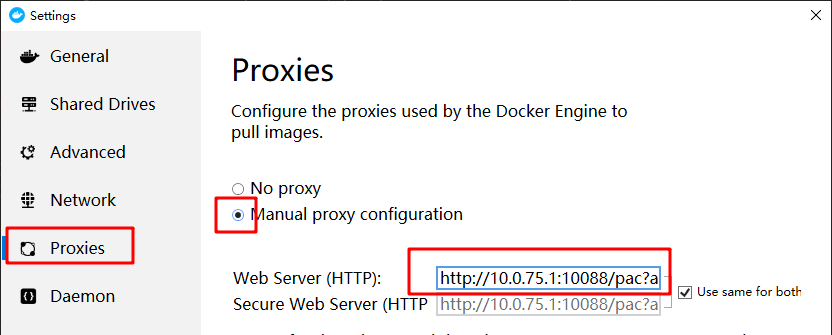
配置代理
查看 ip, 要需要的是
DockerNAT虚拟网卡的 IPv4 地址1
2
3
4
5
6
7
8
9
10$ ipconfig
Windows IP Configuration
Ethernet adapter vEthernet (DockerNAT):
Connection-specific DNS Suffix . :
IPv4 Address. . . . . . . . . . . : 10.0.75.1 // 这个就是我们需要的
Subnet Mask . . . . . . . . . . . : 255.255.255.240
Default Gateway . . . . . . . . . :查看机子的代理设置
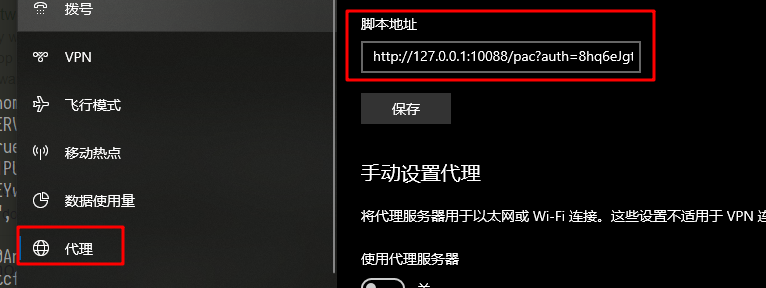
把 ip 替换成 docker 的网关, 也就是
http://10.0.75.1:10088/pac?auth=8hq6eJgtH3v33-4X8Pss&t=201912171101358601设置进去
进入docker里面试一下,
1
root@92ea43e57755:/# curl https://www.youtube.com
不知道为啥
https://www.google.com就不行为了再次验证, 把代理关掉打开分别再试一下.
踩坑
重启后进程被占用
启动实例发现之前的端口还是被占用
1 | $ docker start 5eb9b5e339bf |
解决办法: 查找出进程并杀掉 (被进程 com.docker.backend.exe 占用着 )
查找占用 6306 端口的进程号
1
2
3$ netstat -ano | findstr 6306
TCP 0.0.0.0:6306 0.0.0.0:0 LISTENING 6216
TCP [::]:6306 [::]:0 LISTENING 6216发现是 6216 进程占用着
查找 6216 对应的进程名称
1
2$ tasklist | findstr 6216
com.docker.backend.exe 6216 Services 0 15,740 Kz找到元凶
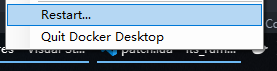
com.docker.backend.exe, 直接任务管理器中杀掉即可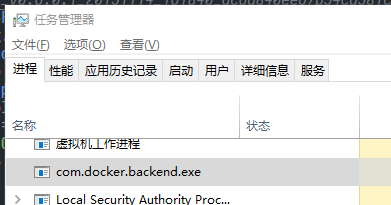
如果启动实例还是失败
1
2
3docker start 5eb9b5e339bf
Error response from daemon: open \\.\pipe\docker_engine_linux: The system cannot find the file specified.
Error: failed to start containers: 5eb9b5e339bf重启一下即可
桌面版不支持 –network host 模式
The host networking driver only works on Linux hosts, and is not supported on Docker Desktop for Mac, Docker Desktop for Windows, or Docker EE for Windows Server.