unity-与ios交互
unity-与ios交互
unity 与 ios 交互
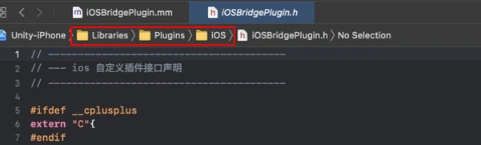
写 ios 插件, 丢到平台层目录 Assets/Plugins/iOS 下
头文件 iOSBridgePlugin.h
1
2
3
4
5
6
7
8
9
10
11
12
13
14
15
// ----------------------------------------
// --- ios 自定义插件接口声明
// ----------------------------------------
extern "C"{
void ShowTips(const char* goName, const char* callFnName, const char* msg);
} // extern "C"实现文件 iOSBridgePlugin.mm.
这个是混编文件 (oc + c/c++) , xcode 可以自动识别为 Objective-C++ 文件
1
2
3
4
5
6
7
8
9
10
11
12
13
14
15
16
17
18
19
20
21
22
23
24
25
26
void ShowTips(const char* goName, const char* callFnName, const char* msg) {
NSLog(@"--- ShowTips");
NSString* go = [NSString stringWithUTF8String:goName]; // c 字符串 转成 oc 字符串, 这里一定要先转成 oc, 不然 const char* 调用后就会释放掉栈内存, 会导致 UnitySendMessage 回传 unity 失败
NSString* fn = [NSString stringWithUTF8String:callFnName];
NSString* content = [NSString stringWithUTF8String:msg];
UIAlertController * alert = [UIAlertController
alertControllerWithTitle:@"Hi, wilker."
message:content
preferredStyle:UIAlertControllerStyleAlert];
UIAlertAction* yesButton = [UIAlertAction
actionWithTitle:@"Reply"
style:UIAlertActionStyleDefault
handler:^(UIAlertAction * action) {
const char* rspMsg = [[NSString stringWithFormat: @"ios replay: %@", content] UTF8String]; // oc 字符串 转成 c 字符串
UnitySendMessage([go UTF8String], [fn UTF8String], rspMsg); // ios 调用 unity
}];
[alert addAction:yesButton];
UIViewController* rootCtrl=[UIApplication sharedApplication].keyWindow.rootViewController;
[rootCtrl presentViewController:alert animated:YES completion:nil];
}
在 csharp 代码导入并使用这个插件 api
GameMgr.cs
1
2
3
4
5
6
7
8
9
10
11
12
13
14
15
16
17
18
19
20
21
22
23
24
25
26
27
28
29
30
31
32
33
34
35
36
37
38
39
40
using System.Collections;
using System.Collections.Generic;
using System.Runtime.InteropServices;
using UnityEngine;
using UnityEngine.UI;
public class GameMgr : MonoBehaviour {
public Text txt;
public GameObject go;
void Start() {
gameObject.name = "GameMgr";
DontDestroyOnLoad(gameObject);
}
public void OnNativeCall(string data) {
Debug.LogFormat("--- OnNativeCall, data: {0}", data);
txt.text = data;
}
public void CallNative() {
string msg = "hello ios-" + Random.Range(1000, 9999);
ShowTips(gameObject.name, "OnNativeCall", msg); // 调用 ios api
Debug.LogErrorFormat("--- no implemention on platform: {0}", Application.platform.ToString());
}
void Update() {
go.transform.Rotate(Vector3.up * 50 * Time.deltaTime);
}
// ------------------- ios native api
[]
private static extern void ShowTips(string goName, string callFnName, string msg);
}目录目录

build 一下生产 xcode 工程
打开 xcode.
Plugins 目录会移到 Libraries 目录下
cmd + R 编译并运行到手机.
不能运行到 ios 模拟器上, 因为 unity 导出的是 arm 架构的库, 而 ios 模拟器时 x86 架构.
效果

扩展 UnityAppController
- Unity iOS接SDK,定制UnityAppController - https://www.codeleading.com/article/76004167121/
Unity3d提供了一套插件机制,可以很方便地在项目中使用自己的CustomAppController继承并重写默认的UnityAppController的方法。
在 Unity 插件目录下创建以下文件:
1 | Assets/Plugins/iOS/CustomAppController.mm |
文件名必须是 xxxxAppController.mm,xxxx前缀可自选,但不能省略,如CustomAppController.mm;否则在 Build项目的时候,会被移动到错误的目录中去。
1 | // CustomAppController.mm |
注意,上面的CustomAppController.mm中有一个宏IMPL_APP_CONTROLLER_SUBCLASS,Unity 就是通过 IMPL_APP_CONTROLLER_SUBCLASS知道要使用我们定制的 CustomAppController而不是使用默认的UnityAppController。
unity view 初始化完后搞事情
Classes/UI/UnityAppController+ViewHandling.h 头文件中包含了 unity controller, view 等初始化的工作, 所以可以重写里面的部分方法去搞事情.
简单版
在 [扩展 UnityAppController](#扩展 UnityAppController) 的基础上, 重写 willStartWithViewController 方法即可, 这个方法在
Classes/UI/UnityAppController+ViewHandling.h头文件中1
2
3
4
5
6
7
8
9
10
11
12
13
14// CustomAppController.mm
#import "Classes/UI/UnityAppController+ViewHandling.h"
@implementation CustomAppController
- (void)willStartWithViewController:(UIViewController *)controller{
[super willStartWithViewController:controller];
NSLog(@"--- iOSAppController.willStartWithViewController, controller: %@", controller);
UILabel* lbl = [[UILabel alloc] initWithFrame:CGRectMake(100, 100, 300, 50)];
lbl.textColor = [UIColor blackColor];
lbl.text = @"hello world 2";
[controller.view addSubview:lbl];
}
@end
复杂版 - 监听 UintyView 生命周期
应用场景: 想要在 view 加载前后搞事情. unity 提供了一个 delegate 让你去实现并注册进去, 它就会在 view 的生命周期里通知你.
自定义一个类 (如: MyPlugin) 实现 UnityViewControllerListener 的 delegate 接口
1
2
3
4
5
6
7
8
9
10
11
12
13
14
15
16
17
18
19
20
21
22
23
24
25
26
27
28
29
30
31
32
33
34
35
36
37
38
39
40
41// MyPlugin.h
#import "Classes/PluginBase/UnityViewControllerListener.h"
#import <Foundation/Foundation.h>
NS_ASSUME_NONNULL_BEGIN
@interface MyPlugin : NSObject<UnityViewControllerListener>
@end
NS_ASSUME_NONNULL_END
// MyPlugin.m
#import "MyPlugin.h"
@implementation MyPlugin
- (void)viewWillLayoutSubviews:(NSNotification*)notification {
NSLog(@"--- MyPlugin.viewWillLayoutSubviews");
}
- (void)viewDidLayoutSubviews:(NSNotification*)notification {
NSLog(@"--- MyPlugin.viewDidLayoutSubviews");
}
- (void)viewWillDisappear:(NSNotification*)notification {
NSLog(@"--- MyPlugin.viewWillDisappear");
}
- (void)viewDidDisappear:(NSNotification*)notification {
NSLog(@"--- MyPlugin.viewDidDisappear");
}
- (void)viewWillAppear:(NSNotification*)notification {
NSLog(@"--- MyPlugin.viewWillAppear");
}
// 这个可以作为 unity view 加载完成的标记. 只会调用一次
- (void)viewDidAppear:(NSNotification*)notification {
NSLog(@"--- MyPlugin.viewDidAppear");
NSLog(@"--- viewDidAppear.obj: %@", notification.object);
UILabel* lbl = [[UILabel alloc] initWithFrame:CGRectMake(100, 100, 300, 50)];
lbl.textColor = [UIColor blackColor];
lbl.text = @"hello world";
UIViewController* rootVC = [UIApplication sharedApplication].windows[0].rootViewController;
[rootVC.view addSubview:lbl];
NSLog(@"--- rootVc: %@", rootVC);
NSLog(@"--- rootVc.view: %@", rootVC.view); // 这个就是 unityView
}
@end纳尼? import 头文件
UnityViewControllerListener.h后编译报错:Unable to compile in XCode: Expected identifier or '(',extern C的几个 const 变量引发的.解决办法就是去改下源文件. 参考: https://answers.unity.com/questions/1251495/unable-to-compile-in-xcode-expected-identifier-or.html
修改 UnityViewControllerListener.h 内容
1
2
3
4
5
6
7
8
9
10
11
12
13
14
15
16
17
18
19// 注释掉 extern 变量声明
//extern "C" __attribute__((visibility("default"))) NSString* const kUnityViewWillLayoutSubviews;
//extern "C" __attribute__((visibility("default"))) NSString* const kUnityViewDidLayoutSubviews;
//extern "C" __attribute__((visibility("default"))) NSString* const kUnityViewWillDisappear;
//extern "C" __attribute__((visibility("default"))) NSString* const kUnityViewDidDisappear;
//extern "C" __attribute__((visibility("default"))) NSString* const kUnityViewWillAppear;
//extern "C" __attribute__((visibility("default"))) NSString* const kUnityViewDidAppear;
//extern "C" __attribute__((visibility("default"))) NSString* const kUnityInterfaceWillChangeOrientation;
//extern "C" __attribute__((visibility("default"))) NSString* const kUnityInterfaceDidChangeOrientation;
// 新加 cosnt 变量
NSString* const kUnityViewWillLayoutSubviews = @"kUnityViewWillLayoutSubviews";
NSString* const kUnityViewDidLayoutSubviews = @"kUnityViewDidLayoutSubviews";
NSString* const kUnityViewDidDisappear = @"kUnityViewDidDisappear";
NSString* const kUnityViewDidAppear = @"kUnityViewDidAppear";
NSString* const kUnityViewWillDisappear = @"kUnityViewWillDisappear";
NSString* const kUnityViewWillAppear = @"kUnityViewWillAppear";
NSString* const kUnityInterfaceWillChangeOrientation = @"kUnityInterfaceWillChangeOrientation";
NSString* const kUnityInterfaceDidChangeOrientation = @"kUnityInterfaceDidChangeOrientation";修改 UnityViewControllerListener.mm 内容
1
2
3
4
5
6
7
8
9// 注释掉 extern 变量定义
//DEFINE_NOTIFICATION(kUnityViewWillLayoutSubviews);
//DEFINE_NOTIFICATION(kUnityViewDidLayoutSubviews);
//DEFINE_NOTIFICATION(kUnityViewWillDisappear);
//DEFINE_NOTIFICATION(kUnityViewDidDisappear);
//DEFINE_NOTIFICATION(kUnityViewWillAppear);
//DEFINE_NOTIFICATION(kUnityViewDidAppear);
//DEFINE_NOTIFICATION(kUnityInterfaceWillChangeOrientation);
//DEFINE_NOTIFICATION(kUnityInterfaceDidChangeOrientation);done. 编译就可以通过了. (感觉这种需要动到 内部源码 的事情就不靠谱, 可能有其他更好的方式)
在 [扩展 UnityAppController](#扩展 UnityAppController) 的基础上, 重写 UnityAppController 的
createUnityView方法. 这个方法在Classes/UI/UnityAppController+ViewHandling.h头文件中1
2
3
4
5
6
7
8
9
10
11
12
13
14
15
16
17
18// CustomAppController.mm
#import "Classes/PluginBase/UnityViewControllerListener.h"
#import "Classes/UI/UnityAppController+ViewHandling.h"
@interface CustomAppController : UnityAppController
@property (strong, nonatomic) MyPlugin* plugin;
@end
@implementation CustomAppController
- (UnityView *)createUnityView {
NSLog(@"--- iOSAppController.createUnityView");
self.plugin = [MyPlugin new];
UnityRegisterViewControllerListener(plugin); // 注册监听
UnityView* unity_view = [super createUnityView];
NSLog(@"--- unity_view: %@", unity_view);
return unity_view;
}
@enddone. 打印出的日志
1
2
3
4
5
6
7
8
9
10
11
12
13
14
15
16
17
18
19
20
212021-02-19 03:11:26.920198+0800 testunityios[45199:3842542] --- iOSAppController.createUnityView // 这个接口调用的比 didFinishLaunchingWithOptions 更早
2021-02-19 03:11:26.922306+0800 testunityios[45199:3842542] --- unity_view: <UnityView: 0x10645dc40; frame = (0 0; 375 812); layer = <CAMetalLayer: 0x281690800>>
2021-02-19 03:11:26.930272+0800 testunityios[45199:3842542] --- MyPlugin.viewWillAppear
2021-02-19 03:11:26.989400+0800 testunityios[45199:3842542] --- iOSAppController didFinishLaunchingWithOptions
2021-02-19 03:11:27.052447+0800 testunityios[45199:3842542] --- MyPlugin.viewWillLayoutSubviews
2021-02-19 03:11:27.095425+0800 testunityios[45199:3842542] --- MyPlugin.viewDidLayoutSubviews
2021-02-19 03:11:27.959829+0800 testunityios[45199:3842542] --- MyPlugin.viewWillAppear
2021-02-19 03:11:27.960434+0800 testunityios[45199:3842542] --- MyPlugin.viewWillDisappear
2021-02-19 03:11:27.960855+0800 testunityios[45199:3842542] --- MyPlugin.viewWillDisappear
2021-02-19 03:11:27.963680+0800 testunityios[45199:3842542] --- MyPlugin.viewWillAppear
2021-02-19 03:11:28.264654+0800 testunityios[45199:3842542] --- MyPlugin.viewWillLayoutSubviews
2021-02-19 03:11:28.264727+0800 testunityios[45199:3842542] --- MyPlugin.viewDidLayoutSubviews
2021-02-19 03:11:28.264775+0800 testunityios[45199:3842542] --- viewDidLayoutSubviews.obj: <UnityDefaultViewController: 0x10645f3f0>
2021-02-19 03:11:28.265655+0800 testunityios[45199:3842542] --- MyPlugin.viewDidDisappear
2021-02-19 03:11:28.266328+0800 testunityios[45199:3842542] --- MyPlugin.viewDidAppear // 这个可以作为 unity view 加载完成的标记. 只会调用一次
2021-02-19 03:11:28.266369+0800 testunityios[45199:3842542] --- viewDidAppear.obj: <UnityDefaultViewController: 0x10645f3f0>
2021-02-19 03:11:28.266905+0800 testunityios[45199:3842542] --- rootVc: <UnityDefaultViewController: 0x10645f3f0>
2021-02-19 03:11:28.267018+0800 testunityios[45199:3842542] --- rootVc.view: <UnityView: 0x10645dc40; frame = (0 0; 375 812); autoresize = W+H; layer = <CAMetalLayer: 0x281690800>> // 这个 根节点的 view 就是 unity_view, 地址一样
2021-02-19 03:11:28.267078+0800 testunityios[45199:3842542] --- MyPlugin.viewWillLayoutSubviews
2021-02-19 03:11:28.267116+0800 testunityios[45199:3842542] --- MyPlugin.viewDidLayoutSubviews
构建 xcode 工程的后处理
使用PostProcessBuild设定Unity产生的Xcode Project - https://www.cnblogs.com/pandawuwyj/p/6904770.html
Unity导出已配置好的Xcode工程 - https://www.jianshu.com/p/51d6b8371e0f
unity3D导出xcode 工程并配置各种权限 - https://blog.csdn.net/chenfujun818/article/details/81711014
Unity iOS 插件开发与SDK接入 - https://www.yangzhenlin.com/unity-ios-plugin/
Embed framework to Xcode project - https://forum.unity.com/threads/embed-framework-to-xcode-project.389211/
1
2
3string framework = Path.Combine(defaultLocationInProj, coreFrameworkName);
string fileGuid = proj.AddFile(framework, "Frameworks/" + framework, PBXSourceTree.Sdk);
PBXProjectExtensions.AddFileToEmbedFrameworks(proj, targetGuid, fileGuid);
开源后处理插件 XUPorter
参数说明
- group:The group name in Xcode to which files and folders will added by this projmods file
- libs: Xcode Build Phases 里需要添加的 内置库, 如: libz.dylib. (如果想添加自己的 .a 库, 需要使用 files 添加)
- frameworks:Xcode Build Phases 里需要添加的 内置 framework, 如: Security.framework. (如果想添加自己的 .framework 库, 需要使用 files 添加)
- headerpaths:Header Search Paths in Build Setting of Xcode
- files:需要添加的文件. (路径为 .projmods 文件的相对路径)
- folders:Folders which should be added. All file and folders(recursively) will be added
- excludes:Regular expression pattern. Matched files will not be added.
- compiler_flags: Compiler flags which should be added, e.g. “-Wno-vexing-parse”
- linker_flags: Linker flags which should be added, e.g. “-ObjC”
- embed_binaries: 可选字段, 支持 XCode 6+
Embed Framework特性. 添加的 framework 必须已经在frameworks或files字段里.- 如果是使用的第三方库是 framework 形式, 则需要用到这个字段, 路径和 files 一样是相对路径. 可以将 framework 设置为 embed 状态. 不然 运行时 会报找不到 库错误.
- !!!!!!!!!!!! 貌似有 bug, 手动添加没问题, 用插件就有问题 !!!!!!!!!!!! 所以这个字段还是不要用了, 自己打个补丁吧 !!!!!!!!!!!!
- plist: edit the Info.plist file, only the urltype is supported currently. in url type settings,
nameandschemesare required, whileroleis optional and isEditorby default.
踩坑
运行时报错 找不到库
错误: dyld: Library not loaded ... Reason: image not found
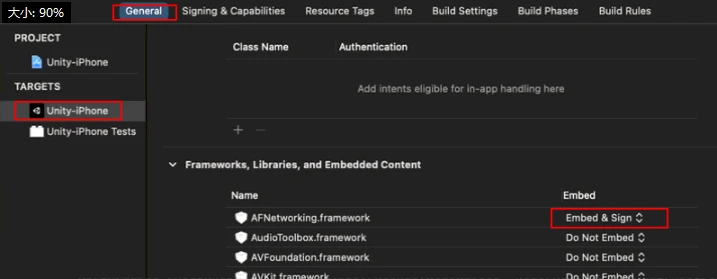
在 TARGETS -> General -> Frameworks, Libraries, and Embedded Content 中,点击,把第三方 framework embed 状态置为 embed & sign
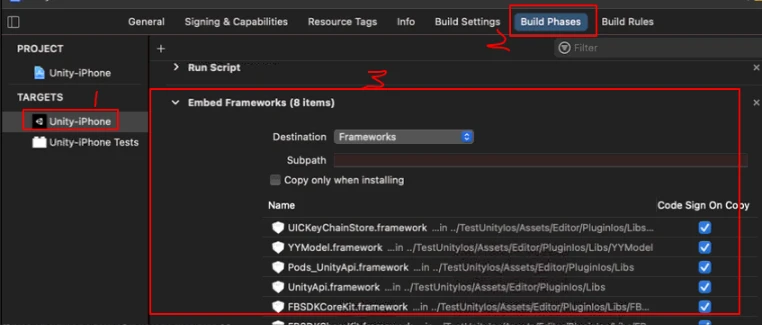
然后在 build phases 中就会显示出来 embed frameworks
在 Linked Frameworks and Libraries 中,把 framework 设为 Optional
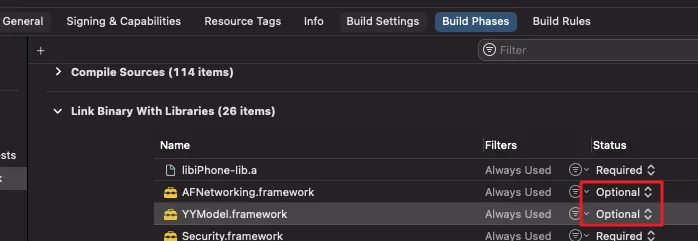
参考: https://www.jianshu.com/p/fe8486cb33f8
unity 2019.4+ 版本 xcode 工程变化
官网
Unity Xcode 项目的结构 - https://docs.unity3d.com/cn/2021.1/Manual/StructureOfXcodeProject.html
UnityFramework:UnityFramework 目标中的一个库部分。此部分包括 Classes、UnityFramework 和 Libraries 文件夹,以及相关的框架。另外,Xcode 将此部分用于构建 UnityFramework.framework 文件。
Unity-iPhone:Unity-iPhone 目标中的一个瘦启动器部分。此部分包括 MainApp 文件夹和应用程序表现数据(例如启动屏幕、.xib 文件、图标、数据和 /Info.plist 文件),并可运行该库。Unity-iPhone 目标对 UnityFramework 目标具有单一依赖关系。
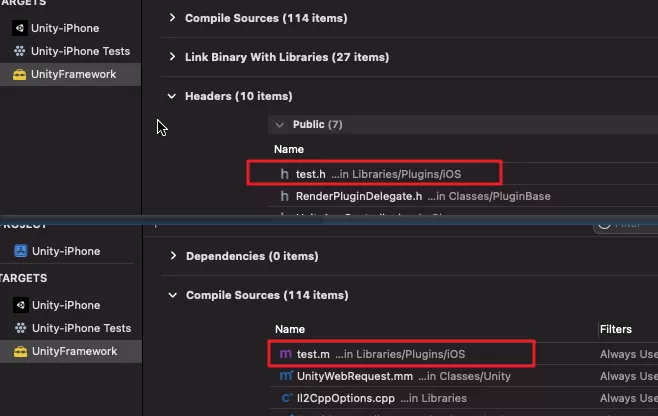
unity 2019.4+ 之后的版本, 平台层的结构发生了变化, 导出 unity 的先关的东西都是在一个 库模块 中, 而不是直接放在 app 模块中
所有相关 .h .m 文件都要放在库模块 UnityFramework 中
unity 与 ios 交互的中间文件不是 .mm 混编文件, 直接就是 oc 的 .m 文件
使用 以前的 .mm 文件, 会报错 unity 声明的 ios 方法找不到, 如:
csharp 声明的 native 函数
1
2
3
4
5
6
7
8
9
10
11
12
13public class PlatformIos : MonoBehaviour {
void Awake() {
SetupPlugin("aaa", "bbb");
}
// ------------------- ios native api
[]
private static extern void SetupPlugin(string jsonMsg, string funcKey);
}报错:
Undefined symbols for architecture arm64:1
2
3
4
5
6Undefined symbols for architecture arm64:
"_SetupPlugin", referenced from:
_PlatformIos_SetupPlugin_mE7352AA25432C5E321E05BDB60813D870BD7B43D in Assembly-CSharp.o
(maybe you meant: _PlatformIos_SetupPlugin_mE7352AA25432C5E321E05BDB60813D870BD7B43D)
ld: symbol(s) not found for architecture arm64
clang: error: linker command failed with exit code 1 (use -v to see invocation)
连接自定义 framework
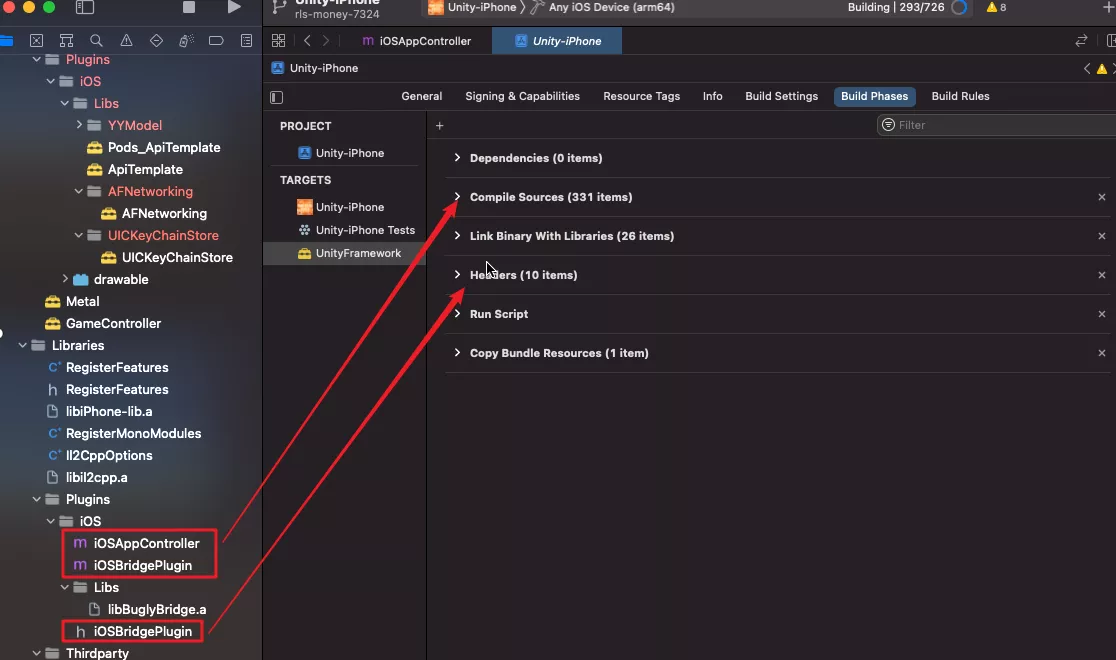
手动添加 native 桥接文件 到 UnityFramework 的 head 和 compile source 中
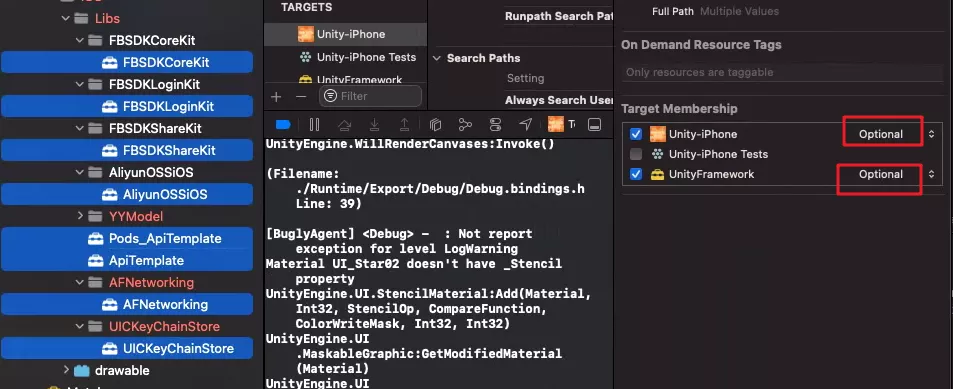
在 Unity-iPhone 模块中引入使用到的第三方库, (不是在 UnityFramework 中引入, 不然运行时报错:
unrecognized selector sent to, 找不到 三方库)方式一
- TARGETS -> General -> Frameworks, Libraries, and Embedded Content 中,点击,把第三方 framework embed 状态置为 embed & sign
在 Linked Frameworks and Libraries 中,把 framework 设为 Optional
方式二:
通过选中 库, 指定到对应的模块, 同时修改为 Optional

然后在 TARGETS -> General -> Frameworks, Libraries, and Embedded Content 中,点击,把第三方 framework embed 状态置为 embed & sign
unity 2019.4+ 手动实操记录
将用到的第三方库 (包括自己的 api 库) 加入到 主模块 和 UnityFramework 模块
主模块 和 UnityFramework 模块 编译设置 build settings -> other linker flags 都加入
-ObjC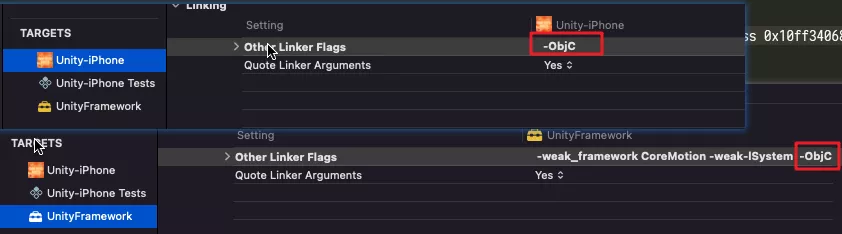
在主模块中
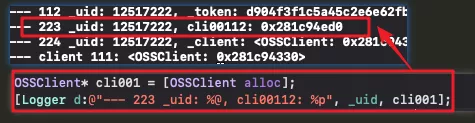
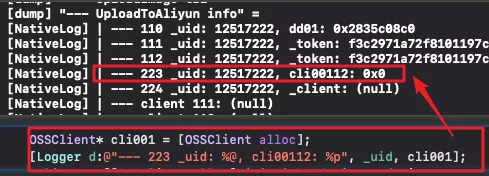
动态库 都设置为 embed & sign (不然会出现分配内存后还是空指针问题 [#alloc 分配内存后还是 空指针 0](alloc 分配内存后还是 空指针 0))

静态库* 都设置为 do not embed (自己的 api 库就是 静态库, 如果设置为 embed & sign 将会运行的时候报错:
The code signature version is no longer supported)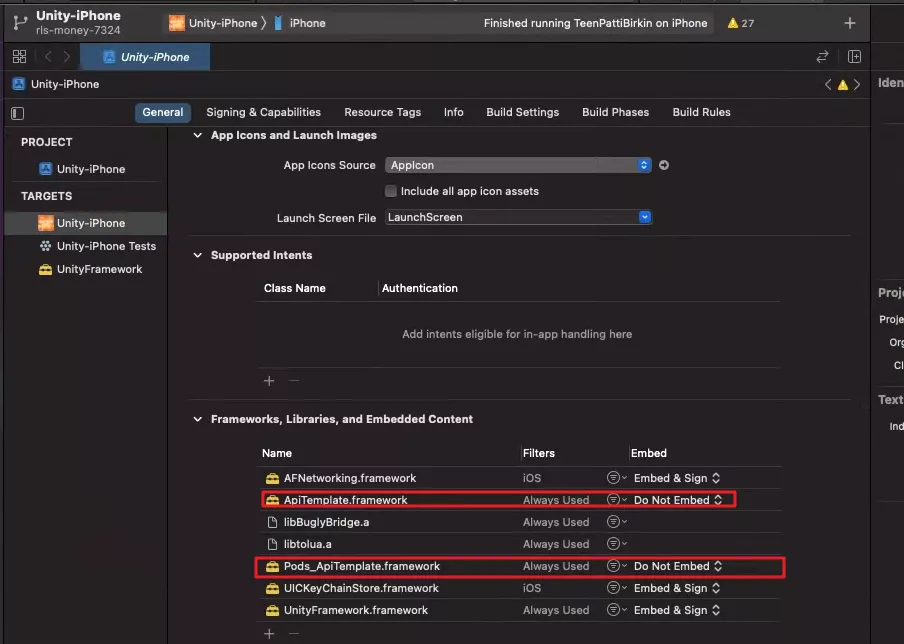
将接口适配的 头文件 和 定义文件 分别放入到 headers 和 compile sources 中 (定义文件不再是 .mm 后缀, 而是 .m 后缀)
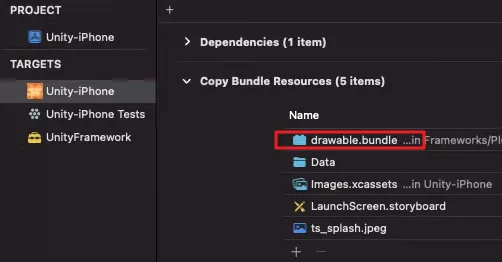
将使用到的 bundle 资源放入 主模块 的 copy bundle resources 中
ios 13.0 以下的需要在 UnityFramework 模块中的 link binary with libraries 引入以下几个 framework, 并设置为 optional
1
2
3
4"Foundation.framework",
"CoreFoundation.framework",
"AppTrackingTransparency.framework",
"AuthenticationServices.framework"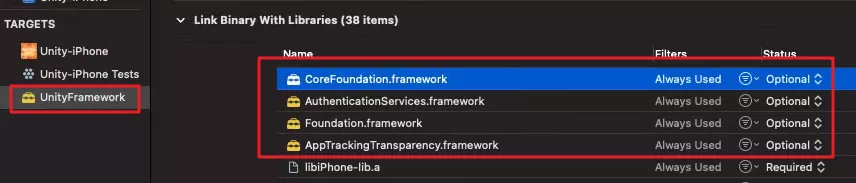
踩坑
alloc 分配内存后还是 空指针 0
出现这种问题一般是在引入 第三方 framework, 使用了里面的 class, 进行 alloc 分配内存时出现, 如:
解决办法: 引入的第三方 framework 要 embed & sign
分配第三方 framework 里面类的内存时, 指针地址就正常了