ubuntu-安装v2ray服务器
ubuntu-安装v2ray服务器
前篇
- V2Ray新脚本安装服务器 - http://loonlog.com/2020/10/5/v2ray-server-new/
- GitHub 下载各平台 - https://github.com/v2fly/v2ray-core/releases/
- V2Ray 配置指南 - https://toutyrater.github.io/basic/vmess.html
服务器搭建
安装方式有两种
运行以下脚本即可. 如果不行, 下载这个脚本手动执行.
1
$ curl -Ls https://raw.githubusercontent.com/v2fly/fhs-install-v2ray/master/install-release.sh | sudo bash
可执行程序会安装到这里:
/usr/local/bin/v2ray手动上传安装. 下载包 v2ray-linux-64.zip: https://github.com/v2fly/v2ray-core/releases/download/v4.33.0/v2ray-linux-64.zip
上传
1
$ scp -P 22 F:\z_installpack\vpn\v2ray\v2ray-linux-64.zip root@139.180.189.238:/root/
解压
1
$ unzip -d ./v2ray ./v2ray-linux-64.zip
新建配置文件
/etc/v2ray/config.json1
2
3
4
5
6
7
8
9
10
11
12
13
14
15
16
17
18
19
20
21
22
23
24
25
26
27
28
29
30
31
32{
"inbounds": [{
"port": 12345,
"protocol": "vmess",
"settings": {
"clients": [
{
"id": "08ef6234-dcc0-45d1-9954-f9490cb2beb2",
"level": 1,
"alterId": 64
}
]
}
}],
"outbounds": [{
"protocol": "freedom",
"settings": {}
},{
"protocol": "blackhole",
"settings": {},
"tag": "blocked"
}],
"routing": {
"rules": [
{
"type": "field",
"ip": ["geoip:private"],
"outboundTag": "blocked"
}
]
}
}启动服务
1
2
3
4
5
6
7// $ /usr/local/bin/v2ray -config /etc/v2ray/config.json >> out.file 2>&1 & // 启动为后台进程
$ /usr/local/bin/v2ray -config /etc/v2ray/config.json
V2Ray 4.32.0 (V2Fly, a community-driven edition of V2Ray.) Custom (go1.15.3 linux/amd64)
A unified platform for anti-censorship.
2020/11/06 15:02:00 [Info] v2ray.com/core/main/jsonem: Reading config: /etc/v2ray/config.json
2020/11/06 15:02:01 [Warning] v2ray.com/core: V2Ray 4.32.0 started查看端口情况, 然后客户端就可以链接了
1
2$ netstat -nalp | grep 12345
tcp6 0 0 :::12345 :::* LISTEN 13684/./v2ray查看进程
1
2
3$ ps -auxf | grep v2ray
root 2490 0.0 0.0 14736 1008 pts/0 S+ 06:46 0:00 | \_ grep --color=auto v2ray
root 2477 0.1 1.6 719280 16920 pts/0 Sl 06:45 0:00 ./v2ray -config config-inout-rules.json
客户端连接
pc 端配置
手机端可以知道扫 pc 端生成的 二维码 即可.
其他
windows 搭建服务
下载 windows 版的 v2ray - https://github.com/v2fly/v2ray-core/releases/download/v4.32.0/v2ray-windows-64.zip
解压, 修改 config.json 为类似 服务器搭建 中的配置
启动服务
1
$ .\v2ray.exe -config config.json
开放 windows 的 12345 端口. 即添加一个 入站规则. 参考: https://blog.csdn.net/qq_35318273/article/details/80091563
如果是 阿里云 之类云主机, 需要在其管理后台开放 12345 端口
done. 用客户端即可连上去.
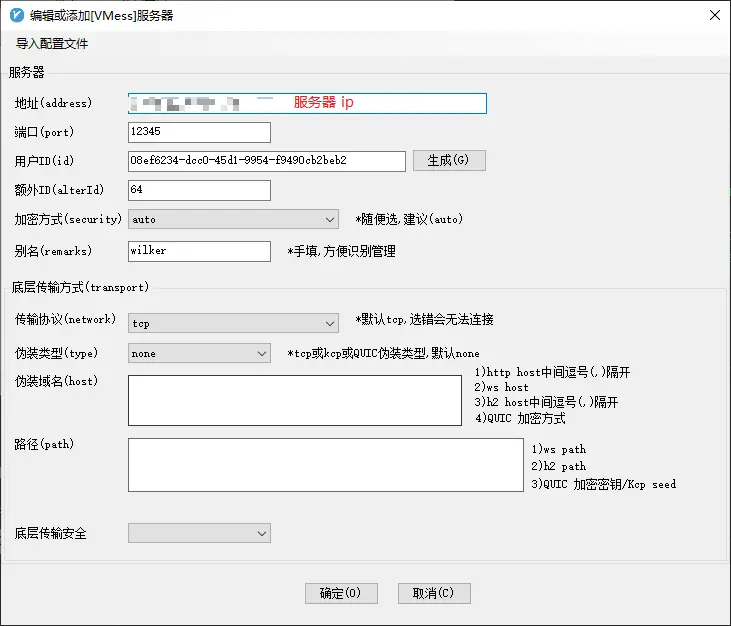
客户端配置
中转配置
也就是 既是 客户端, 也是服务器, 做一层跳板. 应用场景比如 a机子 在 大陆, 访问 印度的 b机子, 速度很慢, 就可以增加一个 香港的 c机子, c机子 作为跳板, a -> c-> b, 这样速度会加快.
config.json 配置如下
1
2
3
4
5
6
7
8
9
10
11
12
13
14
15
16
17
18
19
20
21
22
23
24
25
26
27
28
29
30
31
32
33
34
35
36
37
38
39
40
41
42
43
44
45
46
47{
"inbounds": [ // 入站规则, 也就是 服务器配置, 允许连进来的规则
{
"port": 12345,
"protocol": "vmess",
"settings": {
"clients": [
{
"id": "08ef6234-dcc0-45d1-9954-f9490cb2beb2",
"level": 1,
"alterId": 64
}
]
}
}
],
"outbounds": [ // 出站规则, 也就是 客户端配置, 访问网络时连到该配置的目标机子
{
"protocol": "vmess",
"settings": {
"vnext": [
{
"address": "147.139.29.166",
"port": 12345,
"users": [
{
"id": "08ef6234-dcc0-45d1-9954-f9490cb2beb2",
"alterId": 64
}
]
}
]
}
}
],
"routing": {
"rules": [
{
"type": "field",
"ip": [
"geoip:private"
],
"outboundTag": "blocked"
}
]
}
}
客户端路由规则
- 官网 - https://www.v2ray.com/chapter_02/03_routing.html
- v2rayN 路由规则 - https://www.v2fly.org/config/routing.html
v2rayN 客户端
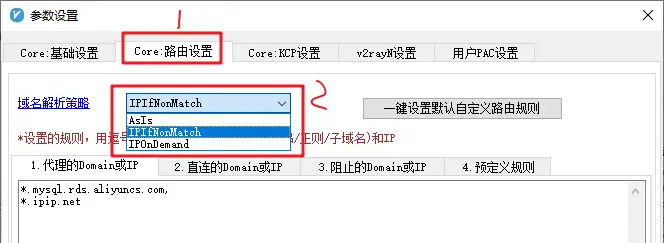
域名解析策略,根据不同的设置使用不同的策略。
"AsIs": 只使用域名进行路由选择。默认值。"IPIfNonMatch": 当域名没有匹配任何规则时,将域名解析成 IP(A 记录或 AAAA 记录)再次进行匹配;
- 当一个域名有多个 A 记录时,会尝试匹配所有的 A 记录,直到其中一个与某个规则匹配为止;
- 解析后的 IP 仅在路由选择时起作用,转发的数据包中依然使用原始域名;
"IPOnDemand": 当匹配时碰到任何基于 IP 的规则,将域名立即解析为 IP 进行匹配;
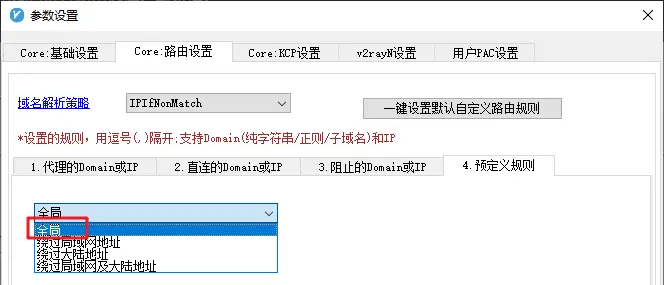
v2rayN 自定义规则
根据自己的需求, 设置哪些走代理, 哪些不走代理.
测试:
$ curl -s http://myip.ipip.net
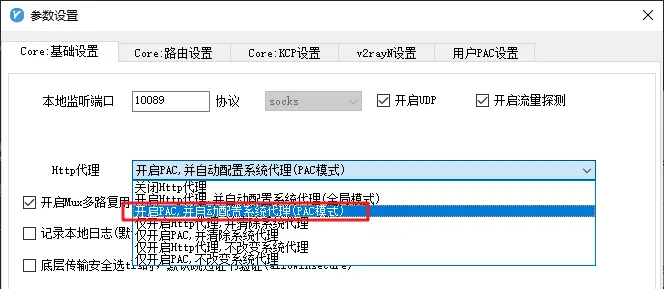
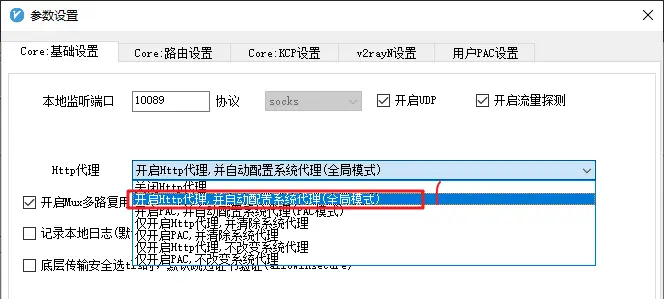
基础设置
路由设置
先一键设置, 然后添加:
domain:ipip.net,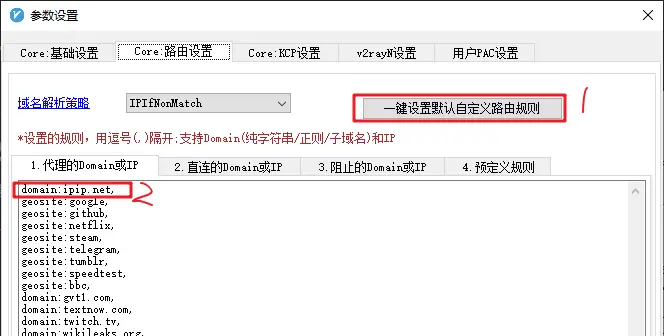
测试一下

可以看到 ipip.net 走了代理
v2rayN 全局模式
如果实在搞不太懂 v2rayN 客户单路由设置, 就走全局
基础设置
路由设置