others-Firebase推送CloudMessaging
海外 app 推送首选, 使用的是 firebase 中的 云消息 库.
2014 年 Google 收购 Firebase 后,将 GCM 改名为「 Firebase 云消息传递( Firebase Cloud Messaging,即 FCM ) 」,它继承了 GCM 的核心基础架构,并带有新的 SDK,简化了云消息传递的开发工作。
前篇
- 官方
- Google FCM 离线推送简明教程 - https://www.jianshu.com/p/d3c6ee3ae122
- Firebase推送教程
- Android系统级推送 - Firebase Cloud Messaging(FCM)快速傻瓜式接入 - https://juejin.im/post/5d130f7f518825327518c364
推送限制
- FCM 不保证传递顺序
- 接到 FCM XMPP 服务器的速率限制为每个项目每分钟 400 次连接
- 向单一设备
发送最多 240 条消息/分钟和 5000 条消息/小时 - 每个
项目的上行消息限制为 15000 条/分钟 - 将每台
设备的上行消息限制为 1000 条/分钟 - 主题订阅添加/移除率限制为每个项目 3000 QPS
- 数据消息里面的键值只支持字符串
前置物料
想要使用FCM,需要满足如下几个条件
- 设备必须是android4.0以上,Google Play Services 必须是 11.2.0以上版本
- Android SDK Manager 必须有 Google Play services SDK
- Android Studio必须是1.5以上版本
- 手机必须可以连得上 Google Play Services
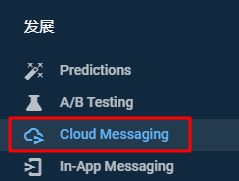
控制台创建应用
创建应用
进入 Cloud Messaging 页签 按步骤填写 应用信息
其实一项填写 appid
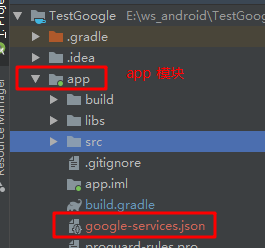
然后会得到一个 google-services.json 文件, [android sdk 接入](#android sdk 接入) 会用到
android sdk 接入
将 google-services.json 文件丢到 模块级 根目录
项目引入 firebase 配置
项目级 build.gradle 引入
1
2
3
4
5
6
7
8
9
10
11
12
13
14
buildscript {
repositories {
google() // 1
}
dependencies {
classpath 'com.google.gms:google-services:4.3.3' // 2
}
}
allprojects {
repositories {
google() // 3
}
}模块级 build.gradle 引入
1
2
3
4
5
apply plugin: 'com.google.gms.google-services' // 一定要要在 application/library 之下
dependencies {
implementation 'com.google.firebase:firebase-messaging:20.0.0'
}
通知服务集成
主 Activity onCreate 初始化时获取令牌 token, 这个 token 用于精准推送
这里告知你的服务器 token, userId, 关联起来就可以做到 用户精准推送
1
2
3
4
5
6
7
8
9
10
11
12
13
14
FirebaseInstanceId.getInstance().getInstanceId()
.addOnCompleteListener(new OnCompleteListener<InstanceIdResult>() {
@Override
public void onComplete(@NonNull Task<InstanceIdResult> task) {
if (!task.isSuccessful()) {
Log.w(TAG, "getInstanceId failed", task.getException());
return;
}
// Get new Instance ID token
String token = task.getResult().getToken();
Log.d(TAG, "--- getInstanceId:" + token);
}
});token 是会变化的. 令牌可能会在发生下列情况时更改:
- 应用删除实例 ID
- 应用在新设备上恢复
- 用户卸载/重新安装应用
- 用户清除应用数据。
新建一个 MessagingService 类, 继承自 FirebaseMessagingService. 当 APP 未被 kill 且在 前台 时,推送消息在这里进行处理
1
2
3
4
5
6
7
8
9
10
11
12
13
14
15
16
17
18
19
20
21
22
23
24
25
26
27
// 当APP未被kill时,推送消息在这里进行处理
public class MessagingService extends FirebaseMessagingService {
private final String TAG = "--- MessagingService";
public void onMessageReceived(RemoteMessage remoteMessage) {
Log.d(TAG, "--- From: " + remoteMessage.getFrom());
if (remoteMessage.getData().size() > 0) {
// 推送中所含的键值对都可以在这里进行获取
Log.d(TAG, "--- Message data payload: " + remoteMessage.getData());
}
if (remoteMessage.getNotification() != null) {
// 如果推送消息仅为通知消息,这里将获取通知消息的内容
Log.d(TAG, "--- Message Notification Body: " + remoteMessage.getNotification().getBody());
}
}
public void onNewToken(String s) {
super.onNewToken(s);
// 当Token发生改变时,通过这个函数获取最新的Token
Log.d(TAG, "--- new Token: " + s);
}
}AndroidManifest.xml 中加入 service 配置
1
2
3
4
5
6
7
8
9
10
11
12
13
14
15
16
17
18<application
...
<!-- Firebase 云消息 -->
<service
android:name="com.its.demo.testgoogle.firebase.MessagingService"
android:exported="false">
<intent-filter>
<action android:name="com.google.firebase.MESSAGING_EVENT" />
</intent-filter>
</service>
<meta-data
android:name="firebase_messaging_auto_init_enabled"
android:value="false" />
<meta-data
android:name="firebase_analytics_collection_enabled"
android:value="false" />
</application>
done. 构建测试.
unity android 接入
大体上流程和 [android sdk 接入](#android sdk 接入) 差不多, 不过有几个坑
这里的打包方式是 unity 中直接打出 apk, 并不是导出 as 工程然后再打出 apk.
自定的 gradle (mainTemplate.gradle) 不需要加入
1
apply plugin: 'com.google.gms.google-services'
如果加入之后, unity 打包会报错:
file google-services.json is missing这行代码的作用是在 as 工程中, 找到 google-services.json 然后自动生成 xml 参数, 也就是这种方式: [as 工程中生成 xml 参数](#as 工程中生成 xml 参数)
生成 xml 参数, 然后丢到 Assets\Plugins\Android\res\values\strings.xml 里面.
这样 firebase 才能 get 到参数, 避免 运行时初始化闪退. 参考: The Google Services Gradle Plugin 和 stackoverflow 底部回答
可以使用以下两种方式生成, [第三方生成 xml 参数](#第三方生成 xml 参数) 和 [as 工程中生成 xml 参数](#as 工程中生成 xml 参数)
第三方生成 xml 参数
这种方式简单, 建议
- 在这个网站 https://dandar3.github.io/android/google-services-json-to-xml.html 直接将 google-services.json 文件转成 xml 文件, 获取到 xml 参数.
as 工程中生成 xml 参数
下载的 google-services.json 丢到 as 工程中 (不需要丢到 unity 工程的 Assets\Plugins\Android 目录)
修改下文件里面的包名为 unity 的安卓工程的包名 (因为 unity 安卓工程 (库工程) 的包名不允许为 应用的包名, 包名这个由 unity 指定)
比如我这里随便起了个包名为 com.its.demo.asdasd
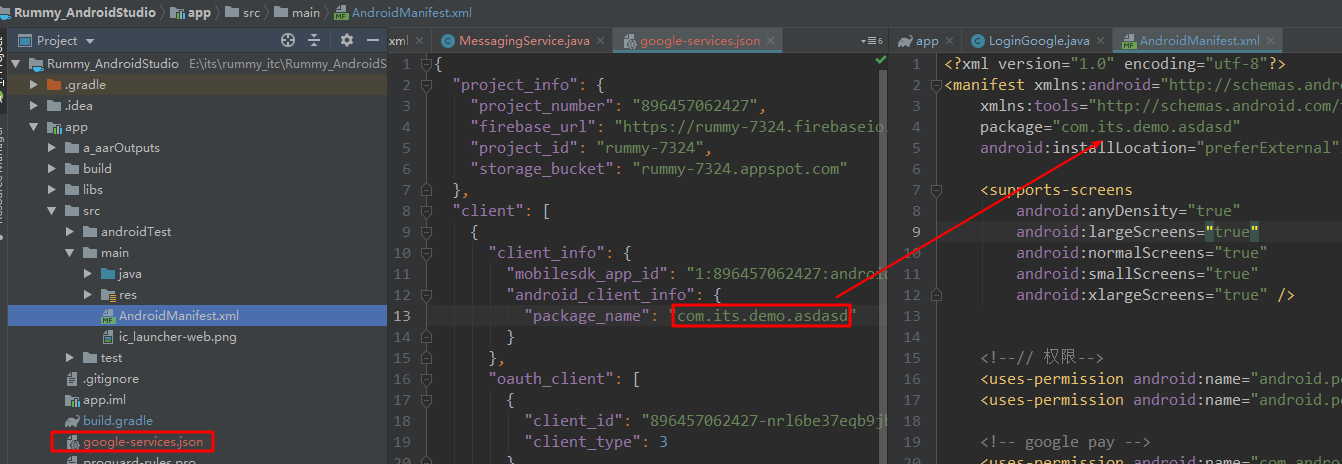
在 as 工程中的 unity 库模块的 build.gradle 文件文件中加入这个插件, 如:
1
2
apply plugin: 'com.android.library'
apply plugin: 'com.google.gms.google-services' // 加入插件build 一下, 会生成一个 xml 文件: \build\generated\res\google-services\debug\values\values.xml, 里面的所有参数就是所需的的 xml 参数
踩坑:
运行时初始化闪退
初始化 firebase 时 FirebaseInstanceId.getInstance().getInstanceId() 闪退, 报错: Default FirebaseApp is not initialized in this process com.rmgstation.rummymon. Make sure to call FirebaseApp.initializeApp(Context) first
原因是 firebase 没有 get 到自动生成的 xml 参数. 参考: [unity android 接入](unity android 接入) 第2步
构建时 报资源重复错误
报错: google_app_id, xml: Error: Duplicate resources
可能是之前接入 google 登录时在 res\values\strings.xml 使用了 google_app_id, firebase 自动生成的 xml 参数又包含了 google_app_id
解决办法是将 登录的那个 google_app_id 修改一下即可
ios sdk 接入
- 官方
- 使用Firebase Cloud Messaging将推送通知发送到您的iOS应用 - https://blog.csdn.net/cunjie3951/article/details/106905662
流程
Apple 开发者后台配置
创建证书时需要勾选 Push Notifications 服务.

获取到 team id, 如:
U3XXXXXXXX同时创建一个
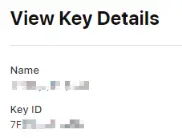
Apple Push Notifications service (APNs)的 key, 获取到 key id, 如:7FXXXXXXXX, 下载公钥 p8 文件, 如: AuthKey_7FXXXXXXXX.p8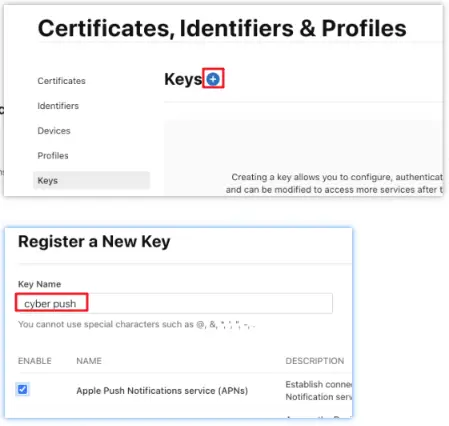
Firebase 后台下载 GoogleService-Info.plist (客户端使用) 和 adminsdk-xxx.json (服务器使用)
同时把 p8 文件上传上去
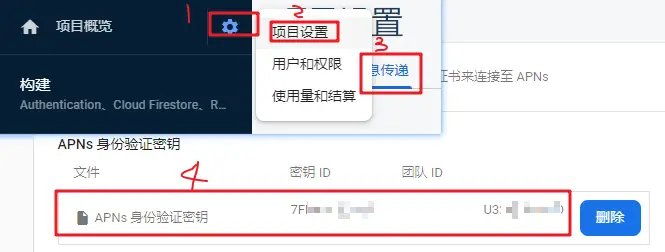
密钥 ID, 就是推送 key 里面的 Key ID
团队 ID, 就是 Team Id
pod 文件引入 云消息 库
1
pod 'Firebase/Messaging'
代码
1
2
3
4
5
6
7
8
9
10
11
12
13
14
15
16
17
18
19
20
21
22
23
24
25
26
27
28
29
30
31
32
33
34
35
36
37
38
39
40
41
42
43
44
45
46
47
48
49
50
51
52
53
54
55
56
57
58
59
60
61
62
63
64
65
66
67
68
69
70
71
72
73
74
75
76
77
78
79
80
81
82
83
84
85
86
87
88
89
90
91
92
@interface FirebaseHelper()<FIRMessagingDelegate, UNUserNotificationCenterDelegate>
@end
@implementation FirebaseHelper
static FirebaseHelper *_sharedIns = nil;
+(instancetype) shareInstance {
static dispatch_once_t onceToken;
dispatch_once(&onceToken, ^{
_sharedIns = [[self alloc] init] ;
}) ;
return _sharedIns ;
}
+(BOOL)application:(UIApplication*)application didFinishLaunchingWithOptions:(NSDictionary*)launchOptions {
[FIRApp configure];
FirebaseHelper* ins = FirebaseHelper.shareInstance;
// 云消息 token
[FIRMessaging messaging].delegate = ins;
// // delegate 可以收到回调, 这里就不需要了
// [[FIRMessaging messaging] tokenWithCompletion:^(NSString *token, NSError *error) {
// if (error != nil) {
// [Logger d:@"--- Error getting FCM registration token: %@", error];
// } else {
// [Logger d:@"--- FCM registration token: %@", token];
// if (token && token.length > 0) {
// [FileTool writeStr:FileFirebase str:token]; // 写到本地
// }
// }
// }];
// 接受通知通知中心
if (@available(iOS 10.0, *)) {
[UNUserNotificationCenter currentNotificationCenter].delegate = ins;
UNAuthorizationOptions authOptions = UNAuthorizationOptionAlert |
UNAuthorizationOptionSound | UNAuthorizationOptionBadge;
[[UNUserNotificationCenter currentNotificationCenter]
requestAuthorizationWithOptions:authOptions
completionHandler:^(BOOL granted, NSError * _Nullable error) {
[Logger d:@"--- firebase completionHandler, granted: %d", granted];
}];
} else {
UIUserNotificationType allNotificationTypes =
(UIUserNotificationTypeSound | UIUserNotificationTypeAlert | UIUserNotificationTypeBadge);
UIUserNotificationSettings *settings =
[UIUserNotificationSettings settingsForTypes:allNotificationTypes categories:nil];
[application registerUserNotificationSettings:settings];
}
[application registerForRemoteNotifications];
return YES;
}
// ------------------------------- 实现 FIRMessagingDelegate 的接口
- (void)messaging:(FIRMessaging *)messaging didReceiveRegistrationToken:(NSString *)fcmToken {
[Logger d:@"--- FCM registration token: %@", fcmToken];
}
// ------------------------------- 实现 UNUserNotificationCenterDelegate 的接口
// app 处在前台收到推送消息执行的方法
- (void)userNotificationCenter:(UNUserNotificationCenter *)center willPresentNotification:(UNNotification *)notification withCompletionHandler:(void (^)(UNNotificationPresentationOptions options))completionHandler __API_AVAILABLE(macos(10.14), ios(10.0), watchos(3.0), tvos(10.0)) {
completionHandler(UNNotificationPresentationOptionNone);
[NotificationHelper clearBadge:^(ECode code, NSString * _Nullable msg) {}];
NSDictionary *userInfo = notification.request.content.userInfo;
[UnityPlugin callUnityPerFunc:NativePerFuncFirebasePush jsonMsg:[userInfo yy_modelToJSONString]];
}
// ios 10 以后系统,app 处在后台 或或者 进程被杀,点击通知栏 app 执行的方法
- (void)userNotificationCenter:(UNUserNotificationCenter *)center didReceiveNotificationResponse:(UNNotificationResponse *)response withCompletionHandler:(void(^)(void))completionHandler __API_AVAILABLE(macos(10.14), ios(10.0), watchos(3.0)) __API_UNAVAILABLE(tvos) {
completionHandler();
[NotificationHelper clearBadge:^(ECode code, NSString * _Nullable msg) {}];
// NSDictionary *userInfo = response.notification.request.content.userInfo;
// [Logger d:@"--- didReceiveNotificationResponse, userInfo: %@", userInfo]
}
- (void)userNotificationCenter:(UNUserNotificationCenter *)center openSettingsForNotification:(nullable UNNotification *)notification __API_AVAILABLE(macos(10.14), ios(12.0)) __API_UNAVAILABLE(watchos, tvos) {
// [Logger d:@"--- openSettingsForNotification"];
}
@end工程推送配置
将 GoogleService-Info.plist 丢到工程根目录 (没有文件初始化会闪退)
(这一步貌似不需要, 会在下一步中的 ) Info.plist 加入 aps 配置 (没有会报错:
未找到应用程序的“aps-environment”的授权字符串, 参考: https://blog.csdn.net/zhonggaorong/article/details/102707758)1
2<key>aps-environment</key>
<string>development</string>- aps-environment:development 这个键值对明显是针对开发环境的。如果到线上环境的时候还用更改为 aps-environment:production, 目前测试的是不用更改,在打 release 包的时候,这个字段会被自动更改
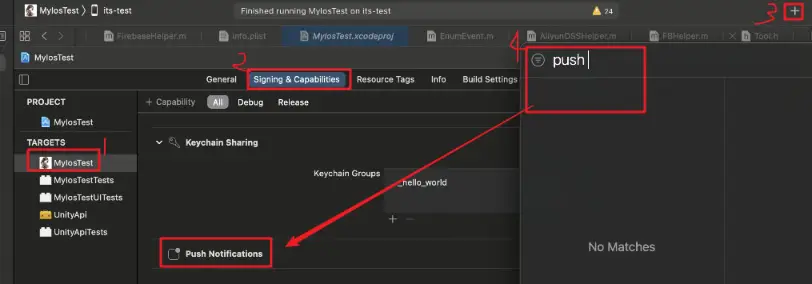
在 signing & capabilities 中加入 Push Notifications. (会在 .entitlements 文件中加入 aps-environment 配置 )
done. 测试
推送接收说明
分两种情况
当 app 进程存在, 且处于 前台 时, 推送不会在手机顶部出现通知, 会通知到
onMessageReceived中接受处理.so, 可以实现 玩家 在线推送
当 app 进程不存在, 或者 app 进程存在时处于 后台, 推送都将会在手机顶部出现通知, 不会通知到
onMessageReceived.
通知图标问题
官方文档: Android notifications - https://documentation.onesignal.com/docs/customize-notification-icons#section-about-notification-icons
goland 推送 api : https://godoc.org/google.golang.org/api/fcm/v1#AndroidNotification
Android推送通知:图标未显示在通知中,而是显示白色正方形 - https://www.codenong.com/30795431/
android 5.0以上通知栏、状态栏图标变成白色 - https://blog.csdn.net/gjy211/article/details/52189692
创建展开式通知 - https://developer.android.com/training/notify-user/expanded

细读开发者文档其实也可以发现一些线索,虽然笔者是直接查的源码发现的问题原因。http://developer.android.com/design/patterns/notifications.html 一文的Use distinct icons部分介绍了几点关于通知的建议,其中的有两点是建议开发者不要做的行为。
1 | Don't |
简单的说就是5.0后Android官方建议不要为通知的图标添加任何额外的透明度,渐变色,不要企图用颜色将通知图标与其他应用,比如系统应用,应用的通知图标只能是在透明的背景上有白色的图案。
至于原因,文档并没有细说,只是提到5.0系统将会在底层处理图标,想知怎么处理的可以参考Android SDK API level 21后的Notificaiton源码,里面写的较详细。
如果不遵循建议那么有很大几率是会出上文提到问题的,为什么不是别然出问题呢?
这还依赖于代码编译的版本,根据尝试,目前api 21以后编译会出问题,20及以前的版本编译不会出问题。所以解决问题比较简单粗暴的方案是用20及更早的版本编译代码。但是要测底解决问题,还是得遵循文档指导,及从新设计通知的图标以符合要求。
使用 fcm 推送只能为 BigPictureStyle
Referring to this link, you still cannot send Push notification via Firebase in big notification style. It’ll always be in s simple single notification style, unless Firebase Library adds this feature and starts supporting it. 参考: https://stackoverflow.com/questions/41030770/how-to-add-big-text-or-inbox-style-notification-for-this-firebase-android-pr
firebase 中的 issue
- Custom Notifications when app is in background or killed - https://github.com/firebase/quickstart-android/issues/4
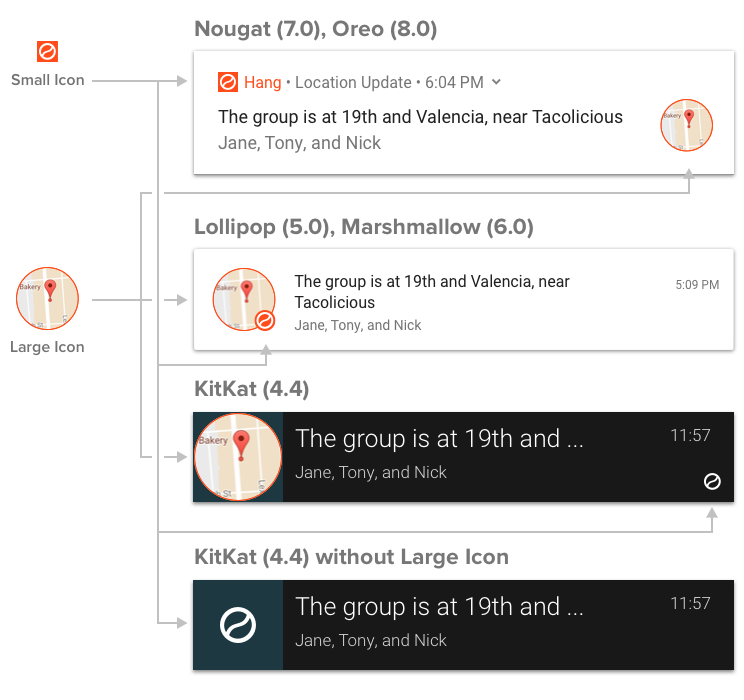
通知 icon 使用
small icon.
不可动态变化. 展示在手机顶栏. 通知下拉栏无 large icon 时也展示 small icon
- 制作
- 分辨率: 192x192, png 格式
- 内容: 表现内容为 纯白色 (255,255,255,255) , 其他地方 镂空(x,x,x,0)
- 然后丢到
res\drawable目录下, 假如命名为: ic_notification.png - AndroidManifest.xml 文件中加入 图片指定
1
2<meta-data android:name="com.google.firebase.messaging.default_notification_icon"
android:resource="@drawable/ic_notification" />
- 制作
small icon 背景色.
在官网中叫 Small Icon Accent Color
由服务端推送时指定 color 颜色.
1
2
3
4
5
6
7message := &messaging.Message{
Android: &messaging.AndroidConfig{
Notification: &messaging.AndroidNotification{
Color: "#c9a63e",
},
},
}large icon.
由服务端推送时指定 https 图片链接.
1
2
3notification := &messaging.Notification{
ImageURL: "https://img-blog.csdnimg.cn/20200216122912287.png", // 必须是 https
}- Minimum - 512x256
- Balanced - 1024x512
- Maximum - 2048x1024
实测 Android 5.1.1
系统: Android 5.1.1 (逍遥模拟器)
包内默认图标:

展示情况:
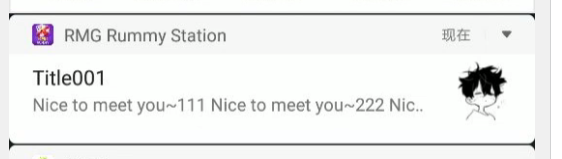
服务器 sdk 推送 未加入
ImageURL链接的情况下, 下拉栏使用默认图标效果:
服务器 sdk 推送 加入
ImageURL链接的情况下, 下拉栏展示的是 链接图片与默认图标 的组合
效果:
通知信息下拉效果:
实测 Android 4.4.2
系统: Android 4.4.2 (夜神模拟器)
效果
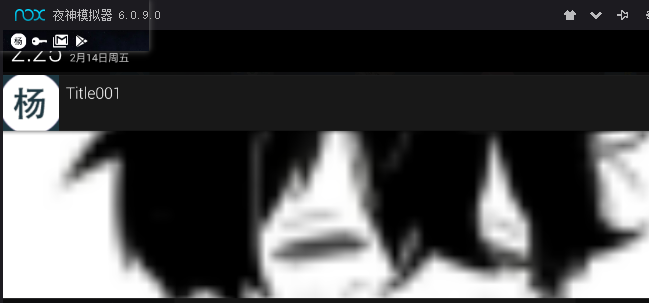
可以开到 gmail 应用也是一样的情况, 也是纯色
如果服务器 sdk 推送 加入
ImageURL链接的情况下, 将强制展开, 不显示 文字内容. 没有链接则显示 文字内容.
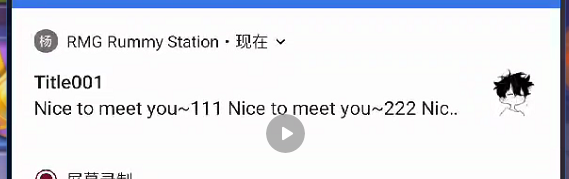
实测 Android 8.1.0
系统: Android 8.1.0 (mi 8 lite)
效果
实测 Android 9
系统: Android 9 (oppo)
效果
系统: Android 9 (redmi note 8)
效果

推送测试
一般都是用 [api 测试](#api 测试), 程序上控制推送.
注册令牌 就是 初始化时获取的令牌 token, 这个 token 必须启动应用后才能获取到
控制台测试
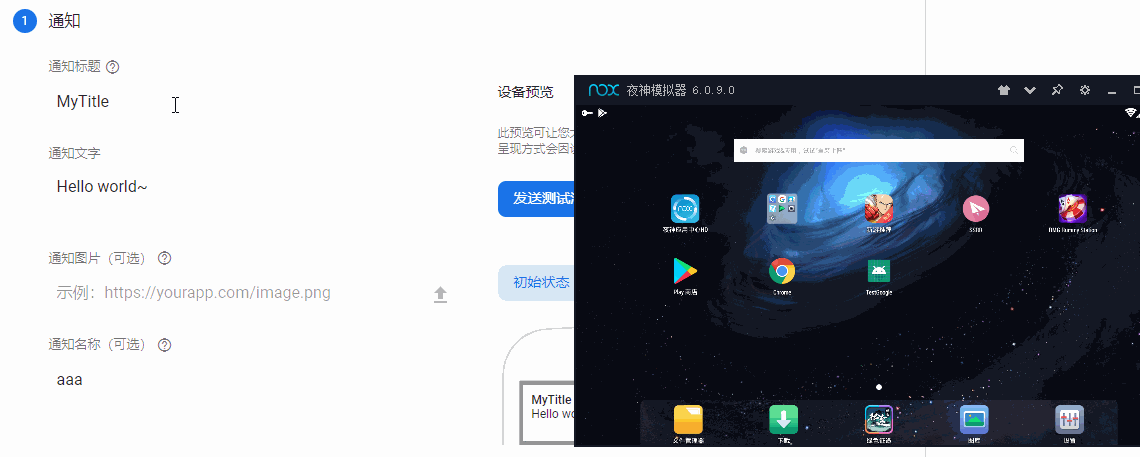
api 测试
代码参考: 服务器
在客户端卸载后, 订阅成功数量就会减少.
服务端
- 在服务器上管理主题订阅 - https://firebase.google.com/docs/cloud-messaging/android/topic-messaging?hl=zh-cn#manage_topic_subscriptions_on_the_server
- 从服务器管理主题 - https://firebase.google.com/docs/cloud-messaging/manage-topics?hl=zh-cn
- 选择服务器选项 - https://firebase.google.com/docs/cloud-messaging/server
- 将 Firebase Admin SDK 添加到您的服务器 - https://firebase.google.com/docs/admin/setup#add-sdk
- Firebase 云消息传递 HTTP 协议 (推送字段说明) - https://firebase.google.com/docs/cloud-messaging/http-server-ref
去控制台生成 秘钥文件 (如: temp_test001.json) - https://console.firebase.google.com/project/_/settings/serviceaccounts/adminsdk
go 示例 单元测试.
ImageURL链接必须是 https, 否则无法显示.1
2
3
4
5
6
7
8
9
10
11
12
13
14
15
16
17
18
19
20
21
22
23
24
25
26
27
28
29
30
31
32
33
34
35
36
37
38
39
40
41
42
43
44
45
46
47
48
49
50
51
52
53
54
55
56
57
58
59
60
61
62
63
64
65
66
67
68
69
70
71
72
73
74
75
76
77
78
79
80
81
82
83
84
85
86
87
88
89
90
91
92
93
94
95
96
97
98
99
100
101
102
103
104
105
106
107
108
109
110
111
112
113
114
115
116
117
118
119
120
121
122
123
124
125
126
127
128
129
130
131
132
133
134
135
136
137
138
139
140
141
142
143
144package test_firebase
import (
"context"
"fmt"
"log"
"testing"
firebase "firebase.google.com/go"
"firebase.google.com/go/messaging"
"google.golang.org/api/option"
)
func Test_firebase01(t *testing.T) {
opt := option.WithCredentialsFile("./temp_test001.json")
app, err := firebase.NewApp(context.Background(), nil, opt)
if err != nil {
log.Fatalf("error initializing app: %v\n", err)
}
// Obtain a messaging.Client from the App.
ctx := context.Background()
client, err := app.Messaging(ctx)
if err != nil {
log.Fatalf("error getting Messaging client: %v\n", err)
}
randTopic := "25696773511053390"
// This registration token comes from the client FCM SDKs.
cliRegToken := "cknfyZ8rBbM:APA91bE085dJjz1kaHQOj1lySbSH0lPrziJ9V6dPWX8lZpE2EfU73lTphN2bLjx1D52sbRfZTYSfnVKLr_ZOOPHjYI4vAlzxG9zY3cpm_MrAxAt0iWaR9zSlUJQhjxsgdYzgElpCVAqt"
// These registration tokens come from the client FCM SDKs.
cliRegTokenArr := []string{
cliRegToken,
// ...
}
subscribe(ctx, client, randTopic, cliRegTokenArr)
sendMsgToTopic(ctx, client, randTopic)
unsubscribe(ctx, client, randTopic, cliRegTokenArr) // 发送完就取消订阅
// createCustomToken(ctx, app)
//sendMsgToToken(ctx, client, cliRegToken)
}
func subscribe(ctx context.Context, client *messaging.Client, topic string, registrationTokens []string) {
// Subscribe the devices corresponding to the registration tokens to the topic.
response, err := client.SubscribeToTopic(ctx, registrationTokens, topic)
if err != nil {
log.Fatalln(err)
}
// See the TopicManagementResponse reference documentation for the contents of response.
fmt.Println(response.SuccessCount, "tokens were subscribed successfully")
}
func unsubscribe(ctx context.Context, client *messaging.Client, topic string, registrationTokens []string) {
response, err := client.UnsubscribeFromTopic(ctx, registrationTokens, topic)
if err != nil {
log.Fatalln(err)
}
fmt.Println(response.SuccessCount, "tokens were unsubscribed successfully")
}
// 对多个 token 发送, 设备必须先订阅某个主题
func sendMsgToTopic(ctx context.Context, client *messaging.Client, topic string) {
notification := &messaging.Notification{
Title: "Title001",
Body: "Nice to meet you~",
ImageURL: "https://www.baidu.com/img/PC-pad_6d2362fef025ffd42a538cfab26ec26c.png?123",
}
// See documentation on defining a message payload.
message := &messaging.Message{
//Data: map[string]string{
// "score": "88888",
// "time": "2:45",
//},
Notification: notification,
Topic: topic,
}
// Send a message to the devices subscribed to the provided topic.
response, err := client.Send(ctx, message)
if err != nil {
log.Fatalln(err)
}
// Response is a message ID string.
fmt.Println("Successfully sent message:", response)
}
// 对单个 token 发送
func sendMsgToToken(ctx context.Context, client *messaging.Client, registrationToken string) {
// See documentation on defining a message payload.
notification := &messaging.Notification{
Title: "Title002",
Body: "Nice to meet you~",
ImageURL: "https://www.baidu.com/img/PC-pad_6d2362fef025ffd42a538cfab26ec26c.png?123",
}
// timestampMillis := int64(12345)
message := &messaging.Message{
// Data: map[string]string{
// "score": "850",
// "time": "2:45",
// },
Notification: notification,
//Webpush: &messaging.WebpushConfig{
// Notification: &messaging.WebpushNotification{
// Title: "title",
// Body: "body",
// // Icon: "icon",
// },
// FcmOptions: &messaging.WebpushFcmOptions{
// Link: "https://fcm.googleapis.com/",
// },
//},
Token: registrationToken,
}
// Send a message to the device corresponding to the provided
// registration token.
response, err := client.Send(ctx, message)
if err != nil {
log.Fatalln(err)
}
// Response is a message ID string.
fmt.Println("Successfully sent message:", response)
}
func createCustomToken(ctx context.Context, app *firebase.App) {
authClient, err := app.Auth(context.Background())
if err != nil {
log.Fatalf("error getting Auth client: %v\n", err)
}
token, err := authClient.CustomToken(ctx, "25696773511053390")
if err != nil {
log.Fatalf("error minting custom token: %v\n", err)
}
log.Printf("Got custom token: %v\n", token)
}
推送限制:
-
主题消息传递不限制每个主题的订阅数。但是,FCM 在以下方面有强制性限制:
- 一个应用实例不可订阅超过 2000 个主题。
- 如果您正在使用批量导入来订阅应用实例,则每次请求仅限订阅 1000 个应用实例。
- 每个项目新增订阅的频率受限。如果您在短时间内发送过多订阅请求,FCM 服务器将给出
429 RESOURCE_EXHAUSTED(“已超出配额”)响应。使用指数退避重试。
一个设备订阅不能超过 2000 个主题.
解决办法: 发送完取消订阅即可.
每次订阅仅限 1000 个设备. 要发送 5000 个怎么办?
分五组订阅发送, 一个订阅就 1000 个设备.
参考: https://xbuba.com/questions/37961625/firebase-fcm-usage-limits