unity-shader-CommandBuffer应用之毛玻璃效果
主要记录实现的思路.
可以参考仓库: https://github.com/andydbc/unity-frosted-glass
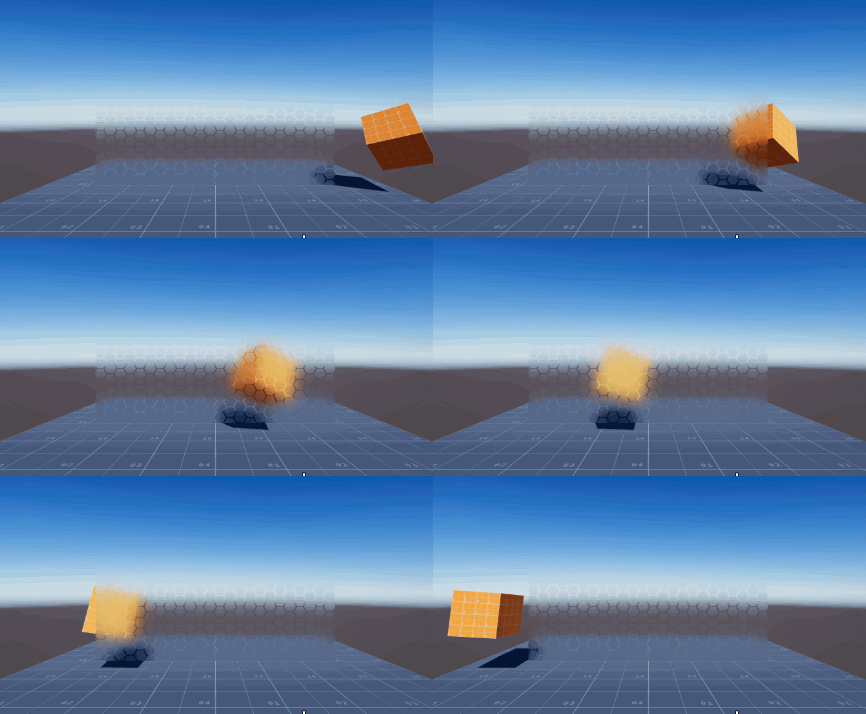
效果图

思路
利用 CommandBuffer 可以在 摄像机渲染 的几个节点中插入, 并执行一些操作.
这里的实现就是把 CommandBuffer 指定在渲染 Transparent 队列前, 也就是此时已经渲染了 天空盒, 不透明物体 (opaque) 等渲染
*render queue* < Transparent (3000)的物体, 把此时摄像机的颜色缓冲区 复制到 申请的一块 render texture 中.然后把这个原始的rt 的设置到 shader 全局纹理属性 中 (
CommandBuffer.SetGlobalTexture)把 render texture 用模糊的算法处理 , 比如: 高斯模糊. 此时这块 rt 是全屏的模糊, 但我们只需要局部区域要这个模糊效果.
然后把这个模糊的rt 的设置到 shader 全局纹理属性 中 (
CommandBuffer.SetGlobalTexture)在想要模糊的地方 丢一个 box或平面 模型, 然后渲染时, 指定渲染队里为 Transparent+ (只要在 CommandBuffer 之后就行). 获取 模型顶点 在屏幕空间的位置值 (也就是 [0, 1] 区间内), 用这个值去采样 原始的rt 和 模糊后的rt, 在用一个遮罩图 去插值指定哪些地方是需要镂空的.
延伸
除了 CommandBuffer 可以在指定的渲染节点内获取摄像机的颜色缓冲区, 也可以用在渲染某个物体前用 GrabPass 的形式抓取摄像机当前的颜色缓冲区到一个 rt 上, 然后再用屏幕空间的位置去采样这个 rt. 可以参考: Unity Shader-热空气扭曲效果
从显存抓数据到内存都是比较耗性能的操作.
源码分析
参考仓库: https://github.com/andydbc/unity-frosted-glass
CommandBufferBlur.cs, 这个脚本一定要挂在含有 camera 组件的 go 上, 因为要在摄像机渲染场景前回调 OnPreRender 函数.
1
2
3
4
5
6
7
8
9
10
11
12
13
14
15
16
17
18
19
20
21
22
23
24
25
26
27
28
29
30
31
32
33
34
35
36
37
38
39
40
41
42
43
44
45
46
47
48
49
50
51
52
53
54
55
56
57
58
59
60
61
62
63
64
65
66
67
68
69
void Initialize() {
if (Initialized)
return;
if (!_Shader) {
_Shader = Shader.Find("Hidden/SeparableGlassBlur"); // 模糊的 shader
if (!_Shader)
throw new MissingReferenceException("Unable to find required shader \"Hidden/SeparableGlassBlur\"");
}
if (!_Material) {
_Material = new Material(_Shader);
_Material.hideFlags = HideFlags.HideAndDontSave;
}
_Camera = GetComponent<Camera>();
if (_Camera.allowHDR && SystemInfo.SupportsRenderTextureFormat(RenderTextureFormat.DefaultHDR))
_TextureFormat = RenderTextureFormat.DefaultHDR;
_CommandBuffer = new CommandBuffer();
_CommandBuffer.name = "Blur screen";
int numIterations = 4;
Vector2[] sizes = {
new Vector2(Screen.width, Screen.height),
new Vector2(Screen.width / 2, Screen.height / 2), // 降低 分辨率, 可以提高性能, 和提高模糊效果, 我的习惯是用 >> 1 位移
new Vector2(Screen.width / 4, Screen.height / 4),
new Vector2(Screen.width / 8, Screen.height / 8),
};
for (int i = 0; i < numIterations; ++i) {
int screenCopyID = Shader.PropertyToID("_ScreenCopyTexture");
// Width in pixels, or -1 for "camera pixel width".
_CommandBuffer.GetTemporaryRT(screenCopyID, -1, -1, 0, FilterMode.Bilinear, _TextureFormat); // 申请 摄像机分辨率大小 的 rt
_CommandBuffer.Blit(BuiltinRenderTextureType.CurrentActive, screenCopyID); // 将摄像机当前的 rt 复制给 screenCopyID
int blurredID = Shader.PropertyToID("_Grab" + i + "_Temp1");
int blurredID2 = Shader.PropertyToID("_Grab" + i + "_Temp2");
_CommandBuffer.GetTemporaryRT(blurredID, (int) sizes[i].x, (int) sizes[i].y, 0, FilterMode.Bilinear, _TextureFormat); // 申请临时的 rt1 rt2, 用来做模糊效果
_CommandBuffer.GetTemporaryRT(blurredID2, (int) sizes[i].x, (int) sizes[i].y, 0, FilterMode.Bilinear, _TextureFormat); //
_CommandBuffer.Blit(screenCopyID, blurredID);
_CommandBuffer.ReleaseTemporaryRT(screenCopyID); // 释放 screenCopyID 的 rt
_CommandBuffer.SetGlobalVector("offsets", new Vector4(2.0f / sizes[i].x, 0, 0, 0)); // 横向模糊
_CommandBuffer.Blit(blurredID, blurredID2, _Material);
_CommandBuffer.SetGlobalVector("offsets", new Vector4(0, 2.0f / sizes[i].y, 0, 0)); // 纵向模糊
_CommandBuffer.Blit(blurredID2, blurredID, _Material);
_CommandBuffer.SetGlobalTexture("_GrabBlurTexture_" + i, blurredID); // 模糊效果完成后, 将其设置到 全局 纹理 _GrabBlurTexture_1234, 其他的 FrostedGlass.shader 中可以直接访问
}
_Camera.AddCommandBuffer(CameraEvent.BeforeForwardAlpha, _CommandBuffer); // 在渲染 Transparent 队列之前执行, 确保渲染 FrostedGlass (Transparent) 的时候可以使用 _GrabBlurTexture_1234.
_ScreenResolution = new Vector2(Screen.width, Screen.height);
}
// OnPreRender is called before a camera starts rendering the Scene.
// This function is called only if the script is attached to the camera and is enabled.
void OnPreRender() {
Debug.LogFormat("--- OnPreRender");
if (_ScreenResolution != new Vector2(Screen.width, Screen.height))
Cleanup();
Initialize();
}FrostedGlass.shader
1
2
3
4
5
6
7
8
9
10
11
12
13
14
15
16
17
18
19
20
21
22
23
24
25
26
27
28
29
30
31
32
33
34
sampler2D _GrabBlurTexture_0;
sampler2D _GrabBlurTexture_1;
sampler2D _GrabBlurTexture_2;
sampler2D _GrabBlurTexture_3;
v2f vert (appdata v) {
v2f o;
o.vertex = UnityObjectToClipPos(v.vertex);
o.uvfrost = TRANSFORM_TEX(v.uv, _FrostTex);
o.uvgrab = ComputeGrabScreenPos(o.vertex); // 这个就是获取模型 顶点位置 在屏幕空间的值, 在 [0, 1] 区间, 屏幕空间位置
return o;
}
fixed4 frag (v2f i) : SV_Target {
float surfSmooth = 1-tex2D(_FrostTex, i.uvfrost) * _FrostIntensity; // 模型顶点的 uv 采样 遮罩图
surfSmooth = clamp(0, 1, surfSmooth);
half4 refraction;
half4 ref00 = tex2Dproj(_GrabBlurTexture_0, i.uvgrab); // 用 屏幕空间位置 采样 模糊效果 的纹理
half4 ref01 = tex2Dproj(_GrabBlurTexture_1, i.uvgrab);
half4 ref02 = tex2Dproj(_GrabBlurTexture_2, i.uvgrab);
half4 ref03 = tex2Dproj(_GrabBlurTexture_3, i.uvgrab);
float step00 = smoothstep(0.75, 1.00, surfSmooth);
float step01 = smoothstep(0.5, 0.75, surfSmooth);
float step02 = smoothstep(0.05, 0.5, surfSmooth);
float step03 = smoothstep(0.00, 0.05, surfSmooth);
refraction = lerp(ref03, lerp( lerp( lerp(ref03, ref02, step02), ref01, step01), ref00, step00), step03); // 插值 模糊效果
return refraction;
}