unity-shader-深度图及其应用
unity-shader-深度图及其应用
前篇
- Unity Shader - 深度图基础及应用 (比较详细的记录了深度图) - https://www.jianshu.com/p/80a932d1f11e
- 深度值精度 - https://learnopengl-cn.readthedocs.io/zh/latest/04%20Advanced%20OpenGL/01%20Depth%20testing/#_3
- 深度冲突 - https://learnopengl-cn.readthedocs.io/zh/latest/04%20Advanced%20OpenGL/01%20Depth%20testing/#_5
- Unity Shader 基础(3) 获取深度纹理 - https://www.cnblogs.com/zsb517/p/6655546.html
开启渲染 深度图
深度图里存放了**[0,1]范围的非线性分布的深度值,这些深度值来自NDC**坐标。
- 延迟渲染 中,深度值默认已经渲染到 gbuffer, 所以不需要
|= DepthTextureMode.Depth这样开启了, 直接可以在 shader 中使用sampler2D _CameraDepthTexture. - 前向渲染 中,需要申请,以便Unity在背后利用Shader Replacement将RenderType为Opaque、渲染队列小于等于2500并且有ShadowCaster Pass的物体的深度值渲染到深度图中。
前向渲染 开启渲染 深度图
需要 Camera 组件的 depthTextureMode 中的深度位设置为1, 也就是用 或 运算 DepthTextureMode.Depth
1 | using UnityEngine; |
然后在 shader 中定义 uniform 变量 , 类型时 sampler2D, 命名必须是 _CameraDepthTexture
1 | sampler2D _CameraDepthTexture; |
深度图
- Unity Shader - 深度图基础及应用 (介绍的挺详细的) - https://www.jianshu.com/p/80a932d1f11e
深度图的使用时比较耗费批次的, 场景中的 不透明 ( opaque ) 物体需要渲染两遍, 第一遍 ( 也就是多出来的那一倍 ) 渲染是为了的得到深度纹理.
所以 深度图 不等于 深度缓存
- 深度图是提前把 不透明 ( opaque ) 物体全都渲染了一遍从而得到的
- 深度缓存 是在渲染每一个物体是根据给定的 深度比较条件 从而写进去的值.
- 注意: 通过增加 深度写入pass 的方式, 也不能将该物体写入到 深度图 中, 因为pass只在正常渲染下起作用.
参考: [透明 ( transparent ) 物体写入深度的姿势](#透明 ( transparent ) 物体写入深度的姿势)

深度纹理并非深度缓冲中的数据,而是通过特定Pass获得。
深度图 不等于 深度缓存
Unity4.X和Unity5.X版本的实现方式不太一样,Unity4.X通过”RenderType” 标签通过Camera Shader 替换获取,Unity5通过ShadowCaster Pass获取,Unity5官方文档描述:
Depth texture is rendered using the same shader passes as used for shadow caster rendering (ShadowCaster pass type). So by extension, if a shader does not support shadow casting (i.e. there’s no shadow caster pass in the shader or any of the fallbacks), then objects using that shader will not show up in the depth texture.
Make your shader fallback to some other shader that has a shadow casting pass, or If you’re using surface shaders, adding an addshadow directive will make them generate a shadow pass too.
Note that only “opaque” objects (that which have their materials and shaders setup to use render queue <= 2500) are rendered into the depth texture.
对于自身带有 ShadowCaster Pass 或者 FallBack 中含有,并且 Render Queue 小于等于 2500 的渲染对象才会出现在深度纹理中,详细的测试可以参考:【Unity Shader】Shadow Caster、RenderType和_CameraDepthTexture
实际测试
即使关了 深度写入 ZWrite Off , 深度图 还是有这个对象的深度信息. (使用 framedebugger 调试)

注意
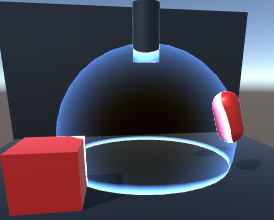
需要注意的是 能量场 ( 透明渲染 ) _CameraDepthTexture 中只保存了场景中不透明物体的深度信息,因此这个时候无法从CameraDepthTexture 中获取 能量场 的深度信息,所以要在 vert 中计算顶点的深度,这里我利用了 COMPUTE_EYEDEPTH 这个内置的宏。在之后的 frag 内就可以很方便的获取场景和能量场当前片元的深度了。
参考: http://www.php361.com/index.php?c=index&a=view&id=5257
1 | //vert |
相交判断
以上面 能量场 (ForceField) 为例, ForceField 丢到透明度队列渲染, 则该物体不会再就不会写入到深度图中, 从 Frame Debug 中可以看出

所以可以用 vert 计算出 深度值, 与 深度图 中的值 ( 也就是场景中 不透明 物体的z值 ) 相比较, 小于某个阈值时可以定义为相交.
1 | //vert |
相关宏
1 |
LinearEyeDepth 与 Linear01Depth 的使用场景
两者的共同点是 参数都是 用从 深度图 中采样出来的 深度值.
1 | //vert |
LinearEyeDepth
可以用在 物体a 需要与场景的 深度值 作比较, 进而判断出是否相交. 此时需要保证 物体a 不会渲染都深度图中, 不然不能做比较. 可以参考 [深度图 不等于 深度缓存](#深度图 不等于 深度缓存)
比较的两个值需要转换到 同一空间 下 (一般就是是 视空间) 才能进行比较, 具体代码可以参考 相交判断
Linear01Depth
可以用在 控制的值 (材质球暴露出来设置) 与 深度值 作比较, 所以要把 深度值 约束在 [0, 1] 区间内就得用到这个函数. 控制的值 就可以在 [0,1] 区间与 深度比较了.
例如扫描线效果
1
2
3
4
5
6
7
8
9
10
11float4 frag_depth(v2f_img i) : SV_Target {
float depth = SAMPLE_DEPTH_TEXTURE(_CameraDepthTexture, i.uv);
float lnr01Depth = Linear01Depth(depth);
fixed4 screenTexture = tex2D(_MainTex, i.uv);
float near = smoothstep(_ScanValue, lnr01Depth, _ScanValue - _ScanLineWidth); // _ScanValue 就是 控制值, 在 [0, 1] 区间
float far = smoothstep(_ScanValue, lnr01Depth, _ScanValue + _ScanLineWidth);
fixed4 emissionClr = _ScanLineColor * (near + far);
return screenTexture + emissionClr;
}
后处理直接绘制 深度图
1
2
3
4
5
6float4 frag_depth(v2f_img i) : SV_Target {
float depth = SAMPLE_DEPTH_TEXTURE(_CameraDepthTexture, i.uv);
float lnr01Depth = Linear01Depth(depth);
return fixed4(lnr01Depth, lnr01Depth, lnr01Depth, 1);
}
透明 ( transparent ) 物体写入深度的姿势
参考: Unity3D - Shader - 开启深度写入的半透明效果 - https://blog.csdn.net/biezhihua/article/details/78690574
正常来说 透明物体 是不会写入深度的, 但是可以通过增加多一个 pass 只用来写入深度, 但不输出颜色.
注意: 即使通过增加 深度写入pass 的方式, 也不能将该物体写入到 深度图 中, 因为pass只在正常渲染下起作用.
1 | Tags { "Queue"="Transparent" "IgnoreProjector"="True" "RenderType"="Transparent"} |
实测一下, 将透明物体的渲染设为 1000, 让它比 opaque 更快渲染

有深度写入pass的结果. 可以正常遮挡后面渲染的 胶囊体 , 同时和天空盒混合了
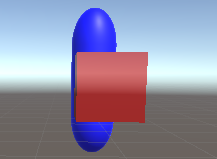
没有深度写入pass的结果, 不能遮挡 胶囊体
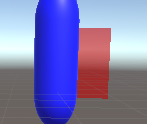
将透明物体的渲染设为 3000, 让它比 opaque 更后渲染, 就正常可以正常混合到 胶囊体, 应为颜色缓存区已经有了胶囊体的颜色了.


踩坑
- 如果代码没错,而看到的是全黑的,那么应该就是摄像机的Far Clip Plane设得太大。
深度值 推到 世界坐标位置
Unity3D 片元NDC空间z值(ZBuffer)转View空间z值,公式推导 - https://blog.csdn.net/u012149999/article/details/78678901
全面认识Depth - 这里有关于Depth的一切 - https://zhuanlan.zhihu.com/p/25095708
shader 推导流程, 可以参照 运动模糊
1
2
3
4
5
6
7
8
9//使用宏和纹理坐标对深度纹理进行采样,得到深度值
float d = SAMPLE_DEPTH_TEXTURE(_CameraDepthTexture, i.uv_depth);
//构建当前像素的NDC坐标,xy坐标由像素的纹理坐标映射而来,z坐标由深度值d映射而来
float4 H = float4(i.uv.x * 2 - 1, i.uv.y * 2 - 1, d * 2 - 1, 1);
//使用 当前帧的视角 * 投影矩阵 的逆矩阵 对H进行变换
float4 D = mul(_CurrentViewProjectionInverseMartix, H);
//把结果除以它的w分量,得到该像素世界空间下的坐标
float4 worldPos = D / D.w;
为什么要除以 分量w ? 参考说明 剪裁坐标
因为经过了 投影矩阵, 分量w 就不在为1, 所以要求得具体的世界坐标, 就需要 除以 分量w 的影响
深度偏移
Offset 修改深度偏移值
1 | Pass |
深度法线图
可以指定模式为 深度法线图, 通过unity的方法取出 深度值 与 法线值
摄像机组件上声明模式
1
2
3
4
5
6
7void OnEnable() {
GetComponent<Camera>().depthTextureMode |= DepthTextureMode.DepthNormals;
}
void OnDisable() {
GetComponent<Camera>().depthTextureMode &= ~DepthTextureMode.DepthNormals;
}shader 中 uniform 变量声明
1
2
3
4
5
6
7
8
9
10
11
12sampler2D _CameraDepthNormalsTexture; // 包含深度与法线的纹理
fixed4 frag_depth(v2f_img i) : SV_Target {
float3 normal = DecodeViewNormalStereo(tex2D(_CameraDepthNormalsTexture, i.uv)); // 观察空间下的法线
// float depth = 1;
// float3 normal = 1;
// DecodeDepthNormal(tex2D(_CameraDepthNormalsTexture, i.uv), depth, normal); // DecodeDepthNormal 内部也是调用 DecodeViewNormalStereo
normal = (normal + 1)/2; // 转到 0~1 范围
return fixed4(normal, 1);
}- 存储分量, depth 在 zw 分量, normal 在 xy 分量