unity-shader-思路与技巧
目的是为了想实现效果时, 快速找到实现的方案.
主要用 shader graph 实现, 可视化会更容易于理解, 部分会结合代码.
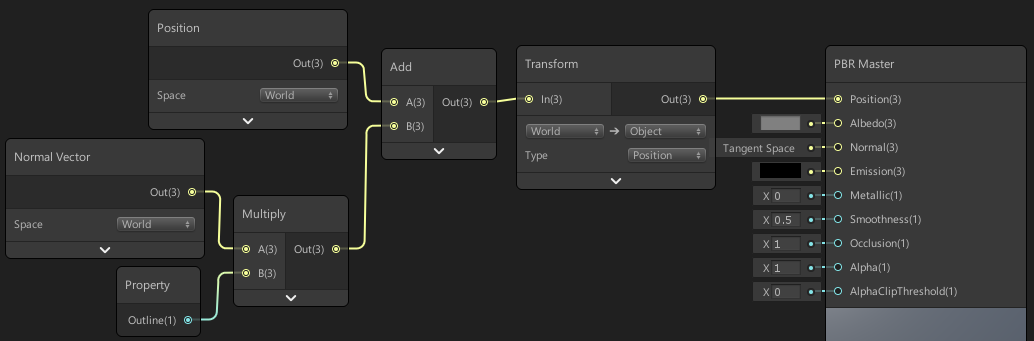
与顶点位置相关
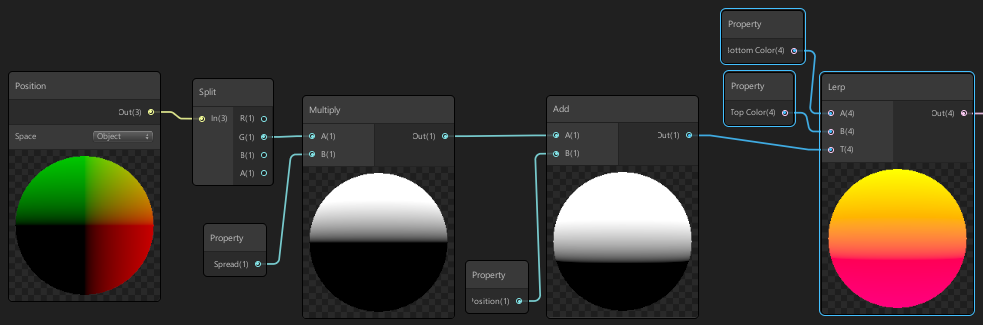
使用 模型空间 顶点位置, 乘以一个系数 spread 来控制顶点位置的缩放, 加上一个系数 position 来控制顶点位置的偏移

顶点法线 Dot
一般都是用 dot(normal, vector3) 来获取夹角余弦值
以 积雪 效果为例
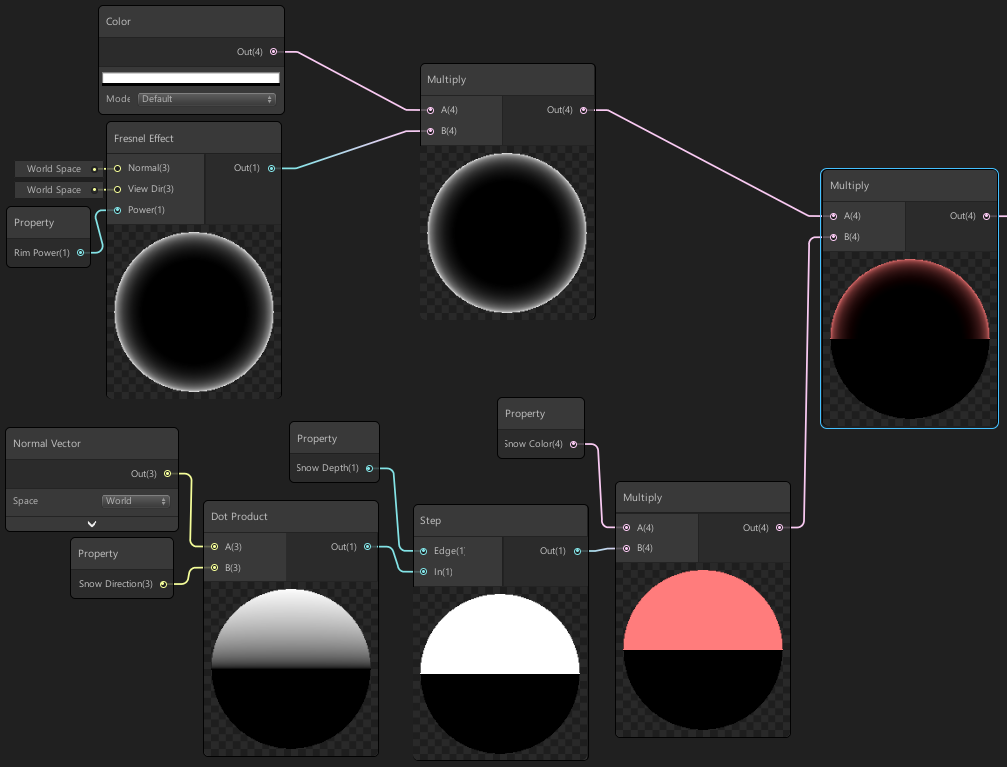
- 用 snow direction 与 法线 点乘, 主要控制哪个方向的面需要做效果
- 用 snow depth 和 step 控制夹角多少以内需要做效果
- 再结合 fresnel 做平滑过渡.
判断 相交
神奇的深度图:复杂的效果,不复杂的原理 - http://www.php361.com/index.php?c=index&a=view&id=5257
测试: 关键字: force field. 红色部分为 代码 实现, 黄色部分为 shader graph 实现, 两者逻辑一样.
相关代码
1
2
3
4
5
6
7
8
9
10
11
12
13
14
15
fixed4 frag(v2f i) : SV_Target {
//获取已有的深度信息,此时的深度图里没有力场的信息
//判断相交
float sceneZ = LinearEyeDepth(SAMPLE_DEPTH_TEXTURE_PROJ(_CameraDepthTexture, UNITY_PROJ_COORD(i.screenPos)));
float partZ = i.screenPos.w - _Offset;
float intersect = 1 - (sceneZ - partZ);
//圆环
float rim = pow((1.0 - saturate(dot(normalize(i.normal), normalize(i.viewDir)))), _FresnelPower);
float smoothVal = smoothstep(0, 1, intersect);
_MainColor.a = smoothVal + rim;
return _MainColor;
}原理
- 判断相交. 用 自己的深度 与 场景的深度(也就是深度图的值) 比较. ( 因为是自身是 transparent, 所以不会渲染到深度图中)
- 圆环 rim. NdotV.
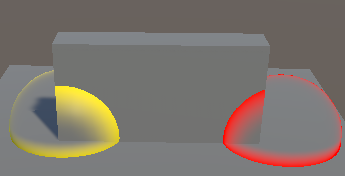
应用场景
- 水面与物体交界处
- 能量场
另外: shader graph 中的实现
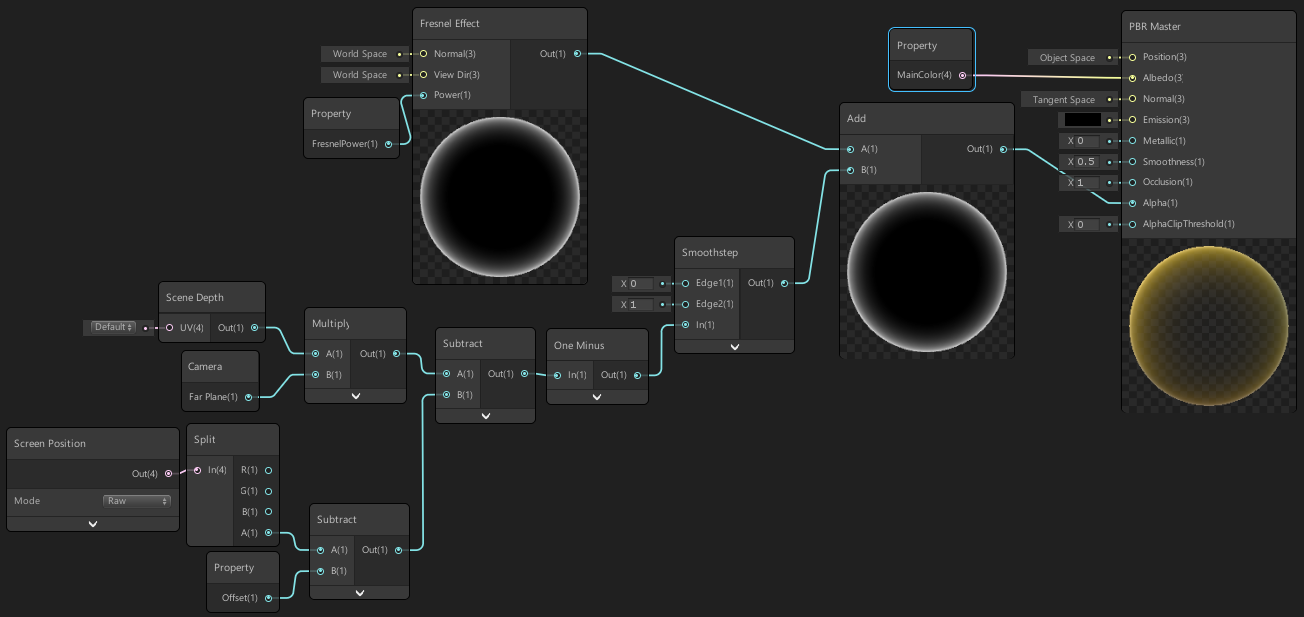
之前看教程 scene depth 貌似 2019 版本的有 linear, eye 等选择. 但是这里是 2018 版本的没有. 可以通过与 camera 的 far plane 相乘 得到一样的数据. 参考: https://www.youtube.com/watch?v=ayd8L6ZyCvw
Scene Depth Node - https://docs.unity3d.com/Packages/com.unity.shadergraph@6.5/manual/Scene-Depth-Node.html
screen position
Provides access to the mesh vertex or fragment’s Screen Position. The mode of output value can be selected with the Mode dropdown parameter.
Default
Returns Screen Position. This mode divides Screen Position by the clip space position W component.
Raw
Returns Screen Position. This mode does not divide Screen Position by the clip space position W component. This is useful for projection.
Center
Returns Screen Position offset so position
float2(0,0)is at the center of the screen.Tiled
Returns Screen Position offset so position
float2(0,0)is at the center of the screen and tiled usingfrac.
切片效果
主要利用函数 frac
$$
y=x-floor(x)
$$
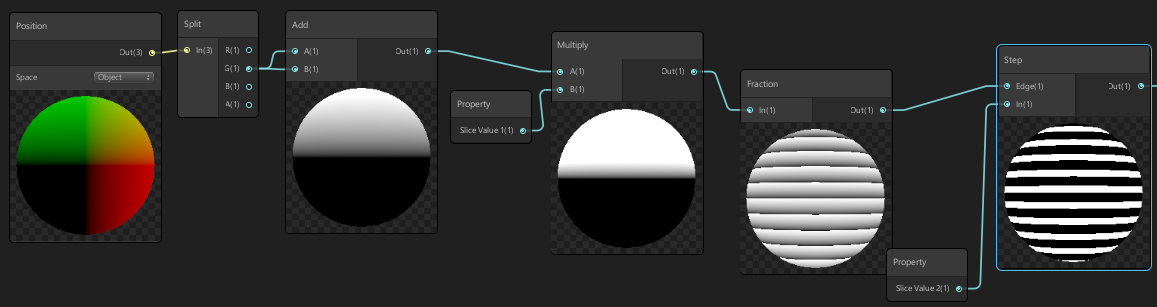
利用模型顶点的 y轴分量, slice value1 和 fraction函数 控制切片细分程度, slice value2 控制细分宽度
uv流动 的几种方式
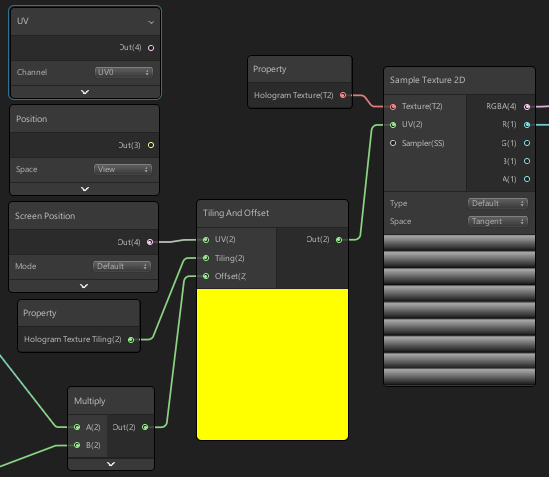
基于 纹理uv. 使用模型顶点的uv值. (看起来有点乱, 因为 uv值 的是在 uv展开 的时候决定的)

基于 顶点位置, 又分为 切线,对象,世界,观察 四个空间的
观察空间下
基于 屏幕空间的位置. 简答的理解就是屏幕的 左下角是(0,0), 右下角是(1, 1), 顶点都位于这个区间内
基于 位置 (2和3) 的看起来贴图是贴在屏幕上的.
流动 偏移量
代码中的实现方式类似 (基于 顶点位置)
1 | half2 flashuv = i.worldPos.yx * _FlashFactor.xy - _FlashSpeed.xy * _Time.y; // 通过 加减 来 偏移 |
shader graph 中的实现方式
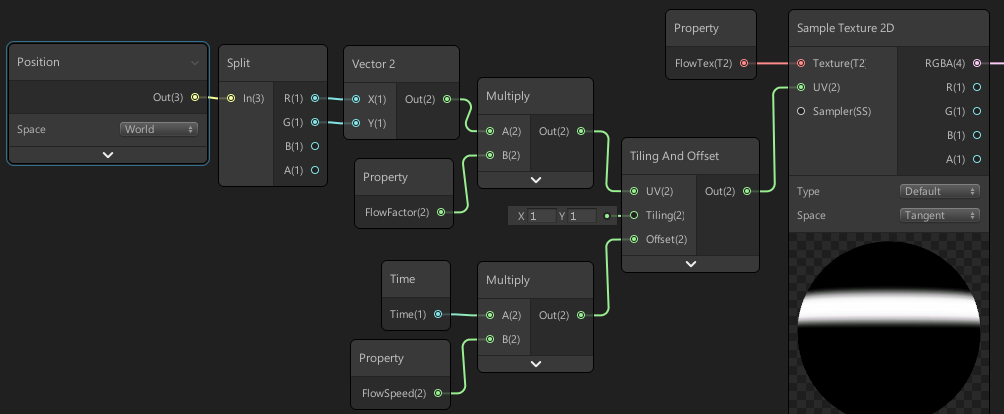
- shader graph 的 tiling and offset 提供了 uv 采样值 和 offset 偏移值, 就不需要用 加/减 的方式 来达到 偏移流动的目的了.
判断 边缘, 平滑, 宽度
smoothstep 函数用于 平滑, 宽度 计算
step 函数用于判断
基于 纹理uv
效果
代码
1
2
3
4
5
6
7
8
9
10
11
12
13
14
15
16fixed4 frag (v2f i) : SV_Target
{
fixed val = tex2D(_Noise, i.uvNoise).r;
fixed isShow = step(val, _BurnAmout);
clip(1 - isShow - 0.0001);
fixed4 mainClr = tex2D(_MainTex, i.texcoord);
fixed4 edgeClr = fixed4(1, 1, 0, 1);
fixed4 finalClr;
// 方式c 平滑边界颜色
float edgeSmooth = 1 - smoothstep(val, _BurnAmout, _BurnAmout - _EdgeWidth);
edgeClr *= edgeSmooth;
finalClr = mainClr + edgeClr;
return finalClr;
}
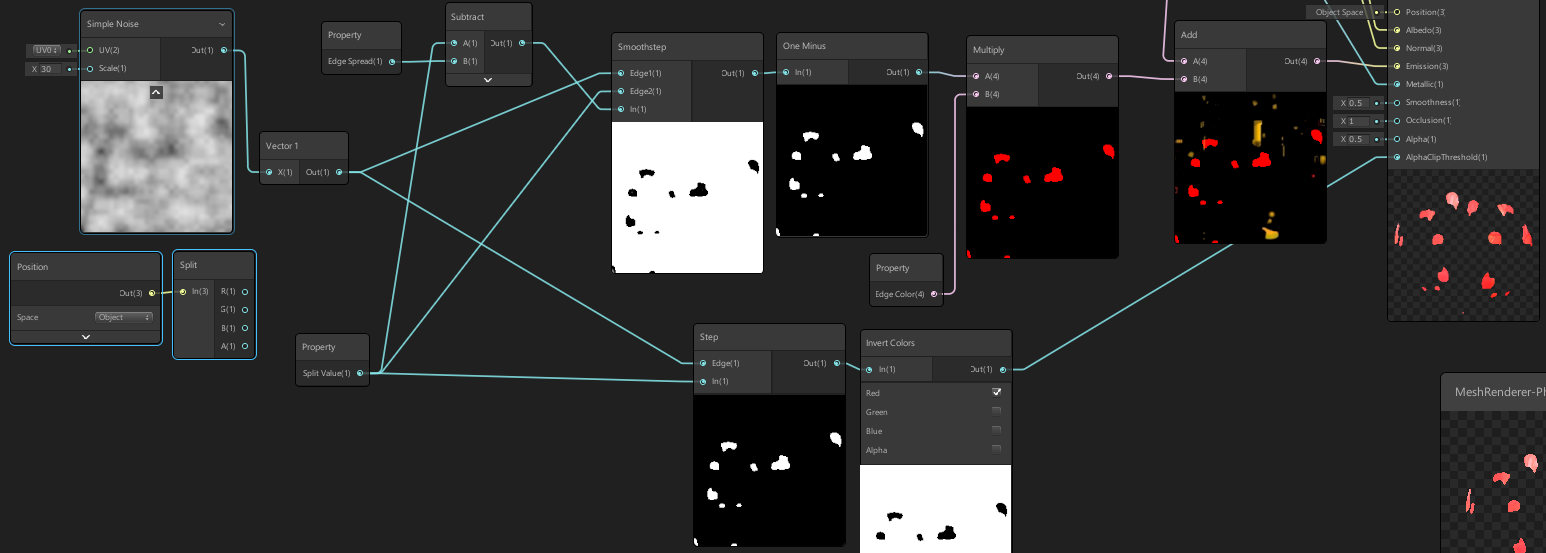
基于 顶点位置
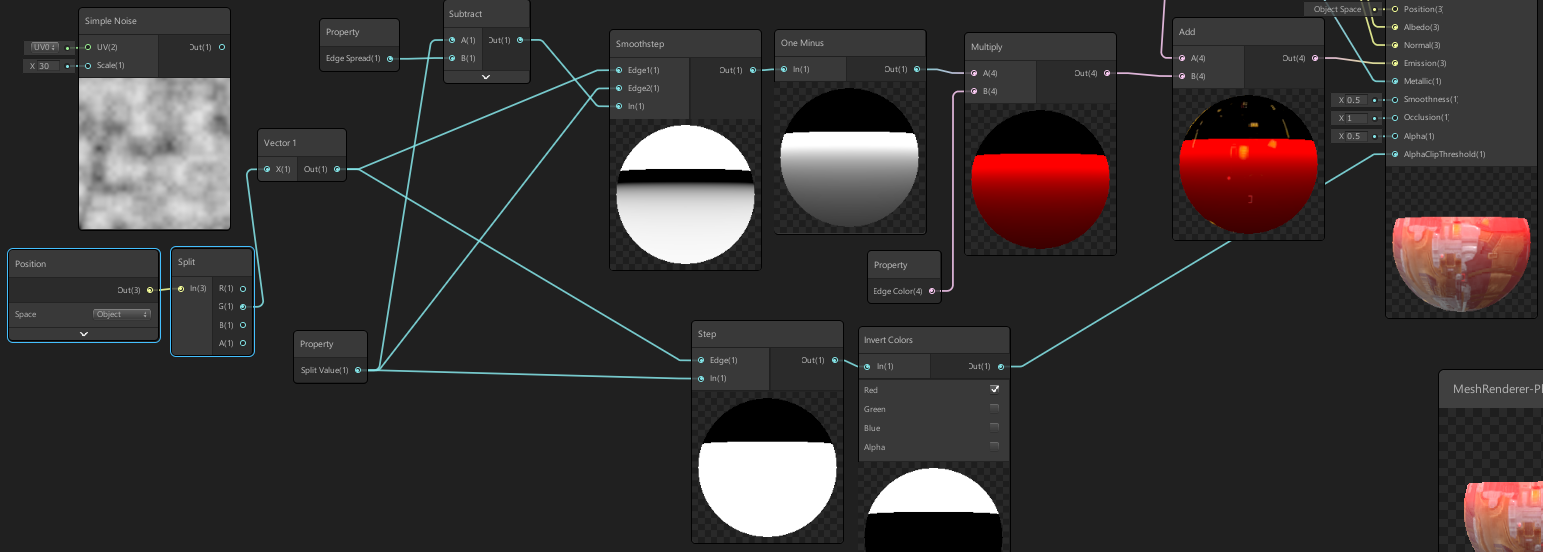
split value 控制clip的值, 及边缘的 边界值2, edge spread 控制边缘的宽度, edge spread 越小就越接近 边界值2, 也就是越窄
上半部分计算宽度及渐变, 下半部分计算clip
代码
1
2
3
4
5
6
7
8
9
10
fixed4 frag(v2f i) : SV_Target
{
float isShow = step(i.objPos.x, _DissolveThreshold);
clip(1 - isShow - 0.0001);
fixed3 mainClr = tex2D(_MainTex, i.uv).rgb;
float edgeSmooth = 1 - smoothstep(i.objPos.x, _DissolveThreshold, _DissolveThreshold - _EdgeWidth);
_DissolveColor *= edgeSmooth;
return fixed4(mainClr, 1) + _DissolveColor;
}
理解 边缘 效果思路1
step
smoothstep

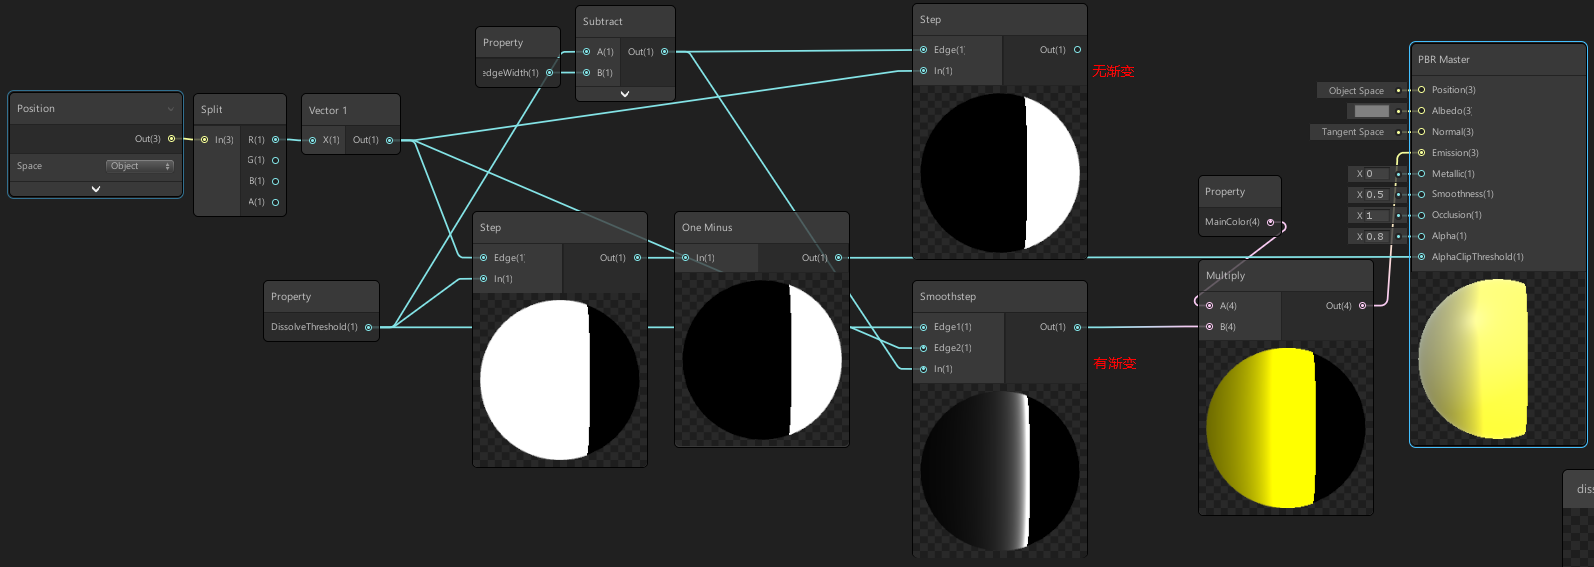
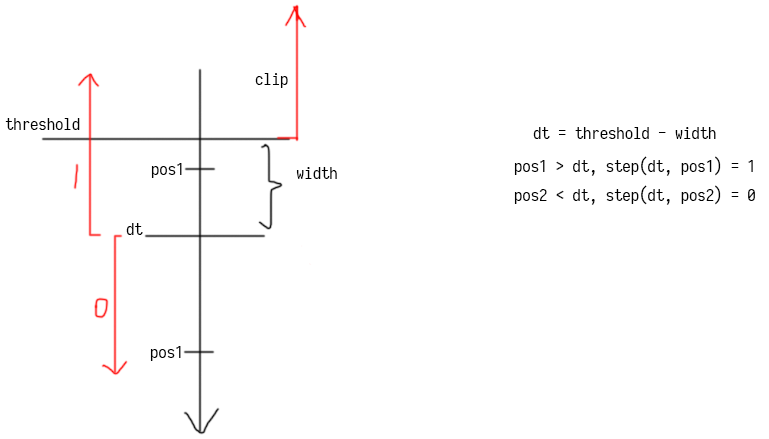
理解 边缘 效果思路2
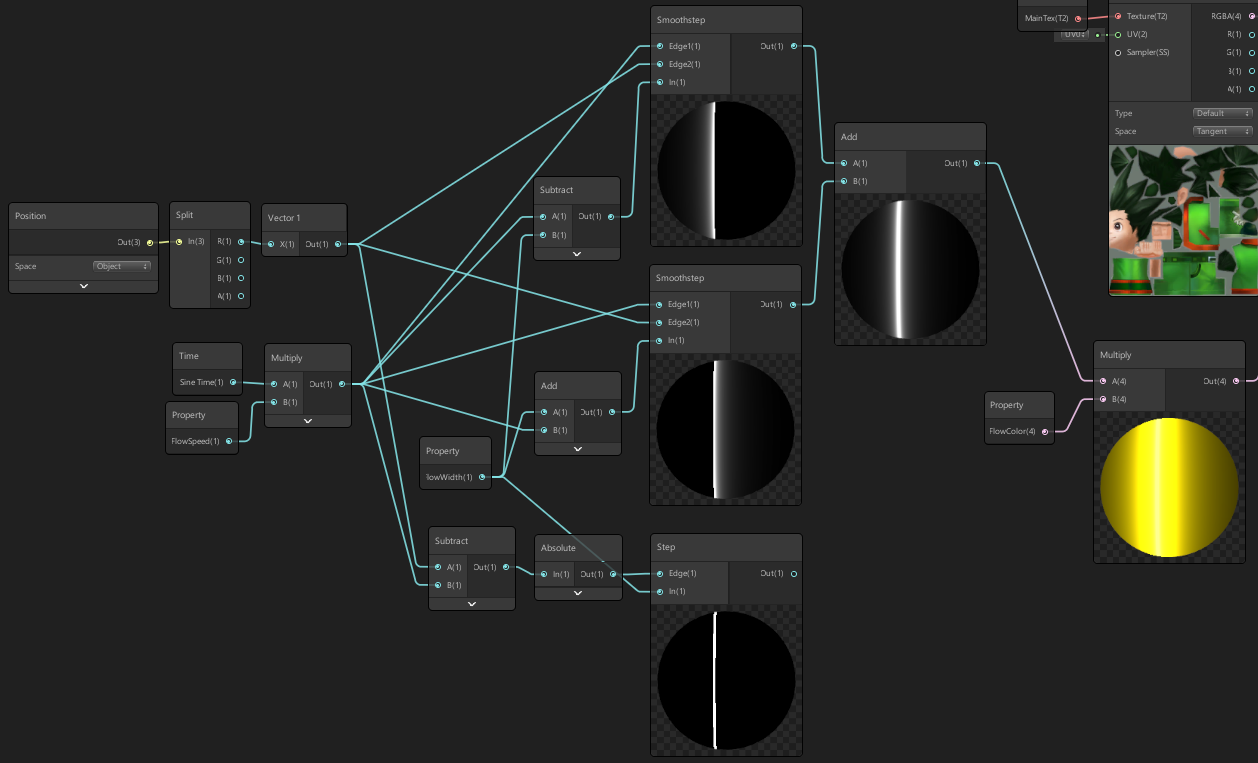
FlowSpeed 与 Time 的乘积用来控制流动速度, 等价于 思路1 中的 Threshold, 也就是过渡的 起始值edge1
加上 或 减去 FlowWidth 是 dt, 也就是过渡的 结束值edge2
顶点的位置则为 in
扫描线效果
程序算法节点
可以参考文档里面的算法实现, 搬运代码时方便 - https://docs.unity3d.com/Packages/com.unity.shadergraph@6.5/manual/Procedural-Nodes.html
顶点沿法线偏移
可用于 描边 pass, 只显示背面
代码
1 | v2f vert_outline(appdata_t v) { |
看见 后面 的东西
颜色混合
这个是最容易想到的, 也是最容易实现的, 但是能做的事情很少, 只能把当前绘制的物体的颜色 与 颜色缓冲区 的颜色 根据 运算规则混合这两种样色. 所以不详细说了.
抓取颜色缓冲区处理
抓取当前显存中的颜色缓冲区 到rt 中, 通过 shader 处理一下这个 rt, 然后在 绘制的物体上, 获取模型顶点 屏幕空间 的值, 采样 rt.
抓帧的方式有几种
- CommandBuffer 方式: unity-shader-CommandBuffer应用之毛玻璃效果 - https://blog.csdn.net/yangxuan0261/article/details/90348851
- shader grabpass 方式: Unity Shader-热空气扭曲效果 - https://blog.csdn.net/puppet_master/article/details/70199330
生成贴图
比如生成 噪声图
- CommandBuffer 方式, 使用 噪声算法的 shader, blit 到一个 rendertexture 上
- 单独一个相机, 挂个 后处理 脚本, 使用 噪声算法的 shader, 输出到 rendertexture 上
然后拿 rendertexture 生成一个 贴图文件 xxx.png.
todo: 理论可行, 未实测