art-高光贴图制作
前篇
流程
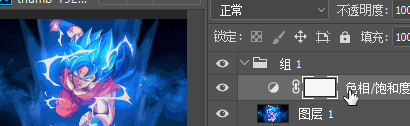
一般喜欢在图层中干, 保留原图
先把 颜色贴图 变成黑白图. 也就是把 饱和度 调为 -100 ( 效果和 图像 -> 调整 -> 去色 一样 )
调整 色阶
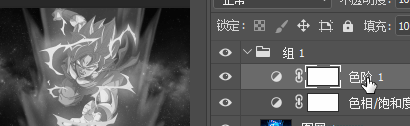
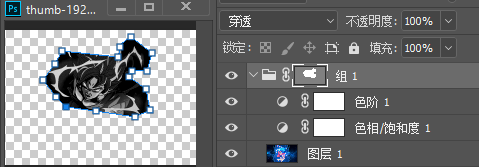
- 部分不需要的话可以给 组 加个蒙版.
这里用 钢笔工具 随便圈个路径, 然后生成矢量蒙版
应用高光贴图
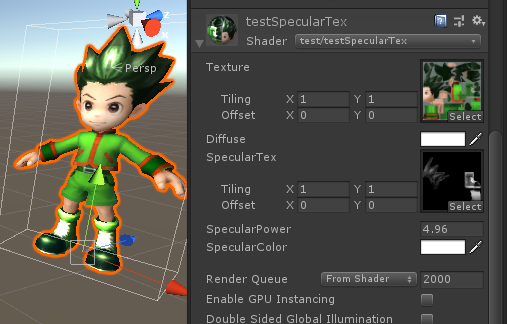
shader
这里只用了 ForwardBase 的 pass. 所以只有一个光源起作用
1
2
3
4
5
6
7
8
9
10
11
12
13
14
15
16
17
18
19
20
21
22
23
24
25
26
27
28
29
30
31
32
33
34
35
36
37
38
39
40
41
42
43
44
45
46
47
48
49
50
51
52
53
54
55
56
57
58
59
60
61
62
63
64
65
66
67
68
69
70
71
72
73
74
75
76
77
| Shader "test/testSpecularTex"
{
Properties {
_MainTex ("Texture", 2D) = "white" {}
_Diffuse ("Diffuse", Color) = (1, 1, 1, 1)
_SpecularTex ("SpecularTex", 2D) = "white" {}
_SpecularPower("SpecularPower", float) = 1
_SpecularColor ("SpecularColor", Color) = (1, 1, 1, 1)
}
SubShader {
pass{
Tags { "LightMode"="ForwardBase" }
CGPROGRAM
#pragma vertex vert
#pragma fragment frag
#include "UnityCG.cginc"
#include "Lighting.cginc"
#include "AutoLight.cginc"
fixed4 _Diffuse;
sampler2D _MainTex;
sampler2D _SpecularTex;
float _SpecularPower;
float4 _SpecularColor;
struct a2v {
float4 vertex : POSITION;
float3 normal : NORMAL;
float2 uv : TEXCOORD0;
};
struct v2f {
float2 uv : TEXCOORD0;
float4 pos : SV_POSITION;
fixed3 worldNormal : TEXCOORD1;
float4 worldPos : TEXCOORD2;
};
v2f vert(a2v v) {
v2f o;
o.worldPos = mul(unity_ObjectToWorld, v.vertex);
o.pos = mul(UNITY_MATRIX_VP, o.worldPos);
o.worldNormal = mul((float3x3)unity_ObjectToWorld, v.normal);
o.uv = v.uv;
return o;
}
fixed4 frag(v2f i) : COLOR {
float attenuation = LIGHT_ATTENUATION(i);
fixed3 ambient = UNITY_LIGHTMODEL_AMBIENT.xyz;
float3 worldLightDir=normalize(UnityWorldSpaceLightDir(i.worldPos));
float3 worldNormal=normalize(i.worldNormal);
float3 worldViewDir=normalize(UnityWorldSpaceViewDir(i.worldPos));
float3 specularTexCol = tex2D(_SpecularTex, i.uv).rgb;
float3 halfVector = normalize(worldLightDir + worldViewDir);
float specular = pow(max(0, dot(worldNormal, halfVector)) , _SpecularPower);
float3 specularColor =_LightColor0.rgb* specularTexCol * specular * _SpecularColor.rgb * attenuation * 10;
fixed3 halfLambert = dot(worldNormal, worldLightDir)*0.5+0.5;
fixed3 diffuse = _LightColor0.rgb * _Diffuse.rgb * halfLambert * attenuation;
fixed3 color = ambient + diffuse + specularColor;
float3 texColor = tex2D(_MainTex, i.uv).rgb;
return fixed4(color*texColor, 1.0);
}
ENDCG
}
}
FallBack "Diffuse"
}
|
辅助: 结合id贴图
高光部位一般是贴图的部分区域 ( 假设整个模型都在一个贴图上的情况 ), 这时可以把不需要高光的区域部位涂成 黑色 , 不过这样手动涂不太科学, 细调时才手动涂. 比较科学的姿势时结合 ID贴图 或者 substance painter 导出一个 遮罩图, 这样可以准确的再对应的 uv 块上填充 黑色或白色
ID贴图方式
这个流程稍微有点多, 具体参考: substance-Substance_Painter记录 中的 ID贴图
painter 遮罩图方式 ( 建议 )
个人感觉这种方式会更快点, 直接在对应的uv块上填充 黑/白 色
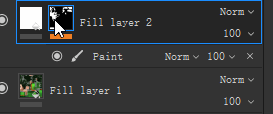
添加一个 填充层 , 随便填一个颜色, 因为这个颜色只是用来参考.
在 填充层 中添加一个 black mask, 然后再给 mask 右键添加一个 paint
选中 paint, 用 polygon fill 工具填充需要高光区域部位为 白色
然后 右键 mask -> export mask to file 导出 遮罩图 给ps用
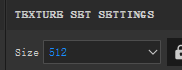
导出的 分辨率 要与原贴图的一致, 可以这里设置
在ps中使用蒙版
具体参考: photoshop-photoshop记录 中的 使用制作好的遮罩图做蒙版