other-hexo笔记
官网配置文档:https://hexo.io/zh-cn/docs/configuration.html
前置条件:安装好了 Git,这里都是在 Git bash 中 输入命令
前篇
参考资料:
- http://www.jianshu.com/p/956c44c87fb1
- https://my.oschina.net/z707z/blog/824830
- 常见问题:https://xuanwo.org/2014/08/14/hexo-usual-problem/
- http://www.jianshu.com/p/dd111ea16f4d
安装
window
下载 nodejs 安装器:https://nodejs.org/zh-cn/download/
打开 Git Bash 输入安装 hexo 的命令
1
npm install -g hexo-cli
安装成功后查看版本
1
2
3hexo version
hexo-cli: 1.0.3
...
初始化一个站点
1
hexo init my_web
生成静态文件
1
2cd my_web
hexo g部署到本地 3600 端口,然后就可以打开浏览器访问了: http://localhost:3600
1
hexo s -p 3600
推送,配置git推送
ubuntu
nodejs、npm
1
root@ubuntu:~# apt install nodejs npm
查看版本,node 低于 6.x 的版本需要升级
1
2
# node -v
# npm -v升级node、npm
1
2
3# npm install -g cnpm --registry=https://registry.npm.taobao.org # 换淘宝源
# npm install -g n # 升级
# n stable修改环境变量
1
2
3
4
5
6
7
8# vi /etc/profile
export NODE_HOME=/usr/local/n/versions/node/9.10.1
export PATH=$PATH:$NODE_HOME/bin
export NODE_PATH=$NODE_HOME/lib/node_modules
# source /etc/profile # 使其生效
# node -v
# npm -v安装 hexo
1
# npm install -g hexo-cli
关闭代码高亮自动检测
将 _config.xml 中高亮自动检测设为 false, 不然生成时没有标记语言的代码段会引起报错
1
2
3
4highlight:
enable: true
line_number: true
auto_detect: false # 关闭
默认展开 toc
在 hexo-theme-next\source\css_custom\custom.styl 文件中加入一行代码
1
.post-toc .nav .nav-child { display: block; }
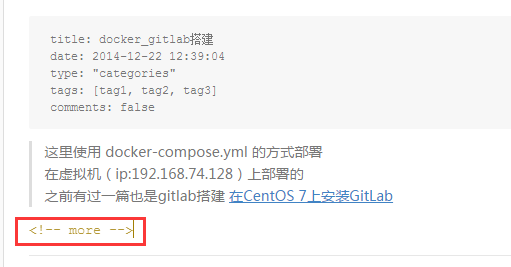
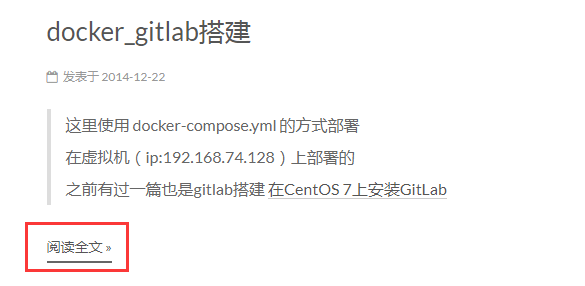
文章截断
在显示文章列表的时候,不全部显示文章内容,可自定义截断内容,在需要截断的内容加入
1
<!-- moer -->
例如:
配置git推送
前提是 装了好了git,并配置了环境
- 修改 _config.yml 文件,
1 | deploy: |
执行部署
1
hexo d
如果报错
1
ERROR Deployer not found: git
输入一下命令,
1
2
3
4
5npm install hexo-deployer-git --save
然后在重新 生成、部署
hexo g
hexo s
[配置 categories 和 tags](#配置 categories 和 tags)
配置 categories 、tags、about
categories ,执行命令
1
hexo new page "categories"
然后修改生成的文件 source\categories\index.md
1
2
3
4
5---
title: All Categories
date: 2017-07-12 22:10:30
type: "categories"
---tags,执行命令
1
hexo new page "tags"
然后修改生成的文件 source\tags\index.md
1
2
3
4
5---
title: All Tags
date: 2017-07-12 22:10:52
type: "tags"
---about,执行命令
1
hexo new page "about"
然后修改生成的文件 source\about\index.md
1
2
3
4
5---
title: Wilker_Yun
date: 2017-07-12 11:34:37
type: "about"
---
配置字体
如果不配置,默认使用的 fonts.googleapis.com 的字体,访问速度极慢,
在 _config.yml 加入字体配置,并指定字体来源,参考资料:http://www.jianshu.com/p/fdbb9aa536bd
1
2
3
4
5
6
7
8
9
10
11
12
13
14
15
16
17
18
19
20
21
22
23font:
enable: true
# Uri of fonts host. E.g. //fonts.googleapis.com (Default)
host: fonts.proxy.ustclug.org # 这里指定源
# Global font settings used on <body> element.
global:
# external: true will load this font family from host.
external: true
family:
# Font settings for Headlines (h1, h2, h3, h4, h5, h6)
# Fallback to `global` font settings.
headings:
external: true
family:
# Font settings for posts
# Fallback to `global` font settings.
posts:
external: true
family:
重新生成
重新生成会删掉 public 目录,然后在运行生成会根据 source 目录生成 html 并放到 public 目录下
1
2hexo clean
hexo g
更换主题
next 主题 :
https://github.com/theme-next/hexo-theme-next
1
git clone https://github.com/next-theme/hexo-theme-next themes/next
http://blog.co1mugx.tk/2017/04/14/easyknow-vuex/#what-s-vuex
步骤
下载主体, 丢到 themes, 如:
themes/hexo-theme-next修改根目录的主体配置
_config.yml1
theme: hexo-theme-next
- 值是目录名
hexo-theme-next
- scheme 为 Pisces 比较好看
第三方插件
评论
- DisqusJS - https://disqusjs.skk.moe/
- Hexo-NexT 主题添加评论系统 - https://guanqr.com/tech/website/hexo-theme-next-comments/
配置搜索
安装
hexo-generator-searchdb1
npm install hexo-generator-searchdb --save
如果主题中有禁用 搜索,需要修改,主题的 _config.yml
1
2local_search:
enable: true参考:
- https://github.com/iissnan/hexo-theme-next/wiki/%E8%87%AA%E5%AE%9A%E4%B9%89%E7%AB%99%E5%86%85%E6%90%9C%E7%B4%A2
- http://hisen.me/20170407-Hexo%20next%E4%B8%BB%E9%A2%98%E6%B7%BB%E5%8A%A0%E6%9C%AC%E5%9C%B0%E6%90%9C%E7%B4%A2%20-%20%E4%B8%8D%E4%BD%BF%E7%94%A8%E7%AC%AC%E4%B8%89%E6%96%B9%E6%9C%8D%E5%8A%A1/
rss 订阅
支持 RSS 订阅,安装 hexo-generator-feed
1 | npm install hexo-generator-feed --save |
修改 hexo 配置
1 | feed: |
修改主题配置
1 | menu: |
忽略文件,不生成html
参考: http://xchb.work/2017/04/08/hexo%E5%BF%BD%E7%95%A5%E6%96%87%E4%BB%B6-skip-render-%E9%85%8D%E7%BD%AE/
指定跳过指定 规则(glob表达式) 下的文件,不生成 html,跳过规则是以 sources 目录为根目录
修改配置文件 _config.yml ,跳过多个目录,或者多个文件:
1
2// 最新版本的hexo,用这个好使
skip_render: ['_posts/**/readme.md', '_posts/**/*ignore.md']- 这里跳过 _posts目录及递归子目录下的所有 readme.md 及 xxxignore.md 文件
踩坑记录
- win10 下 http://localhost:4000 无法显示问题,换一个端口就ok
1 | hexo s -p 3600 |
$ hexo d部署出现报错
1 | ERROR Deployer not found: git |
输入一下命令,
1
2
3
4
5npm install hexo-deployer-git --save
然后在重新 生成、部署
hexo g
hexo s
tags 、categories 报错:
Cannot GET /tags/,参考:https://github.com/iissnan/hexo-theme-next/issues/3801
2hexo new page "categories"
hexo new page "tags"报错代码高亮错误,参考:https://github.com/hexojs/hexo/issues/1913
1
TypeError: Cannot set property 'lastIndex' of undefined
将 _config.xml 中高亮自动检测设为 false
1
2
3
4highlight:
enable: true
line_number: true
auto_detect: false
执行 hexo 命令报错 :
'hexo' 不是内部或外部命令,也不是可运行的程序- 把 hexo.cmd 所在目录加入环境变量即可,目录可能在在 :
C:\Users\用户名\AppData\Roaming\npm
- 把 hexo.cmd 所在目录加入环境变量即可,目录可能在在 :
执行
hexo g报错:hexo pandoc exited with code null.卸载pandoc
1
npm un hexo-renderer-pandoc --save
hexo命令
1 | # hexo init [folder_name] # 初始化web文件夹 |
LaTeX公式支持
姿势一 (建议)
参考: hexo使用hexo-math插件支持MathJax - https://introspelliam.github.io/2018/03/27/hexo/hexo%E4%BD%BF%E7%94%A8hexo-math%E6%8F%92%E4%BB%B6%E6%94%AF%E6%8C%81MathJax/
cd 到 站点根目录 安装 hexo-math
1
2# cd /app/my_hexo_blog
# npm install hexo-math --save编辑 主题目录 下的 _config.yml, 修改或添加, 开启公式支持
1
2mathjax:
enable: true在需要使用数学公司的页面 md 头部添加:
mathjax: true1
2
3
4
5
6
7
8---
title: unity-shader-光照相关
categories: Unity3d-Shader
tags: [unity, shader, 光照模型]
date: 2019-03-19 10:05:18
comments: false
mathjax: true // 添加这个字段
---重新生成站点. done
- 小问题: 不能直接用
\\来当换行符,需要用\newline
- 小问题: 不能直接用
姿势二
hexo 默认对 LaTeX 公式支持很不友好
下载最新版本 pandoc, 上传到服务器上解压, 并加入到环境变量. 下载地址: pandoc-2.7.2-linux.tar.gz
1
2
3
4
5
6
7
8
9
10
11
12
13
14
15
16
17
18
19上传
scp -P 1234 pandoc-2.7.2-linux.tar.gz root@aaa.bbb.cn:/root
解压
tar -xzvf pandoc-2.7.2-linux.tar.gz
加入到环境变量
vi .bash_profile
export PATH=$PATH:/root/pandoc-2.7.2/bin
PANDOC_ROOT=/root/pandoc-2.7.2/bin
export PANDOC_ROOT
使其生效
source .bash_profile
测试一下
pandoc -v
pandoc 2.7.2- 为什么不用
apt install pandoc命令安装呢? 因为这个安装的版本太老 1.x, hexo 调用 pandoc 时会报错.
- 为什么不用
替换渲染引擎. cd hexo根目录
1
2
3
4cd /app/my_hexo_blog
npm uninstall hexo-renderer-marked --save
npm install hexo-renderer-pandoc --save
rm -r node_modules/hexo-renderer-marked小问题
- 换成 pandoc 后生成时间貌似变久了
- 之前的
http://xxx超链接不能直接点击跳转. 必须要严格的md格式[http://xxx](http://xxx)才行
增加生成时间显示
用的是 NexT 主题, 修改页脚, 增加最后生成时间显示
找到 themes/hexo-theme-next/layout/_partials/footer.swig 文件, 增加两行代码即可
1 | <div class="copyright" > |
附: 增加配置的读取也差不多的修改方式 {{ config.author }}
会现在主题文件夹下找 _config.yml 的配置, 找不到再从根目录下找 _config.yml
文章格式
1 | --- |
设置关于、标签、分类、归档、时间线
- Git个人博客hexo设置关于、标签、分类、归档、时间线 - https://www.jianshu.com/p/ebbbc8edcc24
- 解决 Hexo 搭建博客显示不出分类、标签问题 - https://blog.csdn.net/Wonz5130/article/details/84666519
以添加 归档 为例
生成 归档 目录
1
$ hexo new page archives
- 会生成
source\archives\index.md文件
- 会生成
编辑
source\archives\index.md```json
title: archives # 修改显示名
date: 2022-02-15 18:27:35type: archives # 添加类型, 不添加无法生成
持久化路径
- 永久链接(Permalinks) - https://hexo.io/zh-cn/docs/permalinks.html