ubuntu_相关
- vm 中安装 Ubuntu 一定要关了网络,有个下载过程恶心死了,一直在 retrieving file
- 安装vm tools
替换下载的镜像源
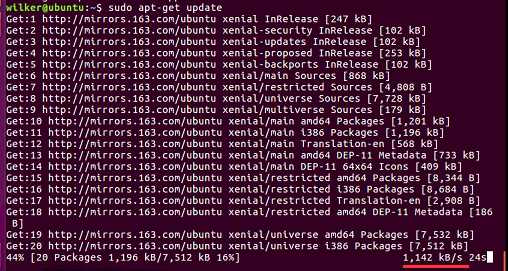
默认使用的是美国的源,下载起来真tm蛋疼,1kb/s 的速度,所以必须修改下载源
备份一下原有的源列表
1
wilker@ubuntu:~$ sudo cp /etc/apt/sources.list /etc/apt/sources.list.bak
编辑源列表
1
wilker@ubuntu:~$ sudo gedit /etc/apt/sources.list
全部替换为一下内容,网易的源比较快,速度基本就是你有的带宽。需要注意的是 xenial 是你当前系统对应的版本
1
2
3
4
5
6
7
8
9
10
11
12
13
14
15
16
17
18
19
20
21
22
23
24
25
26
27
28
29
30
31
32
33
34
35
// 16.04
deb http://mirrors.163.com/ubuntu/ xenial main restricted universe multiverse
deb http://mirrors.163.com/ubuntu/ xenial-security main restricted universe multiverse
deb http://mirrors.163.com/ubuntu/ xenial-updates main restricted universe multiverse
deb http://mirrors.163.com/ubuntu/ xenial-proposed main restricted universe multiverse
deb http://mirrors.163.com/ubuntu/ xenial-backports main restricted universe multiverse
deb-src http://mirrors.163.com/ubuntu/ xenial main restricted universe multiverse
deb-src http://mirrors.163.com/ubuntu/ xenial-security main restricted universe multiverse
deb-src http://mirrors.163.com/ubuntu/ xenial-updates main restricted universe multiverse
deb-src http://mirrors.163.com/ubuntu/ xenial-proposed main restricted universe multiverse
deb-src http://mirrors.163.com/ubuntu/ xenial-backports main restricted universe multiverse
// 18.04
deb http://mirrors.163.com/ubuntu/ bionic main restricted universe multiverse
deb http://mirrors.163.com/ubuntu/ bionic-security main restricted universe multiverse
deb http://mirrors.163.com/ubuntu/ bionic-updates main restricted universe multiverse
deb http://mirrors.163.com/ubuntu/ bionic-proposed main restricted universe multiverse
deb http://mirrors.163.com/ubuntu/ bionic-backports main restricted universe multiverse
deb-src http://mirrors.163.com/ubuntu/ bionic main restricted universe multiverse
deb-src http://mirrors.163.com/ubuntu/ bionic-security main restricted universe multiverse
deb-src http://mirrors.163.com/ubuntu/ bionic-updates main restricted universe multiverse
deb-src http://mirrors.163.com/ubuntu/ bionic-proposed main restricted universe multiverse
deb-src http://mirrors.163.com/ubuntu/ bionic-backports main restricted universe multiverse
// 19.04
deb http://mirrors.163.com/ubuntu/ disco main restricted universe multiverse
deb http://mirrors.163.com/ubuntu/ disco-security main restricted universe multiverse
deb http://mirrors.163.com/ubuntu/ disco-updates main restricted universe multiverse
deb http://mirrors.163.com/ubuntu/ disco-proposed main restricted universe multiverse
deb http://mirrors.163.com/ubuntu/ disco-backports main restricted universe multiverse
deb-src http://mirrors.163.com/ubuntu/ disco main restricted universe multiverse
deb-src http://mirrors.163.com/ubuntu/ disco-security main restricted universe multiverse
deb-src http://mirrors.163.com/ubuntu/ disco-updates main restricted universe multiverse
deb-src http://mirrors.163.com/ubuntu/ disco-proposed main restricted universe multiverse
deb-src http://mirrors.163.com/ubuntu/ disco-backports main restricted universe multiverse如果报一下错误
1
2sudo apt-get update
Err http://security.ubuntu.com precise-security InRelease修改dns,配置文件地址 /etc/resolv.conf,然后重启网络
1
2
3
4
5
6
7
8
wilker@ubuntu:~$ sudo gedit /etc/resolv.conf
加入一下内容
search localdomain
nameserver 202.96.128.86 # 希望修改成的DNS
nameserver 202.96.128.166 # 备用DNS
wilker@ubuntu:~$ sudo /etc/init.d/networking restart # 重启网络参考资料:http://feifeifather.blog.163.com/blog/static/21342203220140895556458/
可用源参考地址:http://wiki.ubuntu.org.cn/%E6%A8%A1%E6%9D%BF:16.04source
更新一下
1
wilker@ubuntu:~$ sudo apt-get update && sudo apt-get upgrade
列出可升级列表 并 升级所有
1
2
# sudo apt list --upgradable # 列出可升级软件
# sudo apt dist-upgrade # 升级所有,升级过程有点小漫长清除所有apt缓存
1
2
3
# sudo apt-get autoclean 清理旧版本的软件缓存
# sudo apt-get clean 清理所有软件缓存
# sudo apt-get autoremove 删除系统不再使用的孤立软件
环境变量
比如添加 go
1
2
3
4
5
6
7
8
9
$ whereis go # 查看 go 可执行文件在哪
go: /usr/local/go /usr/local/go/bin/go
$ vi .bash_profile # 添加到环境变量
GO_HOME=/usr/local/go/bin
export PATH=$PATH:$GO_HOME
$ source .bash_profile # 使之生效
安装 Chrome
使用安装命令
1
2
3
4sudo add-apt-repository ppa:a-v-shkop/chromium
sudo apt-get update
sudo apt-get install chromium-browser
sudo apt-get install google-chrome-stable
物理机安装 Ubuntu
- 如何安装Ubuntu 18.04 LTS桌面和服务器版,详细步骤 - https://www.sysgeek.cn/install-ubuntu-18-04-lts/
解决 vim 方向键 为 abcd 的问题
卸载现有的vim,重新装一个
1
2sudo apt-get remove vim-common
sudo apt-get install vim如果安装 vim 报错,参照 [解决 vim 安装问题](#解决 vim 安装问题)
解决 vim 方向键 e388 错误
问题: 方向键不起作用, 按左方向键 E388: 找不到定义
新增或修改 .vimrc, 中加入set term=ansi
1 | # vi .vimrc |
解决 vim 安装问题
如果安装 vim 报错
1
2
3
4
5root@62a1b3fcae28:~# apt-get install vim
Reading package lists... Done
Building dependency tree
Reading state information... Done
E: Unable to locate package vim则进行一下几步
1
2
3
4apt-get update
apt-get install apt-file
apt-file update
apt-get install vim
解决 vim 粘贴 缩进错乱
进入 粘贴模式
1
:set paste
按 i 键入 insert 模式
粘贴, shift + insert
升级Git
安装git
1
sudo apt-get install git # 此时安装好并不是最新的git
解决不是最新的的问题
1
2
3
4sudo add-apt-repository ppa:git-core/ppa
sudo apt-get update
sudo apt-get install -y git
git --version
安装 https 工具
不安装的情况下请求 https 会报错
1
E: The method driver /usr/lib/apt/methods/https could not be found.
安装 https 请求工具
1
2sudo apt-get install apt-transport-https ca-certificates
sudo apt-key adv --keyserver hkp://p80.pool.sks-keyservers.net:80 --recv-keys 58118E89F3A912897C070ADBF76221572C52609D # 添加GPG key
防火墙
- 开启:
ufw enable - 关闭:
ufw disable - 开放端口:
ufw allow 10080 - 状态:
ufw status
ssh 相关
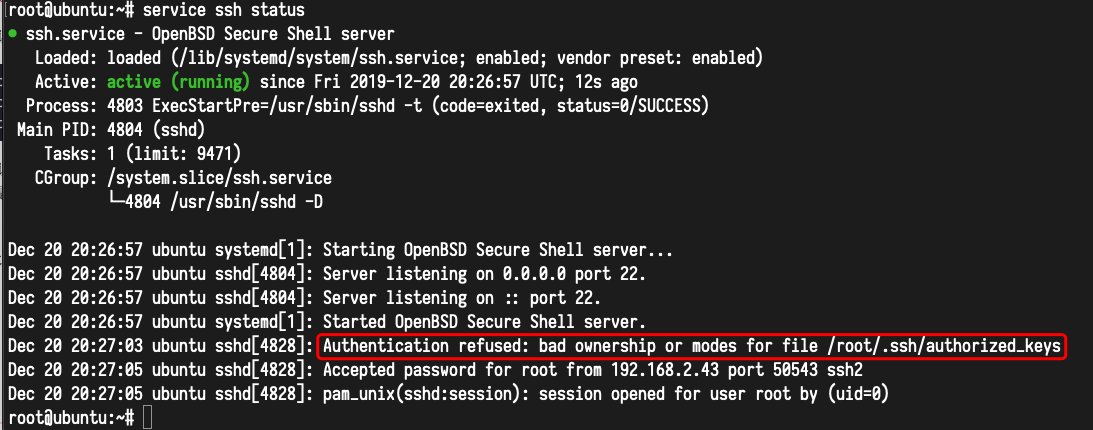
开启 ssh 服务
- 查看是否有服务
1 | wilker@ubuntu:~/Desktop/z_mywiki$ sudo service ssh status |
安装 open-server
1
2
3
4
5wilker@ubuntu:~/Desktop/z_mywiki$ sudo apt-get install openssh-server
Reading package lists... Done
Building dependency tree
Reading state information... Done
...启动服务
1
2
3
4
5
6
7
8
9wilker@ubuntu:~/Desktop/z_mywiki$ sudo /etc/init.d/ssh start # 启动服务
[ ok ] Starting ssh (via systemctl): ssh.service. # 启动 ok
wilker@ubuntu:~/Desktop/z_mywiki$ sudo service ssh status # 再查看一下服务,有 22 端口显示
● ssh.service - OpenBSD Secure Shell server
Loaded: loaded (/lib/systemd/system/ssh.service; enabled; vendor preset: enabled)
...
Jul 06 18:58:18 ubuntu sshd[17313]: Server listening on 0.0.0.0 port 22.
Jul 06 18:58:18 ubuntu sshd[17313]: Server listening on :: port 22.配置 ssh 端口 及 公钥认证文件,配置文件放在
/etc/ssh/sshd_config, 然后重启服务1
2
3
4
5
6
7
8
9
10
11
12
13
14
15wilker@ubuntu:~/.ssh$ sudo vi /etc/ssh/sshd_config
修改以下几个两个内容
Port 2233
PermitRootLogin no # 不可以用密码登录
PubkeyAuthentication yes
AuthorizedKeysFile %h/.ssh/authorized_keys # 公钥文件
wilker@ubuntu:~/.ssh$ sudo service ssh restart # 重启服务
wilker@ubuntu:~/.ssh$ sudo service ssh status
● ssh.service - OpenBSD Secure Shell server
Loaded: loaded (/lib/systemd/system/ssh.service; enabled; vendor preset: enabled)
...
Jul 06 19:19:18 ubuntu sshd[17859]: Server listening on 0.0.0.0 port 2233.
Jul 06 19:19:18 ubuntu sshd[17859]: Server listening on :: port 2233.上传公钥文件
1
2
3
4scp -P 2233 id_rsa.pub wilker@192.168.23.128:/home/wilker/.ssh/authorized_keys
wilker@192.168.23.128's password: # 需要输入 wilker 用户的密码
id_rsa.pub 100% 742 3.8KB/s 00:00 # ok然后就可以不用密码登陆了,在 物理机 上登录测试一下
1
2
3
4
5
6
7
8
9
10
11
12
13yangxuan@yangxuan-PC MINGW64 ~/.ssh
ssh -l wilker -p 2233 192.168.23.128
Welcome to Ubuntu 16.04.2 LTS (GNU/Linux 4.8.0-58-generic x86_64)
* Documentation: https://help.ubuntu.com
* Management: https://landscape.canonical.com
* Support: https://ubuntu.com/advantage
9 packages can be updated.
0 updates are security updates.
Last login: Thu Jul 6 19:20:38 2017 from 192.168.23.1
wilker@ubuntu:~$
ssh 连接超时
如果ssh客户端连接时报错
connection timed out,并且ip端口都正确设置,可能是服务端的端口没有允许外部连接,需要设置防火墙开放这个端口开启 2233 端口
1
2
3wilker@ubuntu:~/.ssh$ sudo ufw allow 2233
Rule added
Rule added (v6)
ssh authorized_keys 无效问题
修改权限:
2
3
chmod 700 /home/your_user/.ssh
chmod 600 /home/your_user/.ssh/authorized_keys
保持 ssh 会话不断开
- 怎样长时间保持SSH会话连接不断开? - https://support.huaweicloud.com/trouble-ecs/zh-cn_topic_0138293301.html
步骤:
编辑
/etc/ssh/sshd_config, 加入两行配置 (默认被注释掉了)1
2
3
4$ vi /etc/ssh/sshd_config
ClientAliveInterval 300
ClientAliveCountMax 50- ClientAliveInterval 300 : 表示每 300 秒向客户端发送心跳请求
- ClientAliveCountMax 50 : 表示 50 次心跳都失败后断开连接
重启 ssh 服务
1
$ service ssh restart
done!
root 被拒绝登录
报错: ssh not allowed because listed in denyusers
修改 ssh 配置
1 | $ vi /etc/ssh/sshd_config |
使用ssh登入不执行.bashrc解决方法
- https://blog.csdn.net/lawrencesgj/article/details/8979803
- https://qjzd.net/topic/56777682984f90d869bd23fc
先查看是否是 bash 登录
1
2$ echo $SHELL
/bin/sh如图,因为在给我分配用户的时候默认使用的是 sh 而不是 bash,结果怎么设置bashrc都是没用的啊
1
2
3
4
5$ chsh
Password:
Changing the login shell for guojun
Enter the new value, or press ENTER for the default
Login Shell [/bin/sh]: /bin/bash // 输入: /bin/bash如果是 bash 登录后, 还没有执行 ~/.bashrc, 在
/etc/profile文件最后添加1
2
3
4
5
6
7
8
9$ vi /etc/profile
# if running bash
if [ -n "$BASH_VERSION" ]; then
# include .bashrc if it exists
if [ -f "$HOME/.bashrc" ]; then
. "$HOME/.bashrc"
fi
fiexit 退出重新登录
ssh 免密登录报错
错误: Authentication refused: bad ownership or modes for file , 公钥权限不对
正确的权限应该为
1 | chmod g-w /home/[user] |
且所有者是当前用户
下面这个错误坑了有点久, 权限都设置正确了, 但是不能免密登录, 查看 ssh 日志 service ssh status
再看下 公钥 的权限, 是错误的
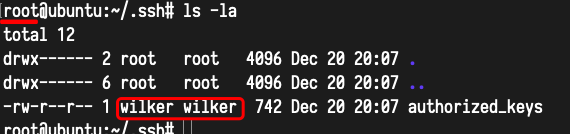
这个错误是在 wilker 的用户拷贝进去的, 应该使用 root 用户上传上去才对
删除掉重新用 root 用户上传 公钥
使用指定秘钥登录
-i 参数就是指定 秘钥文件
1 | $ ssh -i C:\Users\wilker\.ssh\id_rsa root@xxx.com |
执行远端脚本
多个命令用
;分割1
2
3
4
5$ ssh.exe root@aaa.bbb.com -p 22 -i C:/Users/hello/.ssh/id_rsa "~/hellocall.sh; pwd"
// 结果
hello call
/root
root 不能密码登录问题
修改文件 /etc/ssh/sshd_config
找到 PermitRootLogin 注释掉这句,在下面添加:PermitRootLogin yes
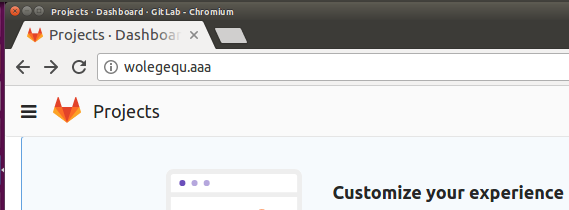
添加域名解析
编辑
/etc/hosts文件,然后重启 网络 服务1
2
3
4
5
6
7wilker@ubuntu:~/Desktop/a_gitlab$ sudo vi /etc/hosts
添加自定义域名解析
127.0.0.1 wolegequ.aaa wolegequ
wilker@ubuntu:~/Desktop/a_gitlab$ sudo /etc/init.d/networking restart # 重启 网络 服务
[ ok ] Restarting networking (via systemctl): networking.service.访问以下,本机搭建的 gitlab
windows secureCRT 中文乱码
- 修改编码, Seesion Options -> Terminal -> Appearance -> Fonts 改成 UTF-8
终端增加颜色显示
编辑 别名 文件
1
2
3
4
5
6
7
8
9
10
11wilker@ubuntu:~$ vi .bash_aliases
增加以下内容
alias cp='cp -i'
alias l.='ls -d .* --color=tty'
alias ll='ls -l --color=tty'
alias ls='ls --color=tty'
alias mv='mv -i'
alias rm='rm -i'
alias vi='vim'
alias which='alias | /usr/bin/which --tty-only --read-alias --show-dot --show-tilde'使之生效
1
2
3
4
5
6
7
8
9
10wilker@ubuntu:~$ source .bash_aliases # 使之生效
wilker@ubuntu:~$ alias # 查看一下
alias cp='cp -i'
alias l.='ls -d .* --color=tty'
alias ll='ls -l --color=tty'
alias ls='ls --color=tty'
alias mv='mv -i'
alias rm='rm -i'
alias vi='vim'
alias which='alias | /usr/bin/which --tty-only --read-alias --show-dot --show-tilde'
通过 .bashrc 配置颜色
编辑
# vi .bashrc文件,然后输入一下内容后,使其生效# source .bashrc1
2
3
4
5
6
7
8
9
10
11
12
13
14
15
16
17
18
19
20
21
22
23
24
25
26
27
28
29
30
31
32
33
34
35
36
37
38
39
40
41
42
43
44
45
46
47
48
49
50
51
52
53
54
55
56
57
58
59
60
61
62
63
64
65
66
67
68
69
70
71
72
73
74
75
76
77
78
79
80
81
82
83
84
85
86
87
88
89
90
91
92
93
94
95
96
97
98
99
100
101
102
103
104
105
106
107
108
109
110
111
112
113
114
115
116
117
118~/.bashrc: executed by bash(1) for non-login shells.
see /usr/share/doc/bash/examples/startup-files (in the package bash-doc)
for examples
If not running interactively, don't do anything
case $- in
*i*) ;;
*) return;;
esac
don't put duplicate lines or lines starting with space in the history.
See bash(1) for more options
HISTCONTROL=ignoreboth
append to the history file, don't overwrite it
shopt -s histappend
for setting history length see HISTSIZE and HISTFILESIZE in bash(1)
HISTSIZE=1000
HISTFILESIZE=2000
check the window size after each command and, if necessary,
update the values of LINES and COLUMNS.
shopt -s checkwinsize
If set, the pattern "**" used in a pathname expansion context will
match all files and zero or more directories and subdirectories.
shopt -s globstar
make less more friendly for non-text input files, see lesspipe(1)
[ -x /usr/bin/lesspipe ] && eval "$(SHELL=/bin/sh lesspipe)"
set variable identifying the chroot you work in (used in the prompt below)
if [ -z "${debian_chroot:-}" ] && [ -r /etc/debian_chroot ]; then
debian_chroot=$(cat /etc/debian_chroot)
fi
set a fancy prompt (non-color, unless we know we "want" color)
case "$TERM" in
xterm-color|*-256color) color_prompt=yes;;
esac
uncomment for a colored prompt, if the terminal has the capability; turned
off by default to not distract the user: the focus in a terminal window
should be on the output of commands, not on the prompt
force_color_prompt=yes
if [ -n "$force_color_prompt" ]; then
if [ -x /usr/bin/tput ] && tput setaf 1 >&/dev/null; then
# We have color support; assume it's compliant with Ecma-48
# (ISO/IEC-6429). (Lack of such support is extremely rare, and such
# a case would tend to support setf rather than setaf.)
color_prompt=yes
else
color_prompt=
fi
fi
修改输入行颜色
if [ "$color_prompt" = yes ]; then
PS1='${debian_chroot:+($debian_chroot)}\[\033[01;32m\]\u@\h\[\033[00m\]:\[\033[01;34m\]\w\[\033[00m\]\$ '
else
PS1='${debian_chroot:+($debian_chroot)}\u@\h:\w\$ '
fi
PS1='\[\033[01;35;1m\]\u\[\033[00m\]@\h:\[\033[34;1m\]\W\[\033[31;1m\]\$ \[\033[00m\]'
unset color_prompt force_color_prompt
If this is an xterm set the title to user@host:dir
case "$TERM" in
xterm*|rxvt*)
PS1="\[\e]0;${debian_chroot:+($debian_chroot)}\u@\h: \w\a\]$PS1"
;;
*)
;;
esac
enable color support of ls and also add handy aliases
if [ -x /usr/bin/dircolors ]; then
test -r ~/.dircolors && eval "$(dircolors -b ~/.dircolors)" || eval "$(dircolors -b)"
alias ls='ls --color=auto'
#alias dir='dir --color=auto'
#alias vdir='vdir --color=auto'
alias grep='grep --color=auto'
alias fgrep='fgrep --color=auto'
alias egrep='egrep --color=auto'
fi
colored GCC warnings and errors
some more ls aliases
alias ll='ls -alF'
alias la='ls -A'
alias l='ls -CF'
Add an "alert" alias for long running commands. Use like so:
sleep 10; alert
alias alert='notify-send --urgency=low -i "$([ $? = 0 ] && echo terminal || echo error)" "$(history|tail -n1|sed -e '\''s/^\s*[0-9]\+\s*//;s/[;&|]\s*alert$//'\'')"'
Alias definitions.
You may want to put all your additions into a separate file like
~/.bash_aliases, instead of adding them here directly.
See /usr/share/doc/bash-doc/examples in the bash-doc package.
if [ -f ~/.bash_aliases ]; then
. ~/.bash_aliases
fi
enable programmable completion features (you don't need to enable
this, if it's already enabled in /etc/bash.bashrc and /etc/profile
sources /etc/bash.bashrc).
if ! shopt -oq posix; then
if [ -f /usr/share/bash-completion/bash_completion ]; then
. /usr/share/bash-completion/bash_completion
elif [ -f /etc/bash_completion ]; then
. /etc/bash_completion
fi
fi
重启网络
命令
1
2wilker@ubuntu:/etc/bind$ sudo /etc/init.d/networking restart
[ ok ] Restarting networking (via systemctl): networking.service.
清除 dns 缓存
命令
1
2wilker@ubuntu:~$ sudo /etc/init.d/dns-clean
wilker@ubuntu:/etc/bind$ sudo /etc/init.d/networking restart # 同时重启网络
中文乱码问题
输入中文问题解决
安装中文包和英文包
1
# apt-get install language-pack-zh-hans language-pack-zh-hans-base language-pack-gnome-zh-hans language-pack-gnome-zh-hans-base
打开 /etc/environment
1
2
3
4# vi /etc/environment
LANG="zh_CN.UTF-8"
LANGUAGE="zh_CN:zh:en_US:en"打开 /var/lib/locales/supported.d/local
1
2
3
4
5
6
7# vi /var/lib/locales/supported.d/local
en_US.UTF-8 UTF-8
zh_CN.UTF-8 UTF-8
zh_CN.GBK GBK
zh_CN GB2312
# locale-gen # 生成打开 /etc/default/locale
1
2
3# vi /etc/default/locale
LANG="zh_CN.UTF-8"
LANGUAGE="zh_CN:zh:en_US:en"重启就ok
显示中文乱码问题解决
如果显示中文乱码,则安装 utf8 语言包
1 | # apt-get install language-pack-en |
http://www.nikochan.cc/2017/10/30/DockerSolution/
https://segmentfault.com/q/1010000006953395
修改密码
1 | admin@ubuntu_1604:~$ passwd admin # admin为账号名 |
关机 重启
1 | $ shutdown now // 关机 |
shell
判断参数是否为 null
1 | para1= |
获取外网ip
1 | $ curl -s whatismyip.akamai.com |
修改所属权限
修改 文件/文件夹 的 所有者/所有组
1 | $ ll |
查看安装软件版本
姿势一
1 | root@09f250e7060f:/app/my_hexo_blog# apt list --installed | grep pandoc |
姿势二
1 | root@09f250e7060f:/app/my_hexo_blog# apt-cache show pandoc |
列出目录树
参考: linux 如何以树形结构显示文件目录结构 - https://blog.csdn.net/xuehuafeiwu123/article/details/53817161
1 | # apt install tree # 安装 tree |
tree 以树状图显示所有文件
tree -L N 以树状图显示所有文件,子文件夹显示到第 N 层
系统日志 rsyslog
参考: 如何对rsyslog进行配置 - https://www.mtyun.com/library/how-to-config-rsyslog
貌似 16.04 默认没有安装 rsyslog 模块
安装 rsyslog
1
# apt install rsyslog
编辑配置, 去掉相关注释, 就可以打开对应模块的日志
1
2
3# vi /etc/rsyslog.d/50-default.conf
# 找到cron.log相关行,将前面注释符#去掉,保存退出,重启rsyslog:- 加入其它进程的入职, 比如 ssh, 在最后一行加入 就可以看到 ssh 进程相关的日志了
1
ssh* /var/log/ssh.log
1
2
3root@7c49aa7a8304:/# cat /var/log/ssh.log
...
Sep 18 07:45:01 7c49aa7a8304 rsyslogd: rsyslogd's userid changed to 106 Sep 18 07:45:01 7c49aa7a8304 rsyslogd: [origin software="rsyslogd" swVersion="8.32.0" x-pid="4439" x-info="http://www.rsyslog.com"] start Sep 18 07:45:26 7c49aa7a8304 sshd[4465]: Server listening on 0.0.0.0 port 33822. Sep 18 07:45:26 7c49aa7a8304 sshd[4465]: Server listening on :: port 33822. Sep 18 07:45:26 7c49aa7a8304 sshd[4467]: Bad protocol version identification 'GET / HTTP/1.1' from 192.168.2.2 port 59156
- 加入其它进程的入职, 比如 ssh, 在最后一行加入
重启系统后要手动启动服务. 也可以考虑加载开启自启动中
升级 python2 到 python3
如果没有安装 python3, 先先进行安装. # apt install python3
移除原来的 python 可执行程序
1
2
3
4# whereis python # 先找到在哪
python: /usr/bin/python
# # rm /usr/bin/python # 删除添加一个软连接
1
2
3
4# whereis python3 # 先找到在哪
python3: /usr/bin/python3
# ln -s /usr/bin/python3 /usr/bin/python # 软连过去done! 测试一下
1
2
3
4
5# python
Python 3.5.2 (default, Nov 12 2018, 13:43:14)
[GCC 5.4.0 20160609] on linux
Type "help", "copyright", "credits" or "license" for more information.
>>>
安装 pip3
1 | # apt install python3-pip |
pip3 install --upgrade pip升级后报错:File "/usr/bin/pip3", 输入一下命令重装1
python3 -m pip uninstall pip && apt install python3-pip --reinstall
修改时区
使用命令:
tzselect, 选择好时区1
2
3
4
5
6
7
8
9
10
11
12
13
14
15
16
17
18
19
20
21
22
23
24
25
26
27
28
29
30
31
32
33root@v2ray:~# tzselect
Please identify a location so that time zone rules can be set correctly.
Please select a continent, ocean, "coord", or "TZ".
4) Asia
#? 4
Please select a country whose clocks agree with yours.
9) China 26) Laos 43) Taiwan
#? 9
Please select one of the following time zone regions.
1) Beijing Time
2) Xinjiang Time
#? 1
The following information has been given:
China
Beijing Time
Therefore TZ='Asia/Shanghai' will be used.
Selected time is now: Sat Dec 5 02:29:22 CST 2020.
Universal Time is now: Fri Dec 4 18:29:22 UTC 2020.
Is the above information OK?
1) Yes
2) No
#? 1
You can make this change permanent for yourself by appending the line
TZ='Asia/Shanghai'; export TZ
to the file '.profile' in your home directory; then log out and log in again.
Here is that TZ value again, this time on standard output so that you
can use the /usr/bin/tzselect command in shell scripts:
Asia/Shanghai拷贝时区文件
1
2
3
4
5root@v2ray:~# cp /etc/localtime /etc/localtime_utc // 备份一下
root@v2ray:~# cp /usr/share/zoneinfo/Asia/Shanghai /etc/localtime // 覆盖当前时区
root@v2ray:~# date // 查看一下就是上海时间, CST 也就是 东八区
Sat Dec 5 02:30:27 CST 2020
获取当前 shell 脚本所在目录
- 参考: shell 中获取文件真实路径(绝对路径) - https://blog.csdn.net/LGD_2008/article/details/45913957
1 | CURDIR=$(cd $(dirname ${BASH_SOURCE[0]}); pwd ) |
nodejs 安装升级
安装
1
2
3
4
5
6$ sudo apt-get install nodejs-dev
$ sudo apt-get install npm
$ node -v
$ npm -v
// 可以看到版本是6.xxx.xx升级node版本
1
2
3
4
5
6
7
8$ sudo npm cache clean -f
$ sudo npm install -g n
$ sudo n stable
installing : node-v10.16.3
mkdir : /usr/local/n/versions/node/10.16.3
fetch : https://nodejs.org/dist/v10.16.3/node-v10.16.3-linux-x64.tar.gz
installed : v10.16.3 (with npm 6.9.0)替换原有的 node
1
2
3
4
5
6
7
8
9$ whereis node // 查找 node 所在的 可执行 文件
node: /usr/bin/node /usr/local/bin/node
$ rm -f /usr/bin/node
$ rm -f /usr/local/bin/node
$ ln -s /usr/local/n/versions/node/10.16.3/bin/node /usr/bin/node
$ ln -s /usr/local/n/versions/node/10.16.3/bin/node /usr/local/bin/node
// 同样 npm 也替换软连接
启动后台进程
1 | command >> out.file 2>&1 & |
启动后台进程 pic_download.sh 并把日志输出 aaa.log 文件中.
比如里面执行的是 python, 会把 print 的日志都输出到 aaa.log 文件中
1 | /my_git_repo/qiniuPicture/pic_download.sh >> /my_git_repo/qiniuPicture/aaa.log 2>&1 |
参考: https://blog.csdn.net/liuyanfeier/article/details/62422742
查看出口 ip
使用命令: curl cip.cc
1 | # curl cip.cc |
查看 ip 所在地
1 | # curl cip.cc/121.10.186.69 |
查看系统版本
1 | $ lsb_release -a |
新装 Ubuntu 系统设置密码
- Ubuntu1804 | 如何用root用户登陆Ubuntu - https://www.jianshu.com/p/c8ee39488d2a
用新创建的用户 aaa 登录进去
设置 root 的新密码
1
sudo passwd root
切换到 root
1
su - root
ubuntu 1804 设置静态 ip
- Ubuntu 18.04 LTS 设置固定 IP - https://blog.csdn.net/github_38336924/article/details/87930932
先查看本机 ip, 命令:
ip a1
2
3
4
5
6
7root@ubuntu:~# ip a
2: ens33: <BROADCAST,MULTICAST,UP,LOWER_UP> mtu 1500 qdisc fq_codel state UP group default qlen 1000 // ens33 就是物理网卡
link/ether 00:0c:29:77:ab:58 brd ff:ff:ff:ff:ff:ff
inet 192.168.1.188/24 brd 192.168.1.255 scope global ens33
valid_lft forever preferred_lft forever
inet6 fe80::20c:29ff:fe77:ab58/64 scope link
valid_lft forever preferred_lft forever修改配置文件
/etc/netplan/xxx.yaml, 这个文件可能名字不一样, 但这个目录下只有一个文件1
2
3
4
5
6
7
8
9
10$ vi /etc/netplan/50-cloud-init.yaml
network:
ethernets:
ens33:
addresses: [192.168.1.177/24]
gateway4: 192.168.1.1
nameservers:
addresses: [192.168.1.1]
version: 2192.168.1.177/24: 意思就是设置 ip 为192.168.1.177
使配置即使生效
1
$ netplan apply
修改 Ubuntu 默认编辑器
系统默认的编辑器 EDITOR 是 nano. 不好使. 修改为 vim
查一下 vim 路径
1
2root@c910f87548b2:~# whereis vim
vim: /usr/bin/vim直接在
~/.bashrc加入 EDITOR 环境变量1
2
3
4$ vi ~/.bashrc
export EDITOR=/usr/bin/vim
$ source ~/.bashrc # 使其生效
apt 报错: 验证公钥失败
报错: [The following signatures couldn't be verified because the public key is not available: NO_PUBKEY XXXX]
apt-key adv –recv-keys –keyserver keyserver.ubuntu.com XXXXXX
apt-get update
参考: https://www.cnblogs.com/wangjq19920210/p/11611094.html
查看所有 service 命令服务
1 | $ service --status-all |
清楚命令行历史记录
历史记录保持在 ~/.bash_history 文件中, 如果要删除指定的命令, 直接 vim 进去删除并保存即可.
修改命令行前缀
- linux下改变命令行前缀 - https://blog.csdn.net/fusugongzi/article/details/77978213
例如在环境变量中加入 PS1 值 : export PS1='\e[1;36m[\u@\h \w]\$ \e[0m', 然后 source 一下

- \u – Username
- \h – Hostname
- \w – Full path of the current working directory
样式01:
1
PS1='${debian_chroot:+($debian_chroot)}\[\033[01;32m\]\u@\h\[\033[00m\]:\[\033[01;34m\]\w\[\033[00m\]\$ '

命令行忽略大小写
- Linux终端忽略大小写自动补全 - https://blog.csdn.net/weixin_43833642/article/details/104712175
在
~/.inputrc中增加一样1
set completion-ignore-case on
退出重新登录即生效
图片转换-WebP
- 如何在Ubuntu Linux中使用WebP图像 - https://www.codenong.com/f-webp-ubuntu-linux/
流程
安装
webp1
$ sudo apt-get install webp
转换
encode
1
$ cwebp -q 80 example.jpeg -o example.webp
-q是压缩质量. where quality is between 0 (poor) to 100 (very good). Typical value is around 80.
decode
1
2
3
4
5
6
7
8
9
10
11
12$ dwebp example.webp -o example.png
---
### 升级 node npm 到最新版本
1. 安装
```json
$ apt install nodejs npm查看版本
1
2$ node -v
$ npm -v
升级 node
1
2$ npm install -g n
$ n stable升级 npm
1
$ npm install npm -g
退出 登录 (bash) 重进生效
检测网络连通性 - 状态码 204
检测地址, 如谷歌地址: http://www.gstatic.com/generate_204
1
2$ curl -s -w "%{http_code}\n" http://www.gstatic.com/generate_204
204- HTTP 204 状态码表示 “无内容”(No Content)。这是一个成功状态码,意味着服务器已经成功处理了请求,但没有返回任何内容。
ls 命令显示除文件单位
显示 KB MB GB 单位, 文件夹固定显示 4.0k
1
2
3
4
5ls -lh
drwxr-xr-x 3 root root 4.0K Aug 4 11:33 dir01
-rw-r--r-- 1 root root 15M Jul 25 14:19 hello.zip
-rw------- 1 root root 26K Aug 5 14:28 world.txt