vscode-记录
vscode-记录, 事无巨细, 统统都记
lua 使用
加入lua代码提示
搜索插件 lua (lua language support fo visual studio code) 安装
建个运行lua的任务
https://blog.otorb.com/2017/01/31/fast-execution-of-scripts-in-vscode/
protobuff 提示
搜索插件 proto(vscode-proto3) 安装
常用插件
Bracket Pair Colorizer :对括号对进行着色,
vscode-icon
vscode-proto3
debugger for chrome
lua(不可以跳转方法,有 内置库提示) or vscode-lua(可以跳转方法,没有内置库提示)
python
c#
- debugger for unity : 断点调试unity项目
- 需要安装 dotnet 库
markdown all in one
npm
path intellisense
Material icon theme 主题
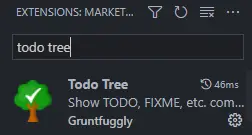
todo tree
code runner 运行代码,快捷键 ctrl + alt + n
多开 vscode
ctrl + shift + n
任务配置 (task.json)
变量替换 Variable substitution
当创作任务配置时,一写预先定义的一般变量经常很有用。VS Code支持tasks.json中字符串里的变量替换,并且提供以下预先定义的变量:
When authoring tasks configurations, it is often useful to have a set of predefined common variables. VS Code supports variable substitution inside strings in the tasks.json file and has the following predefined variables:
- ${workspaceRoot} VS Code中打开的文件夹的路径
- ${file} 当前打开的文件路径
- ${relativeFile} 当前打开的文件相对于
workspaceRoot的路径 - ${fileBasename} 当前打开的文件的basename (不包括路径、后缀名)
- ${fileDirname} 当前打开的文件的文件夹名
- ${fileExtname} 当前打开的文件扩展名
- ${cwd} 任务运行器启动时的当前路径
测试一下:指定程序加开文件 和 运行脚本
配置多个任务
1
2
3
4
5
6
7
8
9
10
11
12
13
14
15
16
17
18
19
20
21
22
23
24
25
26
27
28
29
30
31
32
33
34
35
36
37
38
39
40
41
42
43
44
45
46
47
48
49
50
51
52
53
54
55
56
57
58
59
60
61
62
63
64
65
66
67
68
69
70
71
72
73
74
75
76
77
78
79
80
81
82
83
84
85
86
87
88
89
90
91
92
93
94
95
96
97
98
99
100
101
102
{
// See https://go.microsoft.com/fwlink/?LinkId=733558
// for the documentation about the tasks.json format
"version": "2.0.0",
"tasks": [
{
"label": "typroa",
"type": "shell",
"presentation": {
"echo": true,
"reveal": "never",
"focus": false,
"panel": "shared"
},
"command": "Typora", //需要将 Typora.exe 配置到环境变量中
"args": [
"${file}"
],
"group": {
"kind": "build",
"isDefault": true
},
"problemMatcher": []
},
{
"label": "push z_mywiki",
"type": "shell",
"presentation": {
"echo": true,
"reveal": "always",
"focus": true,
"panel": "shared"
},
"command": "python",
"args": [
"${workspaceRoot}/git_update_push.py"
],
"group": {
"kind": "build",
"isDefault": true
},
"problemMatcher": []
},
{
"label": "lua",
"type": "shell",
"presentation": {
"echo": true,
"reveal": "always",
"focus": true,
"panel": "shared"
},
"command": "lua", //需要将 lua.exe 解释器 配置到环境变量中
"args": [
"${file}"
],
"group": {
"kind": "build",
"isDefault": true
},
"problemMatcher": []
}
,
{
"label": "python",
"type": "shell",
"presentation": {
"echo": true,
"reveal": "always",
"focus": true,
"panel": "shared"
},
"command": "python",
"args": [
"${file}"
],
"group": {
"kind": "build",
"isDefault": true
},
"problemMatcher": []
}
,
{
"label": "bash_cmd", //需要将 bash.exe 解释器 配置到环境变量中
"type": "shell",
"presentation": {
"echo": true,
"reveal": "always",
"focus": true,
"panel": "shared"
},
"command": "bash",
"args": [],
"group": {
"kind": "build",
"isDefault": true
},
"problemMatcher": []
}
]
}ctr + shift + b,然后选择对应的任务(label)

ps: 修改环境变量 后需要重启 vscode 才能生效
多任务顺序执行
使用 dependsOn 参数
1 | { |
执行 taskCCC 时, 会执行 taskBBB -> taskAAA -> taskCCC
加入下拉参数
使用 input 占位符: ${input:xxx}
1 | { |
启动配置 (launch.json)
不同项目启动配置不同
启动前执行一个task
在 launch.json 中增加一个字段配置 启动前 执行的 task.json 中任务
1 | "preLaunchTask": "build_text", |
快捷键
| 快捷键 | 功能 |
|---|---|
| f12 | 跳转到 定义 |
| shift + alt + f12 | 左边栏 列出所有 引用 (建议) |
| shift + f12 | 小窗口 列出所有 引用 |
| alt + f12 | 小窗口 列出 定义 |
| alt + ← | 向后导航 (返回上一处焦点所在) |
| alt + → | 向前导航 |
| ctrl + shift + o | 列出所有方法 |
| ctrl + . | 列出 帮助 提示 |
| ctrl + \ | 分 2、3个屏 |
| ctrl + 1\2\3 | 焦点移到 第 1、2、3个屏 |
| ctrl + 0 | 焦点移到 侧边栏 |
| ctrl + alt + 左右方向键 | 分屏/合屏 |
| ctrl + shift + w | 关闭所有页签,并 杀掉进程 |
| ctrl + k, ctrl + w | 关闭所有页签,所有屏 |
| ctrl + k, w | 关闭所有页签,当前屏 |
| shift + alt + 1 | 切换 分屏 水平/垂直 |
| ctrl + pageup | 切换 上一个页签 |
| ctrl + pagedown | 切换 下一个页签 |
| ctrl + shift + t | 打开上一个 已关闭页签 |
| ctrl + k , s | 批量保存 |
| ctrl + r | 切换工程 (按住 ctrl 再点击,会在新窗口打开该工程) |
| ctrl + shift + e | 资源管理器 |
| ctrl + shift + f | 搜索 |
| ctrl + shift + g | 源代码管理器 |
| ctrl + shift + d | 调试 |
| ctrl + shift + x | 插件管理 |
| ctrl + shift + u | 输出 |
| f8 | 转到 报错 行 |
| f11 | 全屏 |
| ctrl + k , r | 打开文件所在的文件夹 |
| ctrl + b | 显示隐藏 左边栏 |
| ctrl + q | 打开视图管理器,可选择 终端、资源管理、调试 等等面板 |
| ctrl + k, ctrl + t | 选择 编辑器主题 |
| 终端相关 | |
| ctrl + ` | 终端 |
| ctrl + shift + ` | 新建终端 |
| ctrl + k | 清除 |
| shift + pageup | 向上翻页 |
| shift + pagedown | 向下翻页 |
| ctrl + j | 显示隐藏 终端 |
| 编辑相关 | |
| ctrl + [ | 行 往左缩进 |
| ctrl + ] | 行 往右缩进 |
| f2 | 重命名 符号 |
| ctrl + shift + o | 列出所有方法 (符号) |
| shift + alt + f | 格式化 代码 |
| 焦点在左边栏 | |
| shift + alt + r | 打开 所选文件 所在 资源管理器 |
| shift + alt + c | 复制 所选文件 路径 |
标签栏下显示路径及符号
在 用户设置 (setting.json) 中增加 (1.26.1 之后的特性)
1 | "breadcrumbs.enabled": true, |
快捷键:
- ctrl + shift + . 聚焦在所在符号
- ctrl + ←/→ 左右切换
输入关键字还可以定位到具体行

我的设置
1 | { |
同步设置 Sync
插件: Sync
github token: 7e76e026asdasdasdasdasdasdasd
id: a0384622asdasdasdasdasdasdasd
上传配置: shift + alt + u (upload)
下载配置: shift + alt + d (download) (需要重启 vscode,才能看到同步下来的插件)
- 设置为 强制上传 与 强制下载 , 确保成功
- advanced option -> toggle force upload/download
sftp 插件
配置模板
1
2
3
4
5
6
7
8
9
10
11
12
13
14
15
16
17
18
19
20
21{
"name": "test sftp",
"context": ".",
"protocol": "sftp",
"host": "xxx.com",
"port": 22,
"username": "admin",
"privateKeyPath" : "c:/Users/Administrator/.ssh/id_rsa",
"remotePath": "/app/test_sftp",
"connectTimeout": 5000,
"uploadOnSave": false,
"downloadOnOpen": false,
"syncMode": "update",
"ignore": [],
"watcher": {
"files": "a.ok",
"autoUpload": true,
"autoDelete": true
},
"concurrency": 512
}
终端日志显示到最新

集成 cmder
在 settings.json 中增加 cmder 的配置即可
1 | "terminal.integrated.shell.windows": "C:\\Windows\\System32\\cmd.exe", |
插件
todo tree
配置
1
2
3
4
5
6
7
8
9
10
11
12
13
14
15
16
17
18
19
20
21
22
23"todo-tree.regex.regex": "((--|//|#|<!--|;|/\\*|^)\\s*($TAGS))", // 识别标签的规则
"todo-tree.general.tags": [
"MYTD", // 左侧要生成的 标签
],
"todo-tree.regex.regexCaseSensitive": false, // 大小写不明感
"todo-tree.highlights.defaultHighlight": {
"foreground": "white",
"background": "yellow",
"icon": "check",
"rulerColour": "yellow",
"type": "tag",
"iconColour": "yellow"
},
"todo-tree.highlights.customHighlight": {
"MYTD": { // 自定义关键字
"foreground": "black",
"background": "yellow",
"icon": "tag",
"rulerColour": "yellow",
"iconColour": "yellow",
"rulerLane": "full"
}
},
过滤掉无用文件夹
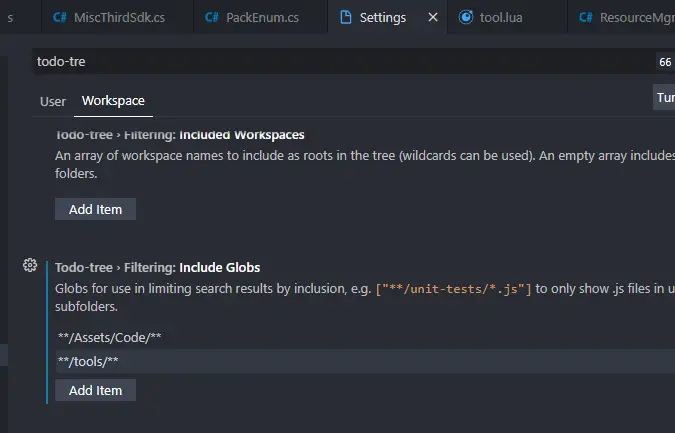
过滤保留目的字符串

Unity 配置
- 安装最新的 .net sdk, 也就是下面两个,下载地址: https://www.microsoft.com/net/learn/get-started/macos
- dotnet-sdk-2.2.103-win-gs-x64.exe
- NDP471-DevPack-ENU.exe
- 安装vscode插件: C# extension
- 安装mono,下载地址: http://www.mono-project.com/download/#download-mac
重启 OmniSharp
才不会提示一堆报错无用提示. ctrl + shift + p 调出命令面板, 输入 restart , 选择: 重启OmniSharp

显示出 解决方案 就表示ok了

踩坑
ctrl + p 打开文件搜多文件打开是, 报错: Uri Error: scheme xxx
貌似是路径找不到, 将项目根目录重命名后重新拖进vscode中即可解决.
tab 键变为了切换窗口, 而不是在编辑器窗口缩进代码
Ctrl+M Toggle Use of Tab Key for Setting Focus
参考: Visual Studio Code Tab Key Not Working - https://stackoverflow.com/questions/35519538/visual-studio-code-tab-key-not-working
csharp 扩展报错: cannot active the debugger for unity
将 c# 插件降级到 1.21.12
参考: https://github.com/OmniSharp/omnisharp-vscode/issues/3620
老是报错
错误: 尝试在目标目录创建文件时出错
VS Code 运行时会弹出unins000.exe 尝试在目标目录创建文件时出错
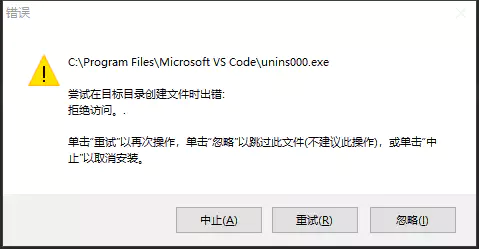
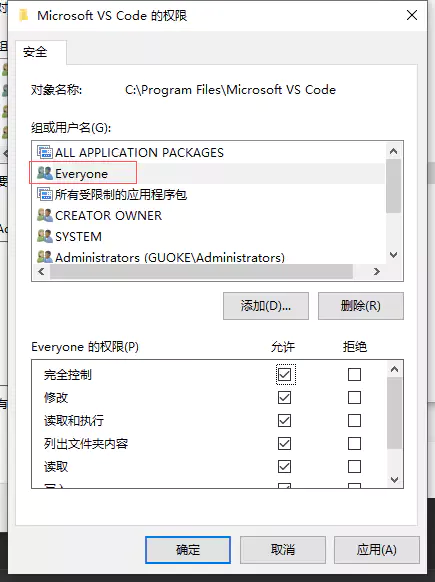
解决办法是,装VS Code 目录权限添加 Everyone 用户完全控制就可以了
参考: https://www.jianshu.com/p/2dd8d511d433
csharp 控制台程序配置
主要是解决报错: "Only 64-bit processes can be debugged". 参考: https://stackoverflow.com/questions/43343721/net-core-debugging-with-vs-code-only-64-bit-processes-can-be-debugged
修改目的平台, 有两种方式
正统方式, 用 vs 打开工程, 右键项目 -> build, platform target 修改为 x64

直接修改 CSharpLab.csproj 文件也行, 找到 PlatformTarget 属性直接改为 x64
1
<PlatformTarget>x64</PlatformTarget>
launch.json 配置
1 | { |
配置中使用环境变量
如: c_cpp_properties.json
1 | { |
设置 cmder 为 terminal
参考: https://blog.csdn.net/leonhe27/article/details/81210000
修改 settings.json
1 | "terminal.integrated.shell.windows": "cmd.exe", |
注意,terminal.integrated.shell.windows 确实是 cmd.exe,而不是 cmder.exe. 此外,要将 [cmder_root] 换成你的 cmder 安装路径。
等宽 分屏
ctrl + \增加一个分屏ctrl + w干掉增加的分屏, 就等宽分屏了
bookmarks 标签
安装 bookmarks 插件
ctrl + alt + k: 打开/关闭 标签ctrl + alt + J/L: 跳转到 上/下 标签ctrl + shift + p里面可以看到 bookmarks 更多功能