unity-与Android交互(unity、android studio)
测试工程:
- unity : https://gitee.com/yangxuan0261/UnityAndroidAAR
- as : https://gitee.com/yangxuan0261/AndroidAAR
测试工程2:
- as : https://gitee.com/yangxuan0261/UnityAndroidPlugin, (接过百度sdk的工程, 使用 yx_baidu_loc 分支)
使用的是工具是 unity5.4,Android Studio 2.0(后面简称 AS)
网上找到的教程大部分都是导出jar给unity调用,极少是用AS导出 aar 包给unity调用
用AS导出jar需要修改一下 build.gradle 文件,但这里主要是说导出 aar包
实现unity掉java里面的代码有两种方式
- 第一种方式,自己写个java类,jni需要的 中转站cpp、 Android.mk、Application.mk,然后用ndk打成so库(无疑巨麻烦,官网例子直接可以下,传送门http://docs.unity3d.com/Manual/PluginsForAndroid.html
- 第二种方式,直接使用unity分装好的类 AndroidJavaClass 等,无需自己打so库(巨方便,本文将的就是这种)
前篇
因为现在eclipse已经停止维护了,官方推荐是用AS来构建Android app,然后导出 aar 包给unity使用
可以用cocos2dx的方式去理解,也是用一个 MainActivity 去继承 unity封装好的 UnityPlayerActivity ,当前应用就是的主线程就是跑在 MainActivity 中
本文是导出 aar 的形式, 其实也是提取里面的 jar 包.
编写的原生 java 代码是以 库 的方式引入到 unity 中, 所以在 as 的模块中是 库模块, 只要在 mainTemplate.gradle 指定启动的 activity 为 库模块 中的 activity 就可以就用到自己写的代码.
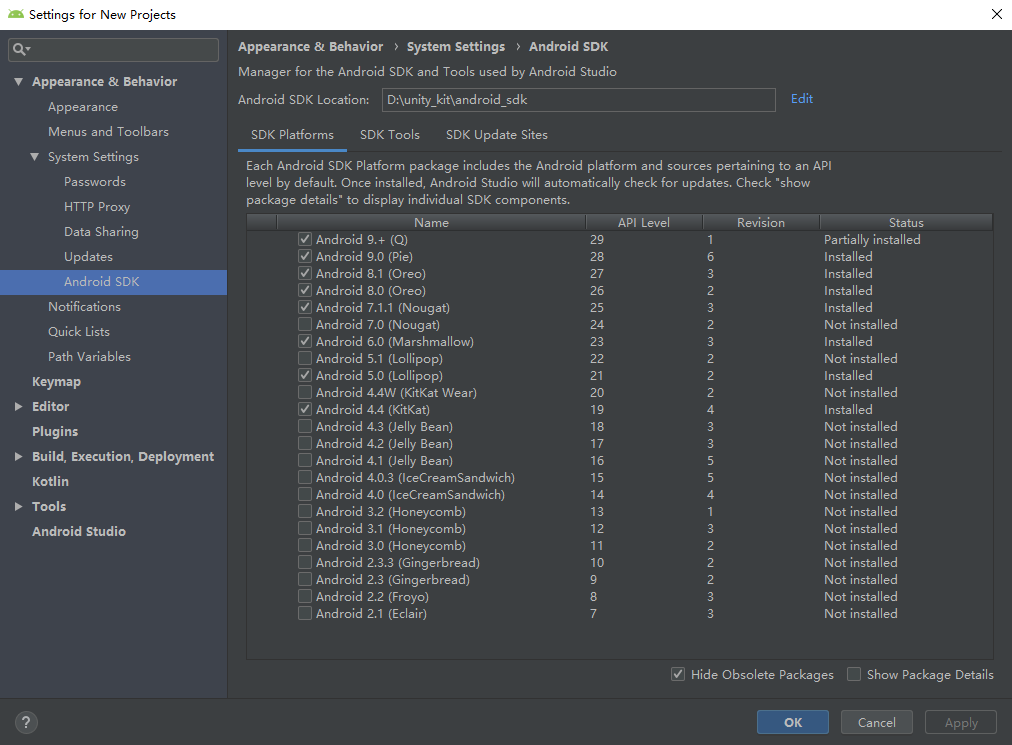
Android Studio 的必要条件库
SDK Tools
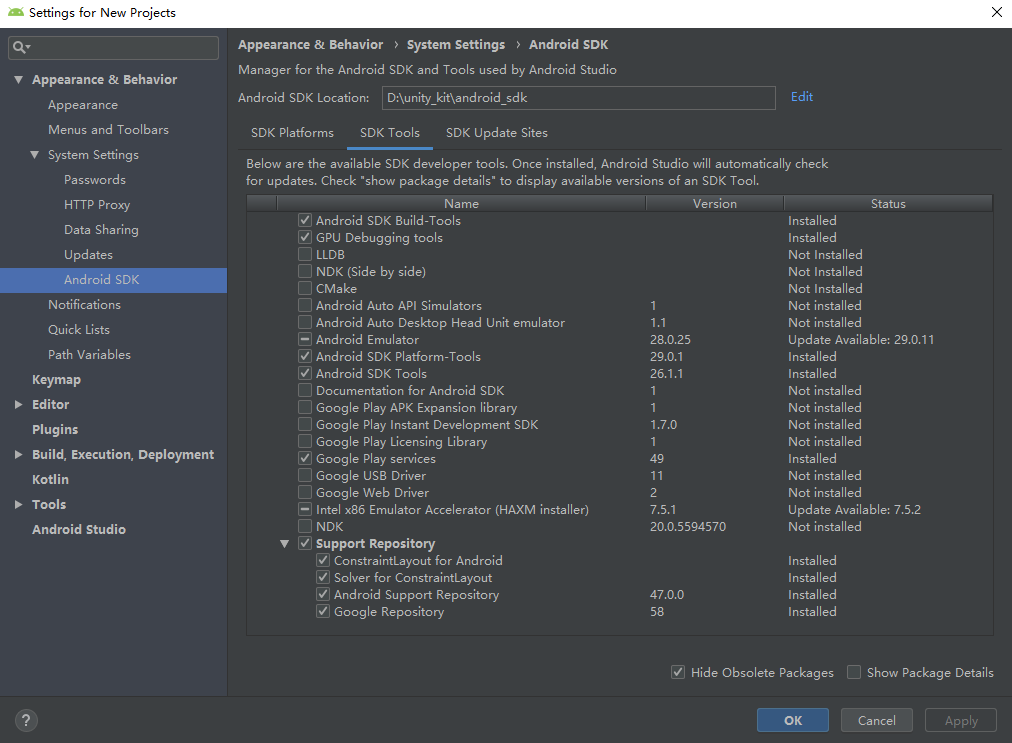
SDK Platforms 根据需要下载
生成库 (arr包)
1、使用AS构建一个app工程
- File->New->New Project
- 包名 Package Name 一定要和unity中打包参数 Bundle Identifier 中的包名一致,这里用 com.test.yangx
- 设置 mini sdk,
- 选个 Empty Activity
- 默认的 MainActivity即可,然后 Finish
2、导入 unity 的 jar 到AS工程中
- 在 unity5 中,在 D:\Unity\Editor\Data\PlaybackEngines\AndroidPlayer\Variations\mono\Release\Classes 的路径下有个 classes.jar
把这个 classes.jar 丢进AS工程的 libs 中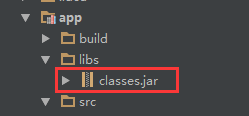
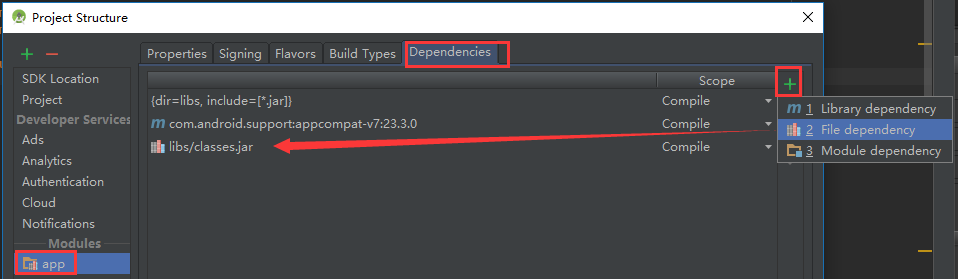
- 工程引用这个 classes.jar,
- 右键 工程-> Open Module Settings
3、编写 MainActivity 代码
完整代码如下
1 | package com.test.yangx; |
4、修改 AndroidManifest.xml
这个 AndroidManifest.xml 可以使用unity中默认的, UNITY_PATH\Editor\Data\PlaybackEngines\AndroidPlayer\Apk\AndroidManifest.xml
1 |
|
package 一定不要和正式报名一致!!!
package 一定不要和正式报名一致!!!
package 一定不要和正式报名一致!!!
否则会引发这个报错 [报错: Program type already present: com.xxx.BuildConfig](#报错: Program type already present: com.xxx.BuildConfig)
因为 unity 会用 编辑器 中指定的报名 来打包, 并不会用这个 AndroidManifest.xml 中的 package
5、修改 build.gradle
将
apply plugin: 'com.android.application'修改为apply plugin: 'com.android.library', 这样才能导出一个 aar 包, 不然 application 构建的是 apk删除掉这句代码
applicationId "com.test.yangx"完整代码
1
2
3
4
5
6
7
8
9
10
11
12
13
14
15
16
17
18
19
20
21
22
23
24
25
26apply plugin: 'com.android.library' // 修改为库
android {
compileSdkVersion 23
buildToolsVersion "23.0.3"
defaultConfig {
minSdkVersion 19
targetSdkVersion 23
// applicationId "com.test.yangx // 注释掉
versionCode 1
versionName "1.0"
}
buildTypes {
release {
minifyEnabled false
proguardFiles getDefaultProguardFile('proguard-android.txt'), 'proguard-rules.pro'
}
}
}
dependencies {
compile fileTree(dir: 'libs', include: ['*.jar'])
compile 'com.android.support:appcompat-v7:23.3.0'
compile files('libs/classes.jar')
}- 假如加入了相关依赖, 需要 refresh 一下, 才能用 alt + enter 去 import 相关的包, 比如加了 Google, Facebook 的依赖 ( implementation 是新的写法, 上面 compile 是老的写法 )
1
2
3
4
dependencies {
implementation 'com.google.android.gms:play-services-auth:17.0.0'
implementation 'com.facebook.android:facebook-login:[5,6)'
}
- 假如加入了相关依赖, 需要 refresh 一下, 才能用 alt + enter 去 import 相关的包, 比如加了 Google, Facebook 的依赖 ( implementation 是新的写法, 上面 compile 是老的写法 )
6、生产 aar 包
有两种方式可以生成aar包
Build->Build APK.
gradle 可视化任务中, 双击 build
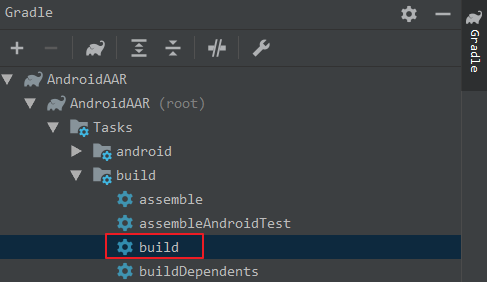
!!!(如果遇到把报错, 可以尝试清空一下工程 build -> clean project , 重新构建.)!!!
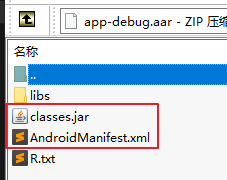
成功会在 app\build\outputs\aar 目录下出现一个 app-debug.aar 包
然后用 解压软件打开这个包,删掉 libs 下的 classes.jar (没错,就是之前重unity中拷过来的, 因为unity打包时会重新把自带的 classes.jar 打进去,如果不删掉它会打包报错,冲突)
然后这就是最终需要的 aar 包, 其实用到只需要里面的两个东西就行
然后把这个 aar 里的 AndroidManifest.xml (指定继承了 UnityPlayerActivity 类的类 ) 和 classes.jar (自己编写的代码类) 文件 丢进 unity 的 Assets\Plugins\Android 目录下
如果 libs 有使用到第三方库的话, 也需要将其丢进 Assets\Plugins\Android 目录下

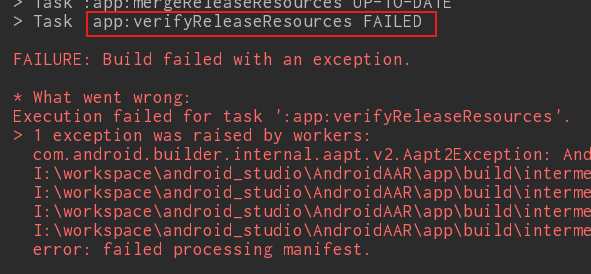
如果 build 遇到资源验证报错, 可以暂且无视, 设置因为在 AndroidManifest.xml 中配置了资源, 但 as 工程中有没有, 最后还是用 unity 编辑器中指定的资源
7、写个c# 测试
1 | using UnityEngine; |
8、最后 unity 打包 apk
修改测试参数
mini sdk 一致
9、done
装在模拟器上测试以下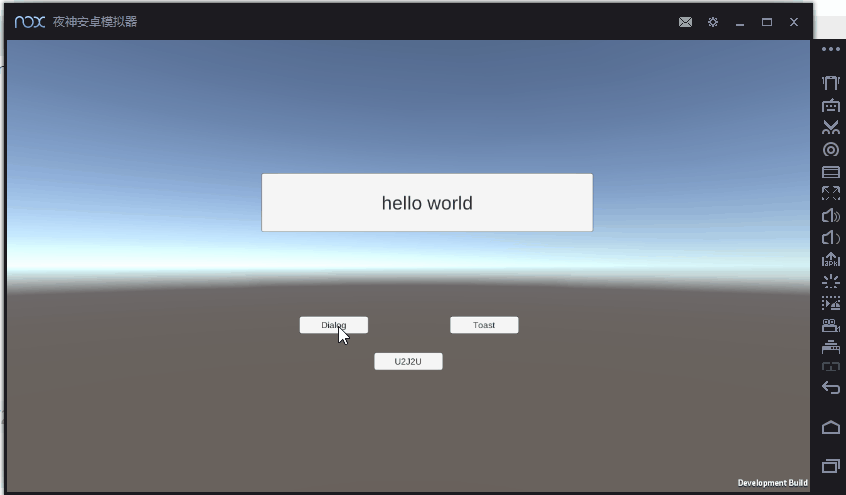
AndroidManifest.xml
- Unity 中 Android Manifest - https://blog.csdn.net/qq_33337811/article/details/88556927
unity 打包后会生成最终的 AndroidManifest.xml 文件, 在项目路径下的 Temp\StagingArea 中, 其中 AndroidManifest-main.xml 是你自定义的, AndroidManifest.xml 才是最终的.
代码中获取 strings.xml
假设主包名是 com.its.xxx.xxx
代码 读取自定义的 strings.xml 文件 ( Assets\Plugins\Android\res\values\strings.xml ), 比如 strings.xml
1 | <resources> |
不要使用这个方式去获取, 也就是 库包名.R
1 | import com.its.demo.asdasd.R; |
会报错找不到 com.its.demo.asdasd.R, 因为 unity 不会把这个文件打包进去, 会把 自定义的 strings.xml 合并到 主 strings.xml 中, 所以理论上应该是
1 | import com.its.xxx.xxx.R; |
所以得曲线救国, 使用这种方式获取
1 | public static String GetStringVaule(Activity ctx, String key) { |
- ctx : 主activity (也就是 UnityPlayerActivity 的实例 )
- “string” : 是指获取 strings.xml 中的值, 而不是指定获取 string 类型. ( layout:布局文件资源的ID, drawable:图片资源的ID, string:字符串资源 )
- “com.its.xxx.xxx” : 是你的应用的包名, 并不是 [4、修改 AndroidManifest.xml](#4、修改 AndroidManifest.xml) 这里面的包名
附:
在 AndroidManifest.xml 中就这样使用, unity 自动合并 AndroidManifest.xml 后, 就可以获取到自定义的 strings.xml 的值
1 | <meta-data |
Android 6.0 (Marshmallow)中的运行时权限
如果您的应用程序运行在Android 6.0 (Marshmallow)或更高版本的设备上,并且还针对Android API级别23或更高,则您的应用程序使用Android运行时权限系统。
Android运行时权限系统要求应用程序的用户在应用程序运行时授予权限,而不是在应用程序首次安装时授予。当应用程序运行时,用户通常可以在应用程序需要时授予或拒绝每个权限(例如,在拍照之前请求相机权限)。这允许应用程序在没有权限的情况下以有限的功能运行。
Unity不支持运行时权限系统,所以你的应用程序会提示用户在启动时允许Android所谓的“危险”权限。有关更多信息,请参阅Android的危险权限文档。
提示用户允许危险的权限是确保插件在丢失权限时不会导致崩溃的唯一方法。但是,如果您不希望Unity Android应用程序在启动时请求权限,您可以在应用程序或活动部分的清单中添加以下内容。
1 | <meta-data android:name="unityplayer.SkipPermissionsDialog" android:value="true" /> |
添加此选项将完全抑制在启动时显示的权限对话框,但是必须小心处理运行时权限,以避免崩溃。此方法只建议高级Android应用程序开发人员使用。
unity android 默认的 keystore
Note: For security reasons, Unity does not save the passwords on this page. The unsigned debug keystore is located by default at ~/.android/debug.keystore on MacOS and %USERPROFILE%\\.android\debug.keystore on Windows.
https://docs.unity3d.com/Manual/class-PlayerSettingsAndroid.html
自定义 gradle
官网资料
参考模板:
D:\unity2018.4.4f1\Editor\Data\PlaybackEngines\AndroidPlayer\Tools\GradleTemplates, 一般使用 mainTemplate.gradle 就行- Android Player settings - https://docs.unity3d.com/Manual/class-PlayerSettingsAndroid.html
- Gradle for Android - https://docs.unity3d.com/Manual/android-gradle-overview.html
将 mainTemplate.gradle 文件复制一份到工程目录 Assets/Plugins/Android 下, 然后自行修改就行, 比如 引入 Google gms 库
1 | dependencies { |
unity 的 build.gradle 分析
在 Temp\gradleOut\build.gradle, 是 unity 根据自定义的 mainTemplate.gradle 生产出来的 android 的 build.gradle 文件
1 | // GENERATED BY UNITY. REMOVE THIS COMMENT TO PREVENT OVERWRITING WHEN EXPORTING AGAIN |
遇到的小坑
unity导出apk, File->Build Run, 当导出apk时,可能遇到问题
Unable to find unity activity in manifest. You need to make sure orientation attribute is set to fullSensor manually.需在AndroidManifest中增加一行:
<meta-data android:name="unityplayer.UnityActivity" android:value="true" />删除 AndroidManifest.xml 中 app 的主题 (使用默认的就行
android:theme="@style/UnityThemeSelector") ,否则 unity 打包 apk 是关联的主题会报找不到错误删除生产的arr文件里的libs下的classes.jar,这个是之前从u3d中拷过去的,打包时会重新打进去,所以要删除,不删除打包会报错
另外还可以参考: Unity接入九游SDK学习与踩坑 - https://www.cnblogs.com/MuniuTian/p/11133341.html
报错: Program type already present: com.xxx.BuildConfig
参考: http://rx1226.pixnet.net/blog/post/347963956-%5Bandroid%5D-program-type-already-present-buildconfig
是因为有2个module在 AndroidManifest.xml 里面具有一样的package name,修改不同名字即可。
被这个坑的有点久
报错: Duplicate class android.support.v4 and support-compat:27.0.2
从这里得知去修改本地的 gradle - https://7dot9.com/2017/12/20/how-to-fix-unity-gradle-build-with-heap-size-error/
类冲突, 解决办法是在本地的 gradle 中加入配置. 路径:
C:\Users\xxxx\.gradle\gradle.properties
2
android.enableJetifier=true使用 as 新建的原生工程就不会报错, 是因为在项目中的 gradle.properties 有配置这两个参数
还有一种解决方法没尝试, 是在 代码中动态重写这个配置, 参考: https://stackoverflow.com/questions/54186051/is-there-a-way-to-change-the-gradle-properties-file-in-unity
报错: NoClassDefFoundError … R$string
代码中你可能使用的是
2
R.string.facebook_app_id要换成这样的方式去获取
2
3
4
5
Resources res = ctx.getResources();
// String appPackageName = ctx.getApplication().getPackageName(); // 可以这样获取主包名
return res.getString(res.getIdentifier(key, "string", "com.its.xxx.xxx"));
}参考: [代码中获取 strings.xml](#代码中获取 strings.xml)
报错参考: https://forum.unity.com/threads/problem-with-r-class-in-custom-unity-player-activity.139741/