python-python记录
python 掉坑记录
更多的 实践 及 工具 在 test_script/python 目录下
w3schools python - https://www.w3schools.com/python/default.asp
前篇
- Python - 100天从新手到大师 - https://github.com/jackfrued/Python-100-Days
- 大牛推荐的10本学习 Python 的好书 - https://zhuanlan.zhihu.com/p/53454574
- 推荐七个Python效率工具 - https://www.toutiao.com/article/7101481589040742925/
书单
- 流畅的Python
- Python Cookbook
- Python学习手册第5版
技巧
- 实现更好编码的 30 个神奇的 Python 技巧 - https://www.infoq.cn/article/bryvp5blfe4qgqqeagf1
- 你可能不知道的 Python 技巧 - https://zhuanlan.zhihu.com/p/104231383
新特性
3.8
- Python 3.8.0 正式发布,一大波新特性和优化来袭 - https://zhuanlan.zhihu.com/p/86751691
- Python 3.8.0 正式版发布,新特性初体验 - https://juejin.im/post/5da7d79fe51d45252c18d0eb
3.7
- Python 3.7.0 正式版发布,新特性翻译 - https://zhuanlan.zhihu.com/p/38609120
- [译] Python 3.7 新特性 - https://juejin.im/post/5a127e60f265da430f31b45b
3.6
- Python3.6新特性官方文档中文版 - https://zhuanlan.zhihu.com/p/24550488
- Python 3.6.0 正式版发布附新特性说明 - https://zhuanlan.zhihu.com/p/24538139
python 升级
安装解释器, 并配到环境变量 (习惯将 3.x 版本的解释器改名为 python3.exe), 查看版本
1
2
$ python3 -V
Python 3.8.5升级 pip, 命令
1
$ python3 -m pip install --upgrade pip
- 不升级直接 pip3 install 各自库会出现以下问题
1
Fatal error in launcher: Unable to create process using
- 不升级直接 pip3 install 各自库会出现以下问题
类型注解
- Python 3 新特性:类型注解 - https://zhuanlan.zhihu.com/p/37239021
这个是 python3 的特性, 可以指定类型, 编代码时可以有提示
1 | self.srcDeps: dict = utils.loadJson(srcPath)["dependencies"] # 指定类型 : dict |
引入父级目录
这个的意思和 lua 差不多, 都是一个搜索路径的问题, 根据当前执行的环境添加相对的目录即可. 参考: import_test2.py
1 | #!/usr/bin/python |
assert 断言:
正确写法
1 | assert False, "--- wolegequ error" # 正确. |
object dict 互转
object -> dict
对象实例的
__dict__字段就是 dict 对象1
2
3
4
5
6
7
8
9
10
11
12
13
14# object -> dict
class Student:
def __init__(self, id, name, age, sex, phone, email):
self.id = id
self.name = name
self.age = age
self.sex = sex
self.phone = phone
self.email = email
stu = Student('007', '007', 28, 'male', '13000000000', '123@qq.com')
print(type(stu)) # <class 'json_test.student.Student'>
stu = stu.__dict__ # 将对象转成dict字典
print(type(stu)) # <class 'dict'>dict -> object
给
__dict__赋值上 dict 即可
局部变量 vs 全局变量
注:在方法内部的变量是在=号前面的,那肯定是局部变量。如果是第一次出现在=号后面的,那肯定是调用的全局变量;全局变量可以在函数里面调用,局部变量只能在对应的函数里面调用,在该函数外面任何地方都无法被调用。
文件 LF 换行符 \n 和 CRLF \r\n 回车符
只要以 rb, wb (二进制) 模式读写, 就不会有替换的问题, 原来怎么样的文件就写成怎么样的文件, 不会有 diff
阿里云 sdk
-
会自动生成对应的代码

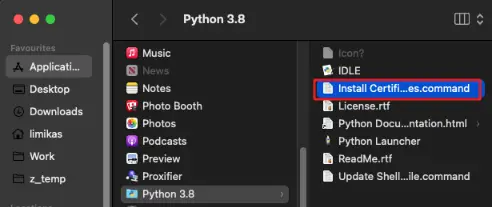
Mac 平台 http 请求报证书错误
报错: Cannot connect to host ssl:True [SSLCertVerificationError: (1, '[SSL: CERTIFICATE_VERIFY_FAILED] certificate verify failed: unable to get local issuer certificate (_ssl.c:1123)')]
解决办法: 需要安装 Python 证书
单元测试
默认支持的是 unittest, 官网文档: https://docs.python.org/zh-cn/3/library/unittest.html
测试命令:
python3 -m unittest -v [py脚本].[测试类].[测试方法]1
2
3
4
5
6
7
8
9
10
11
12
13
14
15
16$ python3 -m unittest -v test_async.Test_Async.test_subprocess
test_subprocess (test_async.Test_Async) ...
------------------ test result ------------------
['git status' exited with 0]
[stdout]
On branch master
Your branch is up to date with 'origin/master'.
nothing to commit, working tree clean
.
----------------------------------------------------------------------
Ran 1 test in 0.103s
OKunittest 模块可以通过命令行运行模块、类和独立测试方法的测试:
1
2
3python3 -m unittest -v test_module1 test_module2
python3 -m unittest -v test_module.TestClass
python3 -m unittest -v test_module.TestClass.test_method
vscode 中配置 单元测试
- 官方文档: https://code.visualstudio.com/docs/python/testing
- Python 单元测试 - https://zhuanlan.zhihu.com/p/29968920
安装 测试框架. 只要第二部中配置测试框架, vscode 会自动提示安装.
配置 测试框架. 在 .vscode/settings.json 中配置
测试框架有几个, nosetestsEnabled, pyTestEnabled, unittestEnabled, 这里使用 unittestEnabled, 其他的都必须设置为false,
1
2
3
4
5
6
7
8
9
10
11
12
13
14{
"python.testing.autoTestDiscoverOnSaveEnabled": true, // 保存文件时自动发现测试用例
"python.testing.nosetestsEnabled": false,
"python.testing.pyTestEnabled": false,
"python.testing.unittestEnabled": true,
"python.testing.unittestArgs": [
"-v",
"-s",
"./test_script/python",
"-p",
"test_*.py"
],
"python.pythonPath": "D:\\Python36-32\\python.exe"
}代码中使用, 在
./test_script/python目录下新建一个 test_unittest.py 文件1
2
3
4
5
6
7
8
9
10
11
12
13
14
15
16
17#!/usr/bin/env python
# -*- coding: utf-8 -*-
import unittest
class Test_Dummy(unittest.TestCase):
def setUp(self):
print("--- setUp")
def tearDown(self):
print("--- tearDown")
def test_hello(self):
self.assertEqual(123, 123)
print("--- hello")
def test_world(self):
print("--- world")vscode 中直接 点击 debug test, 输出日志在 debug console 中
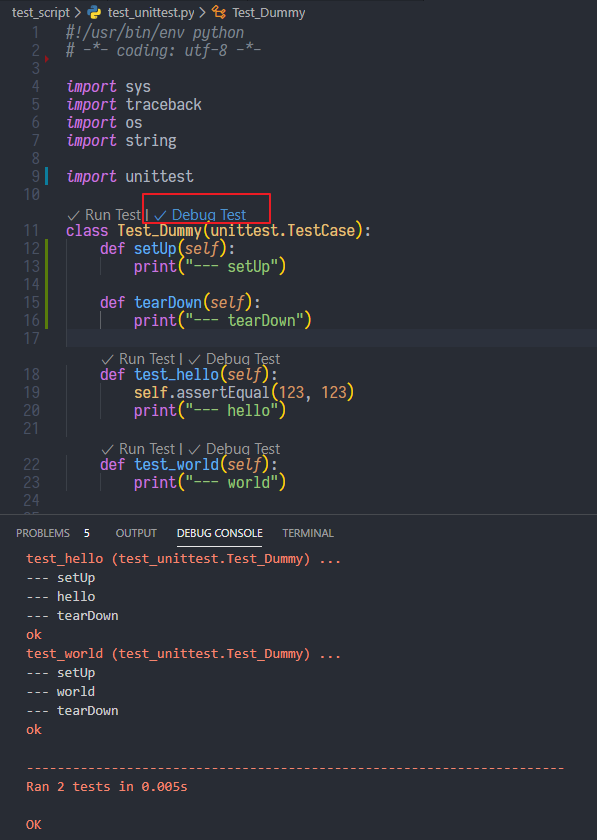
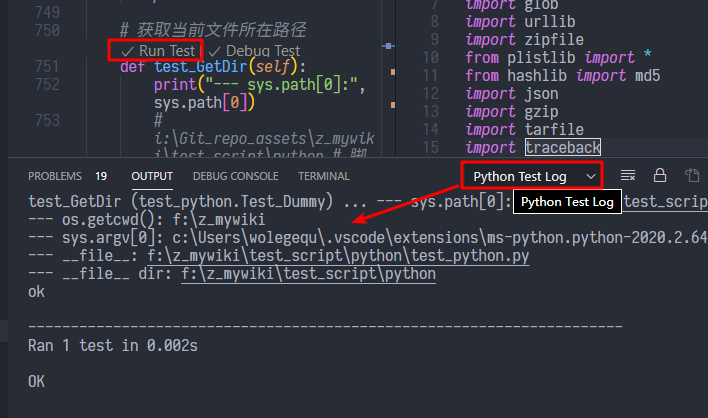
vscode 中直接 点击 run test. 输出日志在 output 中. (在 python test log 这个终端中.)
命令行执行单元测试
测试的可执行程序在 C:\Users\%USER%\AppData\Roaming\Python\Python36\Scripts\pytest.exe
常用的几个命令
1 | pytest.exe test_mod.py # run tests in module |
输出测试结果到文件中
1 | pytest.exe -s test_file_name.py --resultlog=report.txt |
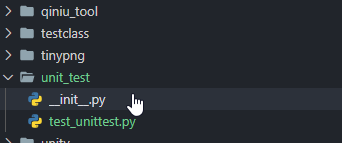
解决子目录 检测不到单元测试用例
在 ./test_script/python 目下的子目录中也有单元测试用例, 但是 vscode 中却发现不了.
解决办法: 需要在 子目录中新建一个空文件 __init__.py, 然后点击一下 discover tests 即可
参考官网: https://code.visualstudio.com/docs/python/testing#_test-discovery
踩坑
ImportError: bad magic number in : b’\x03\xf3\r\n’
解决办法:删除项目中所有的 .pyc 文件。
断言 False 也通过
执行时警告: SyntaxWarning: assertion is always true, perhaps remove parentheses?
写法错误
1 | assert (False, "--- wolegequ error") # 错误. 这里一定不能用括号括起来, 否者会被认为是一个 tuple, 判定为 True (通过断言) |
参考: https://stackoverflow.com/questions/3112171/python-assert-with-and-without-parenthesis
运行pip报错:Fatal error in launcher: Unable to create process using ‘“‘
解决办法: 执行 pip 升级命令: python -m pip install --upgrade pip
参考: https://blog.csdn.net/cjeric/article/details/73518782
报错: MemoryError
可能的原因是使用 32 位的 Python 版本, 可以使用的虚拟内存只有 2g, 而实际使用的 (读文件) 超过 2g, 就会导致这个错误.
解决办法: 安装 64 位的 Python 版本
Mac pip 安装报错: Permission denied: /Library/Python/3.8
pip3 安装命令加上 --user 参数:
1 | $ pip3 install package_name --user |
http 请求 10054 错误
报错: ('Connection aborted.', ConnectionResetError(10054, '远程主机强迫关闭了一个现有的连接。', None, 10054, None))
解决办法: 在 headers 中加入代理信息, 模拟浏览器请求
1 | headers = { |
参考:
- https://stackoverflow.com/questions/56399462/error-message-10054-when-wescraping-with-requests-module
- https://stackoverflow.com/questions/27333671/how-to-solve-the-10054-error
RequestsDependencyWarning 异常
报了个警告: RequestsDependencyWarning
解决办法, 升级一下库即可
1 | $ pip3 install --upgrade requests |