android-Android相关记录
android-Android相关记录
不错的第三方库
网络
- okhttp
AndroidManifest 配置文件
android:configChanges
相关参考:
- 关于AndroidManifest 中的一些配置 - https://blog.csdn.net/maican666/article/details/76169625
mcc:IMSI(国际移动用户识别码)发生改变,检测到SIM卡,或者更新MCC
mnc:IMSI网络发生改变,检测到SIM卡,或者更新MCC
其中mcc和mnc理论上不可能发生变化
locale:语言发生改变,用户选择了一个新的语言,文字应该重新显示
touchscreen:触摸屏发生改变,这通常是不应该发生的
keyboard:键盘类型发生改变,例如,用户使用了外部键盘
keyboardHidden:键盘发生改变,例如,用户使用了硬件键盘(这里说的键盘是硬键盘,自己手机里弹出的是软键盘)
navigation:导航发生改变,(这通常不应该发生) 举例:连接蓝牙键盘,连接后确实导致了navigation的类型发生变化。因为连接蓝牙键盘后,
我可以使用方向键来navigate了
screenLayout:屏幕的布局发生改变,这可能导致激活不同的显示
fontScale:全局字体大小缩放发生改变
orientation:设备旋转,横向显示和竖向显示模式切换。
screenSize: 屏幕大小改变了
smallestScreenSize: 屏幕的物理大小改变了,如:连接到一个外部的屏幕上
安卓提取 sha1
方法一 (推荐)
其实主要就是签名文件 keystore 文件里的信息, 可以直接找到 debug版本(在 %USER%.android 目录下) 和 release版本(自己生成) 的 keystore文件 拿出来查看一下就行.
1 | >keytool -list -v -keystore debug.keystore |
方法二
安卓apk 包用 压缩工具打开, 找到 META-INF/ANDROIDD.RSA 文件, 提取出来, 然后使用java工具 keytool.exe (在%JDK%/bin 目录下) 打开,
1 | > keytool -printcert -file ANDROIDD.RSA |
参考: http://www.voidcn.com/article/p-gpujntey-ps.html
打印堆栈
1 | Thread.dumpStack(); |
导出 logcat 日志
1 | $ adb logcat > temp.txt |
读取文件
- Android 文件外/内部存储的获取各种存储目录路径 - https://blog.csdn.net/csdn_aiyang/article/details/80665185
读取 外部 目录需要申请权限
不申请的话会报错: android java.io.FileNotFoundException (Permission denied)
申请权限代码
1
2
3
4
5
6
7
8
9
10
11
12
13
14
15
16
17
18
19
20
21
22
23
24
25
26
27
28
29
30
31
32
33
34
35
36
37
38
39
40
41
42
43
44
45
46
47
48
49
50
51
52
53
54
55
56
57
58
59
60
61
62
63
64
65
66
67
68
69
70
71
72
73
74
75
76
77
78
79
80
81
82
83
84
85private void checkPermission(final Context context, final Define.CodeRunnable task) {
if (!Tools.isPermOk(context, Manifest.permission.READ_EXTERNAL_STORAGE)
|| !Tools.isPermOk(context, Manifest.permission.WRITE_EXTERNAL_STORAGE)) {
String[] reqPers = new String[]{
Manifest.permission.READ_EXTERNAL_STORAGE, // 读
Manifest.permission.WRITE_EXTERNAL_STORAGE // 写
};
ActivityMgr.getIns().setActivity(this);
ActivityMgr.PerRunnable perRunnable = perReq -> {
int code = MyCode.ECode.Ok;
if (!Tools.isPermOk(context, Manifest.permission.READ_EXTERNAL_STORAGE)
|| !Tools.isPermOk(context, Manifest.permission.WRITE_EXTERNAL_STORAGE)) {
code = MyCode.ECode.LocPermissionError;
}
task.run(code, "");
};
ActivityMgr.getIns().reqPermissions(reqPers, ActivityMgr.EPerCode.Location, perRunnable);
} else {
task.run(MyCode.ECode.Ok, "");
}
}
---
### pc 与 android 互传数据
- https://www.cnblogs.com/liqw/p/5138774.html
---
### 包名, 签名, versionCode 对升级的影响
- Android 应用的 apk 包名和签名一致和不一致时对软件升级有什么样的影响? - https://www.zhihu.com/question/19890258
包名不一致升级 会安装新的APK,旧的APK不会管。签名不一致,包名一致的话,需要先卸载旧的APK 才能安装新版的。
在应用程序被升级的时候,Android系统将会验证被升级的应用程序包与升级后的应用程序包是否使用了同样的开发者签名,如果一致,该应用程序可以被升级;如果不一致,那么将被视为非同一开发者开发的应用程序,用户需要先卸载已经安装的应用然后再安装新应用,在卸载的过程中,应用在android系统中所保存的设置信息(SavedPreferences)将被删除,以保护应用本地保存的资料不被盗取。
#### apk 应用内升级
必须要求 包名, 签名 相同, 且 `version code` 必须提升 (不提升会导致新包安装失败, 报已存在的错: `Failure [INSTALL_FAILED_ALREADY_EXISTS]`)
---
### Android System.Load vs System.LoadLibrary
- http://www.voidcn.com/article/p-gzsrngyk-bom.html
简而言之就是,System.Load 要带上 so 的绝对路径;而 System.LoadLibrary 不应该带上路径,并且不应该带上 lib 前缀和 .so 后缀。比如,你有一个应用,其 package 为 com.test.demo,并且有一个 libtest.so。
那么,你可以这样去加载它:
1. System.Load(getApplicationInfo().nativeLibraryDir + "/libtest.so");
2. System.LoadLibrary("test");
---
### Handler
用于线程间的交互, 与创建的上下文紧密相关
1. 在 主线程 创建的 *handler*, 就可以在 *handleMessage* 中处理 ui 相关的 api
```java
if (mHandlerTips == null) {
mHandlerTips = new Handler(Looper.getMainLooper()) { // getMainLooper 表示主循环
public void handleMessage(Message msg) {
String showMsg = (String) msg.obj;
mTipText.setText(showMsg);
}
};
}
- 在 其他线程 创建的 handler 则不允许操作 ui 相关的 api, 否则会 闪退
URI 解析异常解决
解决 Android N 7.0 上 报错:android.os.FileUriExposedException android.os.FileUriExposedException: file:///storage/emulated/0/xxx.xxx exposed beyond app through Intent.getData() 崩溃异常
If your targetSdkVersion is 24 or higher, we have to use FileProvider class to give access to the particular file or folder to make them accessible for other apps.
8.0+ 安装 apk
- Android8.0未知来源应用安装权限最好的适配方案 - https://zhuanlan.zhihu.com/p/32386135
- Android 8.0安装apk的正确姿势 - https://blog.csdn.net/yechaoa/article/details/82495671
- [apk 应用内升级](#apk 应用内升级)
安装APK时解析包错误问题
- Android 7.0/8.0 安装APK时解析包错误问题 - https://blog.csdn.net/lmy820200104/article/details/84135510
获取 meta-data 值
可以获取 Manifest.xml 中 activity/application/service/receiver 中定义的 meta-data 值
- Android获取Manifest中meta-data元素的值 - https://blog.csdn.net/xx326664162/article/details/50727941
Android string 中 translatable 作用
- Android string中translatable作用 - https://blog.csdn.net/wangjicong_215/article/details/52415856
意思就是不管系统是什么语言,它都只显示xx, 也就是不参与国际化的意思.
gmail 发邮件 添加附件
- 参考官网单元测试: 将用户转到其他应用 (有发邮件示例) - https://developer.android.com/training/basics/intents/sending
- Android之调用系统Email发送邮件 - https://blog.csdn.net/way_ping_li/article/details/9038655
在Android中,调用Email有三种类型的Intent:
Intent.ACTION_SENDTO 无附件的发送
Intent.ACTION_SEND 带附件的发送
Intent.ACTION_SEND_MULTIPLE 带有多附件的发送
当然,所谓的调用 Email,只是说 Email 可以接收Intent并做这些事情,可能也有其他的应用程序实现了相关功能,所以在执行的时候,会出现选择框进行选择。
使用 ACTION_SEND 会弹出很多客户端选择, 而 ACTION_SENDTO 又无法带上附件, 所以 正真解决办法数组合这两个 Intent.
1 | Intent emailIntent = new Intent(Intent.ACTION_SEND); |
参考: https://stackoverflow.com/questions/4883199/using-android-intent-action-send-for-sending-email
service
- Android Service使用详解 - https://www.jianshu.com/p/95ec2a23f300
activity
添加 activity
创建布局文件
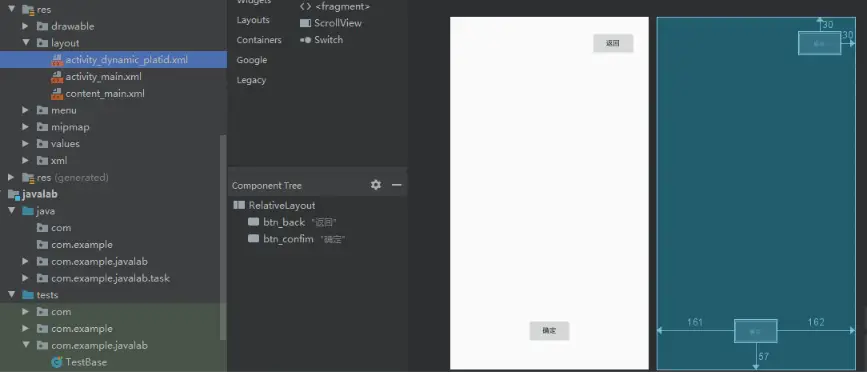
创建 对应的 activity 类
1
2
3
4
5
6
7
8
9
10public class DynPlatIdActivity extends AppCompatActivity {
private static final String TAG = "--- DynPlatIdActivity";
protected void onCreate(Bundle savedInstanceState) {
super.onCreate(savedInstanceState);
setContentView(R.layout.activity_dynamic_platid); // 对应的 xml 布局文件
}
}在 AndroidManifest.xml 声明这个 activity (不声明无法跳转)
1
2
3
4
5
6<application
<activity
android:name="com.its.demo.testgoogle.activity.DynPlatIdActivity"
android:label="@string/app_name"
android:screenOrientation="portrait" />
</application>done. 测试跳转
1
2
3
4
5
6
7
8
9
10
11
12
13
14
15
16
17
18
19Intent intent = new Intent(this, DynPlatIdActivity.class);
startActivity(intent);
---
#### 透传参数
比如从 activityA 带着参数跳转到 activityB, activityB 再带着参数返回到 activityA.
- activityA
```java
Intent intent = new Intent(this, DynPlatIdActivity.class);
intent.putExtra("arg01", "hello world");
ActivityMgr.getIns().startActForResult(intent, 10001, actReq -> {
LogUtil.TD(TAG, "--- arg02: %s", actReq.data.getStringExtra("arg02"));
});
activityB
1
2
3
4
5
6
7
8
9
10
11
12
13
14
15
16
17
18
19
20
21
22
23
24
25
26
27
28
29
30
31
32
33
34
35
36
37
38
39
40
41
42
43
44
45
46
47
48
49
50
51
52
53
54
55
56
57
58
59
60
61
62
63
64
65
66
67
68
69
70
71
72
73
74
75
76
77
78
79
80
81
82
83
84
85
86public class DynPlatIdActivity extends AppCompatActivity {
private static final String TAG = "--- DynPlatIdActivity";
protected void onCreate(Bundle savedInstanceState) {
super.onCreate(savedInstanceState);
setContentView(R.layout.activity_dynamic_platid);
Intent intent = getIntent();
String arg01 = intent.getStringExtra("arg01"); // 获取 跳转源 的参数
LogUtil.TD(TAG, "--- arg01: %s", arg01);
Intent intentBack = new Intent();
intentBack.putExtra("arg02", "nice to meet you");
setResult(RESULT_OK, intentBack); // 返回参数给 跳转源
finish(); // 结束当前 activity
}
}
---
### 默认签名文件 debug.keystore
- Android 默认签名, 路劲: `C:\Users\%USER_NAME%\.android\debug.keystore`
- Keystore password: android
- Key alias: androiddebugkey
- Key password: android
---
### adb 常用命令
- adb shell 常用命令 - https://www.cnblogs.com/JianXu/p/5161179.html
#### 文件操作命令
| 子命令 | 参数 | 说明 |
| ------ | ------------------------------------------------------------ | ------------------------------------------------------------ |
| cd | 无 | 进入目录 |
| cat | [-beflnstuv] [-B bsize] [file...] | 查看文件内容 -n:显示行号 -b:显示行号,但会忽略空行 -s:显示行号,连续空行标记为一行 |
| df | 无 | 列出分区列表 |
| du | [-H] [-L] [-P] [-a] [-d depth] [-s] [-cghikmnrx] [file...] | 查询文件或目录的磁盘使用空间 |
| ls | [-a] [-i] [-l] [-n] [-s] | 列出目录内容 -a:列出所有文件,包括隐藏文件 -i:输出文件的i节点的索引信息 -l列出文件的详细信息 -n:用数字的GUID代替名称 -s:输出该文件的大小 |
| grep | [-abcDEFGHhliJLlmnOoPqRSsUVvwxZz] [-A num] [-B num] [-C[num] [-e pattern] [-f file] [--binary-files=value] [--color=when] [--context=num] [--directories=action] [--lable] [--line-buffered] [pattern] [file...] | 指定文件中搜索特定的内容,并将含有这些内容的行标准输出 |
| mkdir | -p,-parents | 创建目录 -p,--parents:递归创建目录 |
| touch | touch [-alm] [-t YYYYMMDD [.HHMMSS]] < file > | 创建文件 |
| rm | rm [-f\|-i][-dPRrvWx]file | 删除文件 -f:强制删除文件,系统不提示 -i:交互式删除,删除前提示 -d:改变硬连接数据删成0,删除该文件 -r:强制删除文件夹包括里面的文件 |
| mv | mv[-fiv]source target | 移动文件(相当于剪切) -f:强制移动,若文件已经存在目标则直接覆盖 -i:若目标文件已经存在,会询问是否覆盖 |
| rmdir | rmdir[-p] directory | 删除目录 -p:递归删除目录,只能删除空目录 |
| dd | dd[operand...] dd if =source of=targe | 复制文件 |
#### 文件权限命令与其他文件命令
| 子命令 | 参数 | 说明 |
| ------ | ------------------------------------------------------------ | ------------------------------------------------------ |
| chomd | chomd[OPTION]< MODE > < FILE > | 文件权限修改 -R:递归改变文件和目录 -h:不遵循符号连接 |
| chown | chown[-R[-H\|-L\|-P]] [-fhv] owner : group \| owner \| : group file | 更改某个文件或目录的属主和属组 |
| md5 | md5 file... | 查询文件的MD5值 |
| mount | mount [-r] [-w] [-o options] [-t type] device directory | 挂载设备信息 |
| umount | umount < path > | 卸载分区挂载 |
| cmp | cmp[-b][-l][-n count] file1 file2 | 要指出两个文件是否存在差异 |
| ln | ln [-fhinsv] file1 file2 ln [-fhinsv] file...directory | |
---
#### 拷贝文件到电脑 / 拷贝文件到应用
- Android 用adb pull或push 拷贝手机文件到到电脑上,拷贝手机数据库到电脑上,拷贝电脑数据库到手机上 - https://www.cnblogs.com/liqw/p/5138774.html
- 拷贝文件到电脑. 拷贝 files 文件夹 `E:\aaa` 目录中
```json
> adb pull /sdcard/Android/data/com.rmgstation.rummymon/files E:\aaa拷贝文件到应用. 拷贝
E:\aaa目录 到 files 文件夹中1
> adb push E:\aaa /sdcard/Android/data/com.rmgstation.rummymon/files
命令行导出 logcat 日志
清楚日志
1
2
3
4
5
6
7
8
9
10
11
12
13
14
15
16
17
18
19
20
21
22
23
24
25
26
27
28$ adb logcat -c
2. 导出日志
```json
$ adb logcat -d > C:\Users\wilker\Desktop\logcat.log
---
### 反编译 apk
参考:
- 反编译Android APK详细操作指南 - https://blog.csdn.net/fengyuzhengfan/article/details/80286704
- 使用工具: APKTool绿色版 v2.3.3 - http://www.xue51.com/soft/5927.html
使用:
- 反编译 apk. 执行命令: `apktool d [apk_path]`, 会解出内容到 以 apk 文件名命名的目录中
```json
$ apktool d F:\a_desktop\aaa.2.9.34.apk
I: Using Apktool 2.3.3 on aaa.2.9.34.apk
I: Decoding AndroidManifest.xml with resources...
编译 apk. 执行命令:
apktool b [apk_dir],1
2
3$ apktool b F:\a_desktop\APKTool_2.3.3\aaa.2.9.34
I: Using Apktool 2.3.3
I: Built apk...
aapt
- Android aapt 命令 详细解析 - https://blog.csdn.net/hytfly/article/details/49364241
打包好的APK中移除文件
1
$ aapt r[emove] [-v] file.{zip,jar,apk} file1 [file2 ...]
添加文件到打包好的APK中
1
2
3
4
5
6
7
8
9
10
11
12
13
14
15
16
17
18
19
20
21
22
23
24
25
26
27
28
29
30
31
32
33
34
35
36
37
38
39
40
41
42
43
44
45
46
47
48
49
50
51
52
53$ aapt a[dd] [-v] file.{zip,jar,apk} file1 [file2 ...]
---
### 跳转系统设置 Settings 的各个界面
- Android跳转系统设置Settings的各个界面 - https://blog.csdn.net/ouzhuangzhuang/article/details/84029295
- Android中 跳转到系统设置界面方法总结 - https://blog.csdn.net/da_caoyuan/article/details/72829106
---
### scheme
- Android 自定义scheme及多端唤起使用方法 - https://segmentfault.com/a/1190000020616748
- 解锁Activity的跳转新姿势———使用scheme跳转 - https://juejin.im/entry/6844903506822840328
目的是可以让 浏览页 或 其他 app 直接打开 某个 app 的某个 activity
比如 app A 打卡 app B 的 activity C
1. 在 B 中的 *AndroidManifest.xml* 中配置 C 的 scheme
```xml
<application
android:allowBackup="true"
android:icon="@mipmap/ic_launcher"
android:label="@string/app_name"
android:roundIcon="@mipmap/ic_launcher_round"
android:supportsRtl="true"
android:theme="@style/AppTheme">
<activity
android:name="com.its.demo.testgoogle.MainActivity"
android:label="@string/app_name"
android:theme="@style/AppTheme.NoActionBar">
<!-- scheme 跳转配置 -->
<intent-filter>
<action android:name="android.intent.action.VIEW" />
<category android:name="android.intent.category.DEFAULT" />
<category android:name="android.intent.category.BROWSABLE" />
<data
android:host="hello"
android:port="9527"
android:scheme="testgoogle" />
</intent-filter>
</activity>
</application>在这个 activity 中打印一下 跳转过来时的参数
1
2
3Intent intent = getIntent();
Uri uri = intent.getData();
Log.d(TAG, "uri: " + (uri != null ? uri.toString() : "is null"));
在 A 中跳转
1
2String url = "testgoogle://hello:9527/world?name=wolegequ&age=123";
startActivity(new Intent(Intent.ACTION_VIEW, Uri.parse(url)));然后在 C 中就可以打出 log
1
--- MainActivity: uri: testgoogle://hello:9527/world?name=wolegequ&age=123
也可以在网页中跳转
1
<a href="testgoogle://hello:9527/world?name=wolegequ&age=123">打开 test app</a>
adb 广播消息
- 在命令行中通过adb shell am broadcast发送广播通知 - https://blog.csdn.net/zuolongsnail/article/details/8167501
adb shell am broadcast 后面的参数有:
1 | [-a <ACTION>] |
例如:
1 | $ adb shell am broadcast -a com.android.test --es test_string "this is test string" --ei test_int 100 --ez test_boolean true |
唯一标识符 - uuid
- 唯一标识符最佳做法 - https://developer.android.com/training/articles/user-data-ids?hl=zh-cn
- Android设备唯一标识 - https://www.jianshu.com/p/59440efa020c
- Android ID(SSAID) - https://sspai.com/post/58305
总体情况可以分为两种:
安装 id.
即第一次启动时生成一个唯一id, 使用 java 库即可:
UUID.randomUUID().toString(). 以后都是用这个 id. 但是这种每次清除缓存或重装后都会变化.设备 id.
使用硬件相关信息拼在一起, 只要硬件不变, 就不会变换, 无视 app 清除缓存或重装.
这两总方式最好都 md5 哈希一下, 是为了确保 数据等长 和 无法肉眼识别是怎么计算出来的.
获取 ANDROID_ID
这个 id 获取是 Android 支持的. 同一个签名打出来的包, 即使包名不同, 都能获取到相同的值.
因为签名是 APP 所有权的证明, 同个签名打出来的包都是可以公用相同设备 id
1
2
3
4
5
6
7
8
9try {
// 旧方式, 已废弃
// String uid = Settings.System.getString(context.getContentResolver(), Settings.System.ANDROID_ID);
String uid = Settings.Secure.getString(context.getContentResolver(), Settings.Secure.ANDROID_ID);
return EncryptTool.md5Str(uid);
} catch (Exception e) {
e.printStackTrace();
return null;
}- 获取到的值最好也 md5, sha256 处理一下变成固定长度的字符串
.9图报错
报错: top-left corner pixel must be either opaque white or transparent.
参考:
- https://blog.csdn.net/xct841990555/article/details/80382338
- https://blog.csdn.net/OuNuo5280/article/details/97623310
apk 加固 套壳
- Android容器和虚拟化:从应用多开谈起 - https://www.secrss.com/articles/12507
- 安卓APK加固工具 - https://zhuanlan.zhihu.com/p/358253419
- Android应用加固 - https://www.kiwisec.com/product/android-encrypt.html
内嵌 apk
- android apk嵌套 从一个apk启动另外一个apk - https://blog.csdn.net/wulongtiantang/article/details/12649401
- 解决Android一次打包,安装两个不同apk的问题 - https://blog.csdn.net/weixin_45347152/article/details/94436157
ViewPager2
- 官方
- 使用 ViewPager2 在 Fragment 之间滑动 - https://developer.android.com/training/animation/screen-slide-2?hl=zh-cn#java
- 动画过渡 - https://developer.android.com/training/animation/screen-slide-2?hl=zh-cn#java
- Android:ViewPager \ViewPager2 简单介绍 & 使用方法解析 - https://blog.csdn.net/JMW1407/article/details/114273649
material 主题使用
gradle 中引入 material 库
1
implementation 'com.google.android.material:material:1.1.0'
styles.xml 中 修改
AppTheme主题为Theme.MaterialComponents.Light.DarkActionBar1
2
3
4
5<resources>
// <style name="AppTheme" parent="Theme.AppCompat.Light.DarkActionBar">
<style name="AppTheme" parent="Theme.MaterialComponents.Light.DarkActionBar">
</style>
</resources>- 如果这里没有修改, 会报错:
The style on this component requires your app theme to be Theme.MaterialComponents
- 如果这里没有修改, 会报错:
然后就可以在 layout 中使用了
1
2
3
4
5
6
7
8
9
10
11
12
13
14
15
16
17
18
19
20
21
22
23
24
25
26
27
28
29
30
31
32
33
34
35
36
37
38
39
40
41
42
43
44
45
46
47
48
49
50
51
52
53
54
55
56
57
58
59
60
61
62
63
64
65
66<com.google.android.material.button.MaterialButton
android:id="@+id/button2"
android:layout_width="wrap_content"
android:layout_height="match_parent"
android:textAllCaps="false"
android:background="#FFFFFF"
android:text="clear"
android:textAlignment="viewEnd" />
---
### adb 命令行
- adb logcat 命令详解 log过滤 - https://blog.csdn.net/liao277218962/article/details/50129009
---
### Android 适配
#### 11
- 拖不得了,Android11真的要来了,最全适配实践指南奉上 - https://juejin.cn/post/6860370635664261128
- Android 11适配方案变更及适配攻略 - https://www.jianshu.com/p/aa21c40e8c2f
#### 12
- Android 12 快速适配要点 https://zhuanlan.zhihu.com/p/440582410
---
#### Android 11 访问第三方 app 问题
解决 Intent.resolveActivity(context.getPackageManager()) == null
- https://blog.csdn.net/u012452490/article/details/113125945
- https://blog.csdn.net/weixin_40008286/article/details/122342038
---
### 安装 apk 显示成功却看不到
在 AndroidManifest.xml 中配置的启动 activity 缺少 `<intent-filter>` 参数
```json
<activity
android:name="com.its.demo.testgoogle.page.PageMain"
android:exported="true"
android:label="@string/app_name"
android:screenOrientation="portrait">
<!-- 缺少这个配置 -->
<intent-filter>
<action android:name="android.intent.action.MAIN" />
<category android:name="android.intent.category.LAUNCHER" />
</intent-filter>
</activity>
参考: https://cxyzjd.com/article/a947050390/101848671
公共数据存储
- 官方
- 访问共享存储空间中的媒体文件 - https://developer.android.google.cn/training/data-storage/shared/media?hl=zh-cn#java
- 数据和文件存储概览 - https://developer.android.google.cn/training/data-storage?hl=zh_cn#scoped-storage
- 从共享存储空间访问文档和其他文件 - https://developer.android.google.cn/training/data-storage/shared/documents-files?hl=zh_cn
- 访问应用专属文件 - https://developer.android.google.cn/training/data-storage/app-specific?hl=zh_cn
- Android数据存储(一)—-SharedPreferences详解 - https://developer.aliyun.com/article/37026
- Android - MediaStore 媒体库访问使用 - https://www.jianshu.com/p/b3595fc1f9be
- Android Q读写共享目录媒体文件 - https://blog.csdn.net/weixin_42574892/article/details/105840699
- Android-10、11-存储完全适配(下) - https://juejin.cn/post/7012262477828194340
- Android 10、11 存储完全适配!(建议收藏) - https://blog.csdn.net/fitaotao/article/details/119700579
- 轻松适配Android 10 Scoped Storage 分区存储 - https://www.hurryyu.com/2020/04/17/%E8%BD%BB%E6%9D%BE%E9%80%82%E9%85%8DAndroid%2010%20Scoped%20Storage%20%E5%88%86%E5%8C%BA%E5%AD%98%E5%82%A8%20-%20%E5%8D%9A%E5%AE%A2%E7%89%88/
Android系统一共提供了四种数据存储方式。分别是:SharePreference、SQLite、Content Provider和File;此外还有一种网络存储。由于Android系统中,数据基本都是私有的,都是存放于“data/data/程序包名”目录下,所以要实现数据共享,正确方式是使用Content Provider。
一加移除安装权限
用adb指令, 禁用安全应用安装
1
2
3
4
5
6
7
8
9
10
11
12
13
14
15
16
17
18
19
20
21$ adb shell pm disable-user com.oplus.appdetail
---
### http 请求不安全
报错: `CLEARTEXT communication to xx.xx.xx.xx not permitted by network security policy`
原因是 在安卓 P+ 使用了 http 去请求, 就会报这个错
- 解决办法:
1. 在 *res*下新增一个 xml 目录,然后创建一个名为:network_security_config.xml
```xml
<?xml version="1.0" encoding="utf-8"?>
<network-security-config>
<base-config cleartextTrafficPermitted="true" />
</network-security-config>后在AndroidManifest.xml文件下的application标签增加以下属性:
1
2
3
4
5
6
7
8
9
10
11
12
13
14
15
16
17
18
19
20
21
22
23
24
25
26
27
28
29
30
31
32
33
34
35
36
37
38
39
40
41
42
43
44
45<application
...
android:networkSecurityConfig="@xml/network_security_config"
...
/>
参考: https://developer.aliyun.com/article/657574
---
### facebook 登录闪退
报错: `Targeting S+ (version 31 and above) requires that one of FLAG_IMMUTABLE or FLAG_MUTABLE be specified when creating a PendingIntent`
- 原因 fb sdk 太旧了, 升级一下 sdk 即可, 参考: https://stackoverflow.com/questions/69081726/android-facebook-login-library-11-2-0-crashes-android-12-targeting-s-version
---
### 安装 aab 找不到 so, 安装 apk 正常
- 安装 aab 找不到 so, 安装其反编译出来的 apk 正常
- 换了几部手机测试安装 aab 没有问题
- 找不到 so 的那台手机, 据说是 adb 安装对该手机支持不友好, 换多几部测试
---
### 真机打不开 http 地址
- 报错: `NET::ERR_CLEARTEXT_NOT_PERMITTED`
- 解决办法: 在 manifest.xml 的 application 标签中添加 `android:usesCleartextTraffic="true"`, 如:
```json
<application
android:usesCleartextTraffic="true"
...>
</application>
- 参考: net:ERR_CLEARTEXT_NOT_PERMITTED错误四种解决办法 - https://blog.csdn.net/qq_59125846/article/details/121953461
webview 打开 h5 游戏网页黑屏
原因是 activity 未开启硬件加速, 打开即可
1
2
3
4
5
6
7
8
9
10
11
12
13
14
15
16
17
18
19
20
21
22
23
24
25
26
27
28
29
30
31
32
33
34
35
36
37
38<activity
android:hardwareAccelerated="true"
>
---
### 布局报错找不到 id
- 报错: `Missing required view with ID`
- 解决办法: rebuild 一下工程即可
---
### 动态权限判断一直返回失败
- 授权后, 权限判断 `ActivityCompat.checkSelfPermission(context, permission)` 一直返回失败
- 原因是没有在 `AndroidManifest.xml` 中配置相应的权限, 配置上即可, 授权后动态判断就会返回成功了
---
### 方法数量超过 64k
- 报错
```json
Execution failed for task ':launcher:mergeDexRelease'.
> A failure occurred while executing com.android.build.gradle.internal.tasks.DexMergingTaskDelegate
> There was a failure while executing work items
> A failure occurred while executing com.android.build.gradle.internal.tasks.DexMergingWorkAction
> com.android.builder.dexing.DexArchiveMergerException: Error while merging dex archives:
The number of method references in a .dex file cannot exceed 64K.
Learn how to resolve this issue at https://developer.android.com/tools/building/multidex.html解决办法, 在 gradle 中设置支持多个 Dex.
1
2
3
4
5
6
7
8
9
10android {
defaultConfig {
multiDexEnabled true
}
}
dependencies {
// implementation 'androidx.multidex:multidex:2.0.1' //with androidx libraries
implementation 'com.android.support:multidex:1.0.3' //with support libraries
}
找不到约束属性
报错:
Caused by: java.lang.NoClassDefFoundError: Failed resolution of: Landroidx/recyclerview/widget/RecyclerView$Adapter;解决办法: gradle 引入库即可
1
2
3dependencies {
implementation 'androidx.recyclerview:recyclerview:1.1.0'
}
webview 加载 cocos
实测只能在引擎为 2.4.6 版本一下, 3.7.2 会报错
将网页放入到 assets 目录, 如 myapps 网页目录
加入联网权限
1
<uses-permission android:name="android.permission.INTERNET"/>
加载本地代码
1
2
3
4
5
6// webview 需要设置允许 file:// 协议加载
WebSettings settings = _webView.getSettings();
settings.setAllowFileAccessFromFileURLs(true);
settings.setAllowUniversalAccessFromFileURLs(true);
// 加载路径
mWebView.loadUrl("file:///android_asset/myapps/index.html");
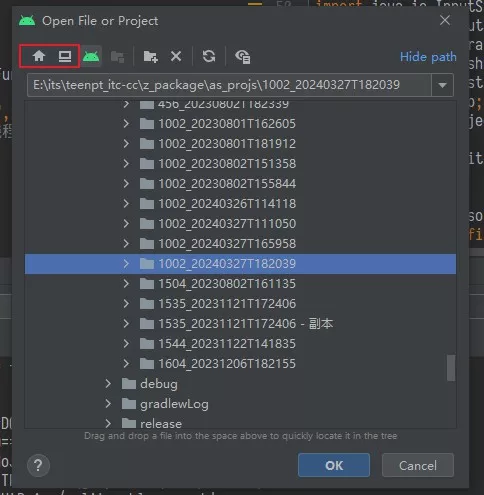
open 新工程看不到目录
来回电几下 Home 和 Desktop 按钮, 再粘贴目录就能刷新出来
修改代码不生效
直接禁用 Instant Run 功能。
Android Studio升级3.5后,Instant Run 用 HotSwap代替了
打开设置 -> Build,Execution,Deployment -> Debugger -> HotSwap
取消勾选 Enable hot-swap agent for Groovy code ,就可以了。

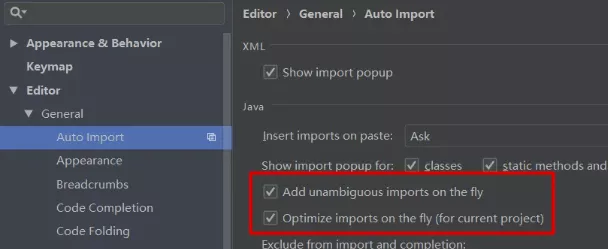
自动导入依赖包