git-相关操作
在一个仓库中引用另一个仓库
初始化配置邮件及用户
1 | $ git config --global user.email "364105996@qq.com" |
检测仓库是否可以 ssh 连接
1 | # 测试连接 成功 地址: 192.168.1.159:22 |
设置代理
参考总结: other-TortoiseGit设置ssr代理.md
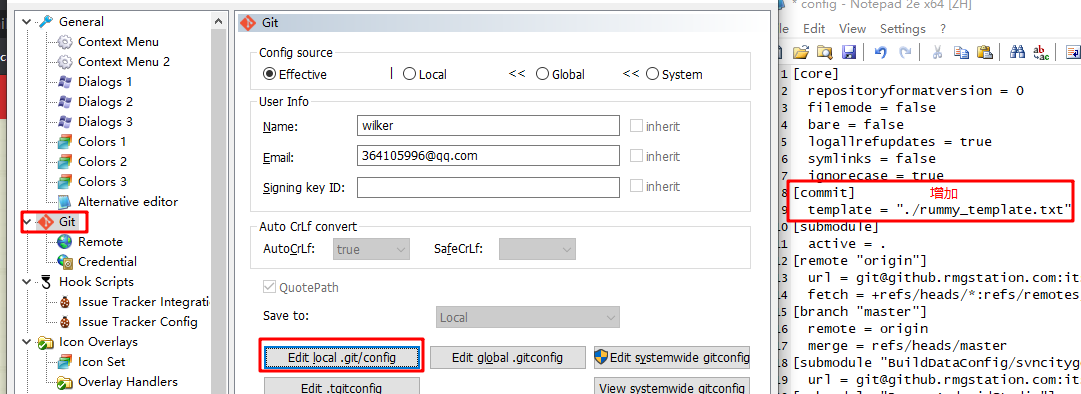
设置提交模板
一般不同项目的模板不同, 所以使用 局部模板
项目内新建一个模板文件, 如
%PROJECT%\rummy_template.txt, 内容如下1
2
3
4
5
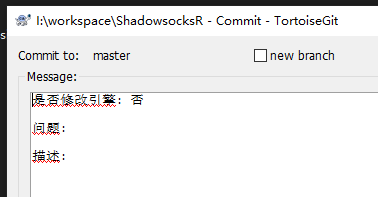
6是否修改引擎: 否
问题:
描述:cd 到 项目根目录 下设置
1
2
3> cd I:\workspace\ShadowsocksR
I:\workspace\ShadowsocksR (master -> origin)
> git config commit.template ./rummy_template.txt # 设置模板其实就是修改
%PROJECT%\.git\config文件, 增加模板字段1
2[commit]
template = "./rummy_template.txt"TortoiseGit 设置
测试提交
取消模板. 把模板文件置空设置即可.
ssh config 配置
- 利用 SSH 的用户配置文件 Config 管理 SSH 会话 - https://www.hi-linux.com/posts/14346.html
SSH 程序可以从以下途径获取配置参数:
用户配置文件 (~/.ssh/config)
系统配置文件 (/etc/ssh/ssh_config)
配置文件可分为多个配置区段,每个配置区段使用”Host”来区分。我们可以在命令行中输入不同的Host来加载不同的配置段。
ssh 生成公钥密钥
命令
1
$ ssh-keygen -t rsa -C "aaa@bbb.com"
- 一直回车即可
ssh 指定私钥登录
a
1
ssh -i /root/.ssh/ido_sch_pro root@192.168.1.111 -p 22
ssh 校验
使用命令:
ssh -T git@ip, git 是 git 服务的默认用户, 直接写 git 就行1
2
3
4
5
6
7
8// 测试 ok
$ ssh -T -p 22 git@github.aaa.com
Hi there, yangxuan! You've successfully authenticated with the key named aaa@qq.com, but Gitea does not provide shell access.
If this is unexpected, please log in with password and setup Gitea under another user.
// 测试 失败
$ ssh -T -p 22 aaa@github.aaa.com
aaa@github.rmgstation.com: Permission denied (publickey,gssapi-keyex,gssapi-with-mic).
文件大小写敏感
1 | $ git config --global core.ignorecase false |
修改已有仓库 文件夹 及 文件 大小写问题
- 用
git执行下列命令:
1 | $ git config core.ignorecase false |
解释:设置本地git环境识别大小写
- 修改文件夹名称,全部改为小写(F2重命名修改即可),然后
push到远程仓库。
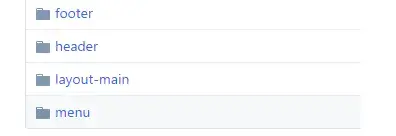
这时如我前面的图片所示,仓库上就会有重名的文件(文件夹)了。 - 删除多余的文件,我这里就是把
Footer,Header,Menu等给删掉。
a). 执行命令,删除远程文件(删除文件夹里面的文件,文件夹也会消失)
1 | # 删除Header文件夹下的所有文件 |
如果显示如下,说明操作成功:
1 | rm 'src/components/Menu/Header.js' |
b). 同步,提交到远程仓库
1 | $ git add . |
这时,如果上面的步骤都顺利,那在远程仓库刷新一下,惊喜就出来了:
git 日志 命令
1 | > git log --since ==2019-08-13 --until=2019-08-15 --pretty=format:"myflag:%h @ %an @ %ai @ %s" --author=yangxuan --no-merges --name-status |
可以用于写工具判读某个时间内 某人 是否有提交过某些文件.
比如: 使用 python 执行这个命令后把输出导出到一个文件中, 然后读取文件解析后封装到数据结构中, 再进行逻辑分析.
–date-order 日期降序排序
–reverse 翻转排序
设置不同平台下的换行符
以 windows 为准,不然 不同平台下的使用 windows 上的仓库会出现 所有文件都有差异
1 | $ git config --global core.autocrlf true |
- 参考文章: git 处理和修改行结束符(CRLF和LF)
正确的姿势:
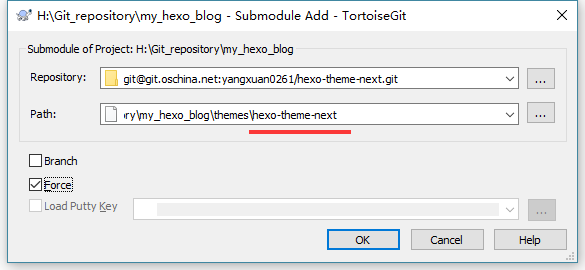
在当前仓库,邮件 TortoiseGit -> Submodule Add
path 中的目的 文件夹必须是不存在的,也就是 hexo-theme-nex 文件夹是不存在的,不然汇报 :xxx alread exists 的错
初始化带有 submodule 的工程
先 clone 出工程
1
root@df0ca32e848a$~# git clone git@git.oschina.net:yangxuan0261/my_hexo_blog.git
cd 进工程后再初始化 submodule
1
2root@df0ca32e848a:~# cd my_hexo_blog
root@df0ca32e848a:~/my_hexo_blog$ git submodule update --init --recursive在分别进入所有的子模块 checkout 到 master 分支
1
2root@df0ca32e848a:~# cd themes/xxxx
root@df0ca32e848a:~/my_hexo_blog/themes/xxxx$ git checkout master然后就在工作中update所有的子模块
1
2root@df0ca32e848a:~/my_hexo_blog/themes/xxxx# cd ../..
root@df0ca32e848a:~/my_hexo_blog$ git submodule update --remote
正确姿势,递归 clone 所有 submodule
1
$ git clone --recursive -b master git@github.com:yangxuan0261/Testmmo-server.git a_mmo_skynet
取消修改,还原到上一次提交
命令
1
$ git checkout -- <file>
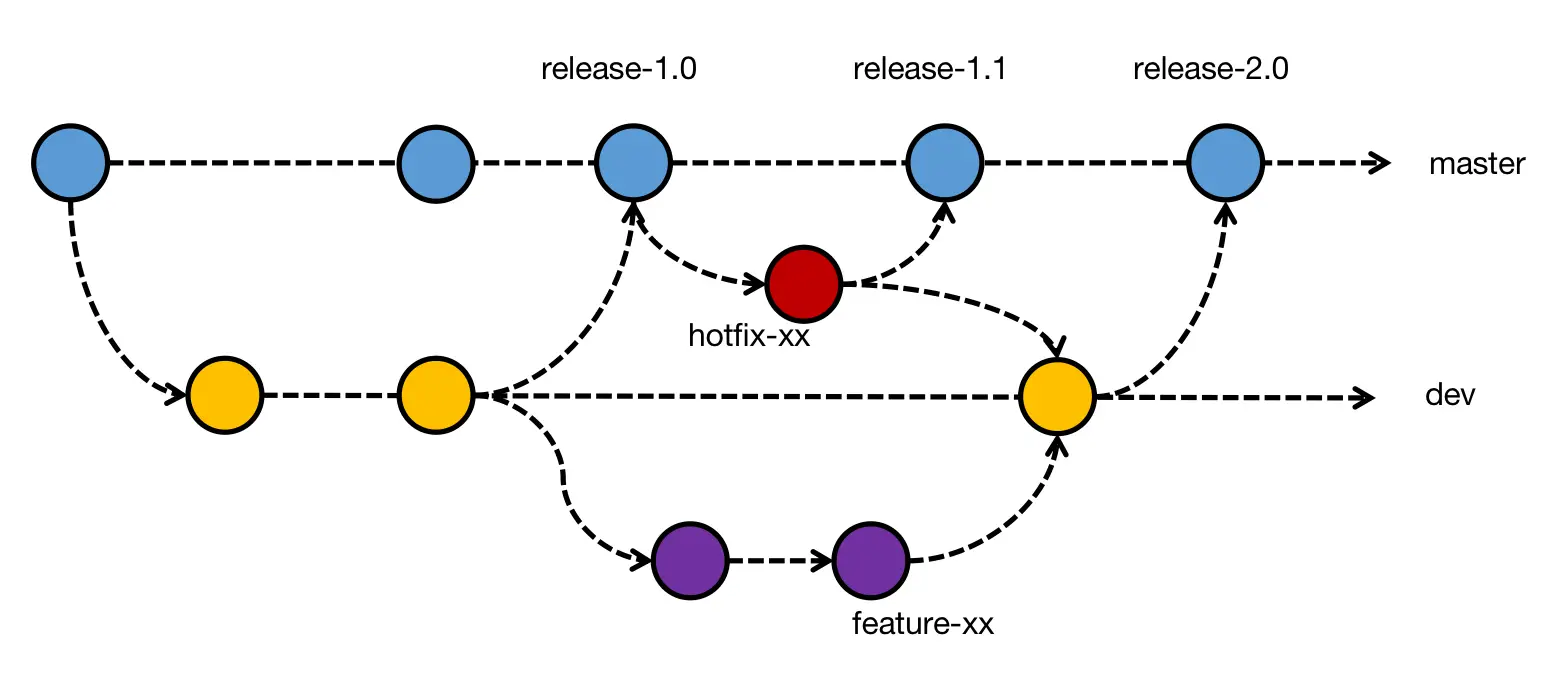
工作流
Github 更新 fork 仓库
有两种方式, 一种 在 web 界面操作, 一种是 命令行 操作
web 同步
创建一个 pull request
这一步很重要, 选择同步方向, 默认是 fork 仓库 -> 源 仓库, 也就是是向别人提交一个合并请求, 并不是我们想要的.
所以要点击 switching the base, 将同步方向修改为 源 仓库 -> fork 仓库
合并请求 merge request
done. 可以看到提交总记录 比 源库 多了一个 (也就是 merge).
提交记录比较

命令行 同步
官方文档 - https://docs.github.com/en/github/collaborating-with-issues-and-pull-requests/syncing-a-fork
将 源 仓库 同步到 在本地仓库, 然后再 推到 fork 下来的仓库.
创建上游仓库地址
1
$ git remote add upstream https://github.com/MisterBooo/LeetCodeAnimation
fetch 更新下来
1
2
3$ git fetch upstream
> remote: Counting objects: 75, done.
> remote: Compressing objects: 100% (53/53), done.切到同步的分支
1
2$ git checkout master
> Switched to branch 'master'并上游提交
1
2
3
4
5$ git merge upstream/master
> Updating a422352..5fdff0f
> Fast-forward
> README | 9 -------
> README.md | 7 ++++++推送到 fork 仓库
1
$ git push origin master
clone 具体分支
加个 -b 参数
1
$ git clone -b OpenSSL_1_0_2-stable git@github.com:openssl/openssl.git openssl_1.0.2
解决git无法clone提示443问题
大概就可以猜测是被墙了…翻墙的话开全局代理也没有起作用
报错:
Failed to connect to chromium.googlesource.com port 443: Timed out
- 需要配置下git代理(前提是你有shadowsocks), 1080 是ss的客户端端口
1 | $ git config --global http.proxy "localhost:1080" |
- 再 clone 就 ok
1 | git.exe clone --progress -v "https://chromium.googlesource.com/external/googletest" "D:\a_tmp_test_dir\googletest" |
参考资料
git warning: refname ‘HEAD’ is ambiguous
https://segmentfault.com/q/1010000006978681
删除 HEAD 分支即可
命令行操作
url_name : 远端地址别名
url : 远端地址
remote_branch : 远端分支名
local_branch : 本地分支名
local_repo_name : 本地仓库名
全局配置
1 | $ git config --global user.name "John Doe" |
初始化仓库及推送流程
1 | $ git init |
暂存修改到缓冲区
- 参考: Git-命令行-使用 git stash - https://blog.csdn.net/qq_32452623/article/details/76100140
使用场景: 在分支 a 上修改着东西, 突然要切到分支 b 上操作, 此时有不想提交分支a 修改的东西, 就可以把修改的东西暂时存放到缓冲区, 然后再切到分支 b 上去修改东西.
在分支 a 上暂存数据
1
2$ git stash
Saved working directory and index state WIP on a: fd52475 - fixed chat bug.查看缓冲区暂存数据
1
2
3$ git stash show
config.gradle | 2 +-
1 file changed, 1 insertion(+), 1 deletion(-)切到分支 b 改改改, 然后在切回分支 a 取出暂存数据
1
$ git stash pop
拉取更新推送
克隆仓库及子模块仓库
1 | $ git clone -b [remote_branch] --recursive [url] [local_repo_name] |
拉取仓库
1 | $ git pull [url_name] [remote_branch] --progress -v --no-rebase #远端remote_branch与本地当前分支合并 |
推送仓库
1 | $ git push [url_name] [remote_branch] #推送本地当前分支到远端remote_branch |
- 初始推送可以带上 -u 参数指定upstream
查看修改状态
1 | $ git status |
revert代码
1 | $ git checkout . # 有点像切分支 |
单独提交某个文件
1 | $ git commit -m 'aaa' refresh_blog_gen.sh |
地址操作
添加远端地址
1 | $ git remote add [url_name] [url] |
查看远端地址
1 | $ git remote -v |
删除远端地址
1 | $ git remote rm [url_name] |
修改远端地址
直接修改
1
$ git remote set-url origin [url]
先删后加
1
2$ git remote rm origin
$ git remote add origin [url]
分支操作
创建本地分支
1 | $ git checkout -b [new_branch] # 创建并切换到 new_branch |
创建远端分支
1 | $ git push [url_name] [local_branch]:[remote_branch] #与推送一样,远端如果没有remote_branch分支会自动创建 |
切换分支
1 | $ git checkout [local_branch] |
更新本地的远端分支列表
1 | $ git remote update origin --prune |
查看本地分支
查看 所有的本地分支, * 在前面的表示是 当前所在分支
1
2
3git branch
aaa
* master查看 当前所在的分支
1
2git rev-parse --abbrev-ref HEAD
master
查看远端分支
1 | git branch -r |
同时查看本地与远端分支
1 | git branch -a |
指定分支upstream
1 | git branch [local_branch] --set-upstream-to [url_name]/[remote_branch] |
删除本地分支
1 | git branch -D [local_branch] |
删除本地缓存的远端无用分支
1 | git remote prune [url_name] # 本地缓存的 指定远端无用的分支 都清除 |
删除远端分支
在Git v1.7.0 之后,可以使用这种语法删除远程分支:
1 | git push origin -d [remote_branch] |
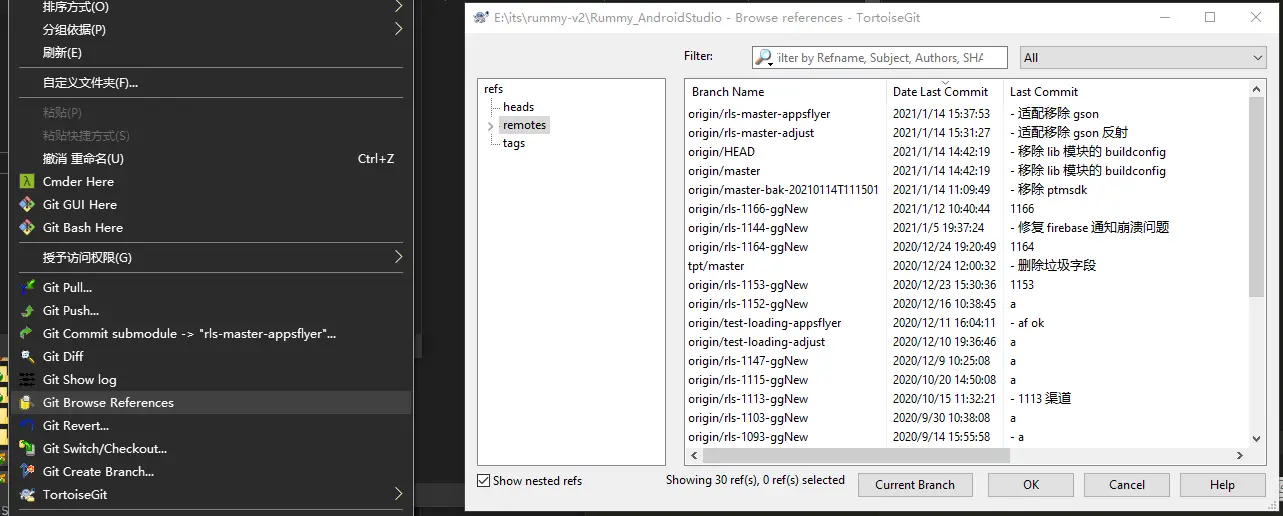
gui 中删除: browse references
分支对比
对比 分支 a 比 分支 b 多了那些提交
1 | git log b..a |
拉取远端所有信息
1 | git fetch origin -v --prune |
tag 操作
- Git的Tag使用 - https://www.jianshu.com/p/a07777d0b018
tag 可作为 时间线 中的一个 标记, 方便看出那个时间点 前后发生了什么事情.
比如发了一个版本, 打个 tag, 看日志的时候就一目了然.
创建 tag
直接可视化记录
本地创建一个新 tag : rls-ccc
查看日志, 在 tag 上右键 -> push “rls-ccc”. 远端就有这个 tag 了. 相当于这个命令
1
git push --progress "origin" refs/tags/rls-ccc
删除本地 tag
1 | git tag -d [tag_name] |
删除远端 tag
1 | git push origin -d tag [tag_name] |
查看所有 tag
列出 tag 及 一行信息, tag 信息优先
1 | $ git tag -ln |
查找符合模式的 tag
1 | $ git tag -l rls-ap* |
查看某个 tag 详情
1 | $ git show rls-patch-v1-0.9.1.1 |
模块操作
递归 初始化 所有子模块
1 | git submodule update --init --recursive |
更新指定子模块
1 | git submodule update --init -- "Assets/Code/lua" |
递归 更新 所有子模块
1 | git submodule update --recursive |
查看子模块,仓库根目录查看记录文件
1 | ~/test_repo/z_mywiki_hello # cat .gitmodules |
添加子模块
1 | $ git submodule add [url] [dir_path] |
删除子模块
- 如何优雅的删除子模块(submodule)或修改Submodule URL - 如何优雅的删除子模块(submodule)或修改Submodule URLhttps://www.jianshu.com/p/ed0cb6c75e25
操作顺序
1
2
3
4
5$ git submodule deinit -f [submodulename]
$ git rm -f [submodulename]
$ git rm -f --cached [submodulename]
$ rm -rf ./git/modules/[submodulename]
$ rm -rf [submodulename]确认删除
./git/modules/[submodulename], 如果命令行删除不了, 就手动删除老仓库需要先更新主仓库再同步一下子模块
1
$ git submodule sync
submodulename 就是 .gitmodules 文件中的这个 3rd/aaa
1
[submodule "3rd/aaa"]
回滚
查看日志
1 | $ git log -2 # 查看最后两次提交 |
commit 字段的值就是版本的 sha1 值
也可以用
git reflog命令1
2
3
4
5
6
7$ git reflog
0373047 (HEAD -> master, origin/master, origin/HEAD) HEAD@{0}: commit: Robot-wilker
0e8a7eb HEAD@{1}: pull --progress -v origin master:master: fast-forward
f2d943c HEAD@{2}: pull --progress -v origin master:master: fast-forward
a0c8186 HEAD@{3}: commit: Robot-wilker
72bf912 HEAD@{4}: commit: Robot-wilker
f62778e HEAD@{5}: commit: Robot-wilker
回滚本地
命令行
1 | $ git reset --hard 0e8a7eb6def60e4988dad024d4a75e9ba0434dab // 需要回滚到的目的版本 |
或者 gui 操作
右键某次提交 -> Reset -> 选择 Hard -> OK
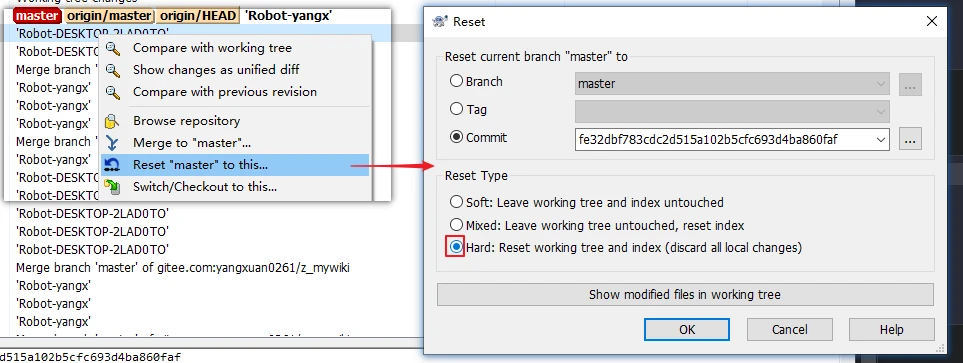
回滚远端
先回滚本地到某一次提交
1
2$ git reset --hard 0e8a7eb6def60e4988dad024d4a75e9ba0434dab // 需要回滚到的目的版本
HEAD is now at 0e8a7eb a强制堆到远端
1
2
3
4
5$ git push origin master -f // 强推到远端
Total 0 (delta 0), reused 0 (delta 0)
remote: Powered By Gitee.com
To gitee.com:yangxuan0261/z_mywiki.git
+ 0373047...0e8a7eb master -> master (forced update)
回退提交
只是回退提交, 保留现有的改变, 这种操作之后一般会有很多 dfif 文件
- reset 到目的版本
- revert 所有, 删除所有未追踪的文件
标签操作
首先说一下作用:Git 中的tag指向一次commit的id,通常用来给开发分支做一个标记,如标记一个版本号。
添加标签
1 | $ git tag -a [tagname] -m "note" |
注解:git tag 是打标签的命令,-a 是添加标签,其后要跟新标签号,-m 及后面的字符串是对该标签的注释。
提交标签到远程仓库
1 | $ git push origin --tags |
注解:就像git push origin master 把本地修改提交到远程仓库一样,-tags可以把本地的打的标签全部提交到远程仓库
删除标签
1 | $ git tag -d version |
注解:-d 表示删除,后面跟要删除的tag名字
删除远程标签
1 | $ git push origin :refs/tags/version |
注解:就像git push origin :branch_1 可以删除远程仓库的分支branch_1一样, 冒号前为空表示删除远程仓库的tag
查看标签
1 | $ git tag或者git tag -l |
删除未监控文件
删除 untracked files
1 | $ git clean -f |
连 untracked 的目录也一起删掉
1 | $ git clean -fd |
连 gitignore 的untrack 文件/目录也一起删掉 (慎用,一般这个是用来删掉编译出来的 .o之类的文件用的)
1 | $ git clean -xfd |
在用上述 git clean 前,强烈建议加上 -n 参数来先看看会删掉哪些文件,防止重要文件被误删
工具
–pretty=format
查看所有 tag 及 sha1
有好几种中姿势, 参考: https://stackoverflow.com/questions/8796522/git-tag-list-display-commit-sha1-hashes
姿势一: 最好姿势, 也最详细, 有 sha1,tag, 等
1
2
3$ git log --decorate --tags --no-walk --pretty=format:"myflag:%H @ %S @ %an @ %ai @ %s"
myflag:e232d5fdd4a6710ced07887140dfed27f7153e31 @ rls-patch-v1-0.9.1.1 @ aaa @ 2020-03-24 21:09:35 +0800 @ sfesdfsdf
myflag:c5505467f5910363806fbdefcae4a608efab0734 @ rls-app-v1-0.9.0.1 @ bbb @ 2020-03-06 16:23:51 +0800 @ werwerwer简约版
1
2
3$ git log --oneline --decorate --tags --no-walk
e232d5fdd (tag: rls-patch-v1-0.9.1.1) sfesdfsdf
c5505467f (tag: rls-app-v1-0.9.0.1) werwerwer姿势二:
1
2
3$ git show-ref --tags
c5505467f5910363806fbdefcae4a608efab0734 refs/tags/rls-app-v1-0.9.0.1
a33cdc78a9675198cf9378713c229aecd3168ee4 refs/tags/rls-patch-v1-0.9.1.1
同步一个fork仓库
参考: Syncing a fork - https://help.github.com/en/articles/syncing-a-fork
自己的解决方案, 用自建的 gogs/gitea/gitlab 服务, 直接镜像 原仓库, 定时同步即可.
TortoiseGit 使用
查看提交日志 diff
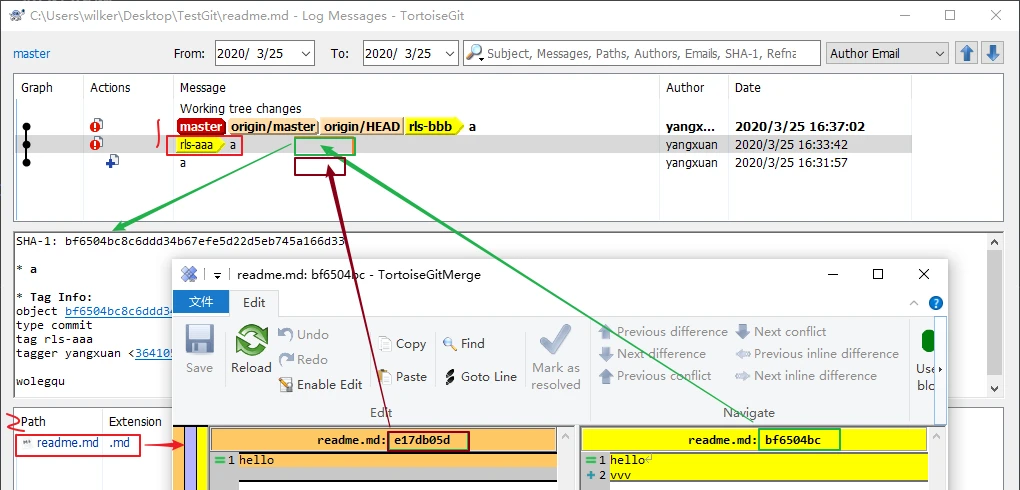
- 选中某次提交, 可以看到
SHA-1值:bf6504bc8c6ddd34b67efe5d22d5eb745a166d33 - 双击某个文件, 弹出 diff 窗口, 右边是 选中提交 的文本值, 左边是 选中提交 的上一次提交 的文本值
查看当前文件 diff
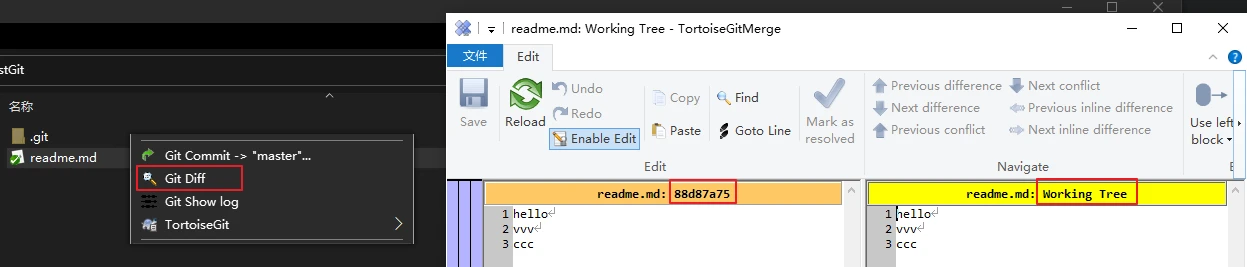
- 选中文件, 右键 -> git diff, 弹出 diff 窗口, 右边是 当前工作区的文本值, 左边是上一次提交的文本值.
设置大小写敏感
1 | $ git config --global core.ignorecase false // 全局 |
换行符 LF (unix) 和 CRLF (windows) 问题
- git 多平台统一换行符 - https://juejin.im/post/5ad21df05188257cc20db9de
git 中有三个参数于换行符有关:
eol: 设置工作目录中文件的换行符,有三个值 lf, crlf 和 native(默认,同操作系统)
autocrlf:
true表示检出是转换CRLF, 提交时转换为 LFinput表示检出是不转换,提交时转换为 LFfalse表示不做转换
safecrlf:
true表示不允许提交时包含不同换行符warn则只在有不同换行符时警告false则允许提价时有不同换行符存在
设置 lf 命令
配置方法
1
2
3
4
5
6
7<!--统一换行符为 lf-->
git config --global core.eol lf
<!--将自动转换关闭,避免转换失败不能不同进行提交-->
git config --global core.autocrlf false
<!--禁止混用 lf 和 crlf 两种换行符-->
git config --global core.safecrlf true
增加配置文件 .gitattributes
- 什么是 .gitattributes ?- https://zhuanlan.zhihu.com/p/108266134
虽然通过设置了 git 全局参数解决了问题,但是作为团队协作的话,并不能保证所有人都正确配好了。git 提供了.gitattributes文件解决了这个问题。在项目根目录新建.gitattributes文件,添加一下内容:
1 | # Set the default behavior, in case people don't have core.autocrlf set. |
通过这种方式避免有人没有设置 core.autocrlf 参数,并且将该文件加入版本控制中。
另外根据需要 .gitattributes 文件可以在项目不同目录中创建,而一些非文本文件可以设置为二进制文件,不用考虑换行符问题。
Git的 .gitattributes 文件详解
.gitattributes 文件示例:
1
2
3
4
5
6* text=auto
*.txt text
*.jpg -text
*.vcproj text eol=crlf
*.sh text eol=lf
*.py eol=lf说明:
第1行,对任何文件,设置text=auto,表示文件的行尾自动转换。如果是文本文件,则在文件入Git库时,行尾自动转换为LF。如果已经在入Git库中的文件的行尾为CRLF,则该文件在入Git库时,不再转换为LF。
第2行,对于txt文件,标记为文本文件,并进行行尾规范化。
第3行,对于jpg文件,标记为非文本文件,不进行任何的行尾转换。
第4行,对于vcproj文件,标记为文本文件,在文件入Git库时进行规范化,即行尾为LF。但是在检出到工作目录时,行尾自动转换为CRLF。
第5行,对于sh文件,标记为文本文件,在文件入Git库时进行规范化,即行尾为LF。在检出到工作目录时,行尾也不会转换为CRLF(即保持LF)。
第6行,对于py文件,只针对工作目录中的文件,行尾为LF。
转换 CRLF 为 LF
使用 git 自带工具 dos2unix 即可
- dos2unix命令将dos文件转换为unix格式 - https://blog.csdn.net/leedaning/article/details/53024290
使用
语法
1
$ dos2unix [-hkqV] [-c convmode] [-o file ...] [-n infile outfile ...]
选项
- -k:保持输出文件的日期不变
- -q:安静模式,不提示任何警告信息
- -V:查看版本
- -c:转换模式,模式有:ASCII, 7bit, ISO, Mac, 默认是:ASCII
- -o:写入到源文件
- -n:写入到新文件
示例
1
dos2unix -k -o file1 file2 file3
奇技淫巧
忽略文件夹下 除某些文件外 的所有文件
, 如: 忽略 patch 目录下所有文件, 但 a_packarg_ 开头的文件除外, 顺序一定要对, 先忽略哪些, 再取消忽略哪些
1 | /patch/**/* |
GitHub PAT 使用
GitHub 即将抛弃 https 拉取仓库时使用 账号,密码 的方式, 而是采用 账号,token 的方式. 参考 文档 获取 token.
1 | $ git clone https://github.com/username/repo.git |
GitHub GPG 使用
下载 gpg 命令行工具. https://www.gnupg.org/download/
生成 gpg, 命令:
gpg --full-generate-key, 期间会要求设置密码 passphrase, 查看秘钥是需要用到1
2
3
4
5
6
7
8
9
10
11
12
13
14$ gpg --full-generate-key
Real name: aaa
Email address: bbb@qq.com
Comment: ccc
You selected this USER-ID:
"aaa (ccc) <bbb@qq.com>"
gpg: C:/Users/asdasd/AppData/Roaming/gnupg/trustdb.gpg: trustdb created
...
pub rsa2048 2020-03-17 [SC]
wwwwwwwwwwwwwwwww // 公钥 signingkey, git 设置需要用到
uid aaa (ccc) <bbb@qq.com>
sub rsa2048 2020-03-17 [E]查看 GPG key ID, 命令:
gpg --list-secret-keys --keyid-format LONG1
2
3
4
5$ gpg --list-secret-keys --keyid-format LONG // 查看 GPG key ID
sec rsa2048/asdasdasd 2020-03-17 [SC] // asdasdasd, 这个就是 GPG key ID, 查看/导出 gpg 公钥/秘钥 需要用到
3A66AEDDD6B9305C256699918C5F94AB1E9C649A
uid [ultimate] aaa (ccc) <bbb@qq.com>
ssb rsa2048/aaaaaaaaa 2020-03-17 [E]使用 GPG key ID 导出 公钥/秘钥
1
2$ gpg --armor --output secret-key-gmail.txt --export-secret-keys asdasdasd // 秘钥, 会要求输入 passphrase
$ gpg --armor --output public-key-gmail.txt --export asdasdasd // 公钥
git 启用 gpg
1 | git config --global commit.gpgsign true |
查看 signingkey
1
2
3
4
5
6
7$ gpg -k
C:/Users/wolegequ/AppData/Roaming/gnupg/pubring.kbx
---------------------------------------------------
pub rsa2048 2020-03-17 [SC]
wwwwwwwwwwwwwwwww
uid [ultimate] aaa (ccc) <bbb@qq.com>
sub rsa2048 2020-03-17 [E]
github 创建 gist 同步仓库
用于 vscode, sublime 等编辑器的 设置同步, 生成 access token 及 gist id
生成 access token.
settings -> developer settings -> personal access tokens, 也就是: https://github.com/settings/tokens
点击 generate new token, 只勾选 gist, 然后点击 generate token, 就会获取到:
1d4486a6c3efab66f37320810a487faaaaaaaaaa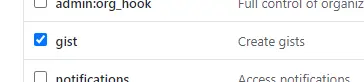
生成 gist id.
- your gists, 也就是: https://gist.github.com/yourname
- 然后点击 + 创建. 创建完之后进入 gist 就可以在网页上就可以看出 gist id, 如: 811a8b2b70df4550391e23aaaaaaaaaa
done. 然后就可以在 vscode, sublime 等编辑器 中使用了.
github 变成 vscode 环境浏览代码
只要在 github 加个 1s 即可.
1 | https://github.com/yangxuan0261/CppLab |
递归列出所有 diff
1 | $ git status -s --untracked-files=all |
命令行相关测试
- 本地未提交, 有冲突返回 128, 不会合并代码
- 本地已提交, 有冲突返回 1, 会合并代码, 需要 abort merge
- 本地无提交 或者不在同一行冲突, 正常返回 0
中文文件名乱码
执行命令
1
2
3
4
5
6
7
8
9
10
11
12
13
14
15
16
17
18
19
20
21
22
23
24
25
26
27
28
29
30
31
32
33
34
35
36
37
38
39
40
41
42$ git config --global gui.encoding utf-8
$ git config --global core.quotepath false
---
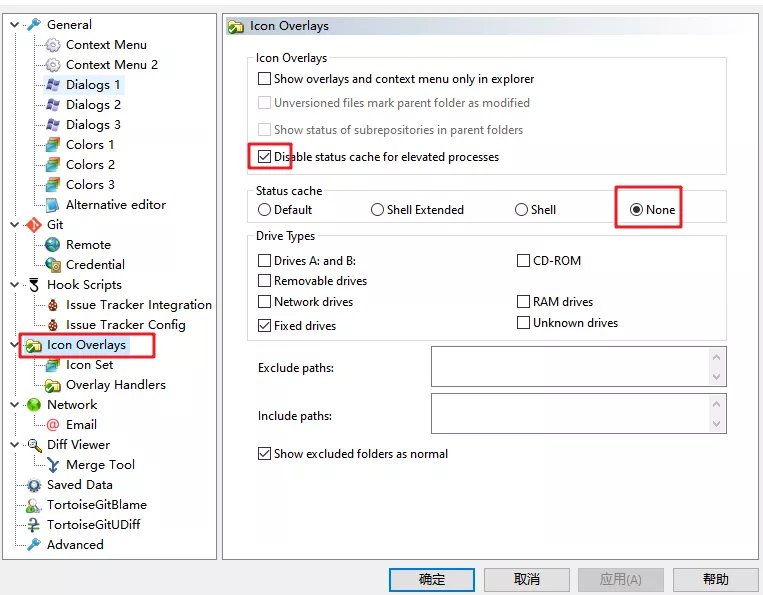
### 右键卡顿
- *icon overlays*, 禁用 status cache
------
### 奇葩问题集合
#### Q: 报错 :Please make sure you have the correct access rights and the repository
> 1. 设置为 git 的 *ssh.exe*, 路径: `D:\Git\usr\bin\ssh.exe`
>
> 
#### Q: 本地一直在 `FETCH HEAD` 提交怎么破
> 此时千万不要直接切到其他分支, 用当前分支 `FETCH HEAD` 为基础创建一个新分支 aaa, 然后推送远端, 然后本地切到 `master` 分支, 拉去远端的分支, 也可以把 aaa 分支 merge 过来.
#### 远端文件夹大小写修改
- https://blog.csdn.net/u013707249/article/details/79135639
1. 设置大小写敏感 并 清除缓存
```json
git config core.ignorecase false
git rm -r --cached .
- 然后在 commit -> push 提交上去. 远端就是大小写敏感的 文件/文件夹
proxifier 代理下拉取 ssh 协议报错
错误: kex_exchange_identification: Connection closed by remote host
使用 443 端口的 https 协议拉取就正常
参考: https://www.v2ex.com/t/832742